Tuesday, October 31, 2006

HAPPY HALLOWEEN!

HAPPY HALLOWEEN, everyone! I apologize for the lapse in blogging over the past week, but we were up to our ears in preparations for our infamous Halloween party this past Saturday evening. There was much cleaning and decorating to do (mostly thanks to my roomie, Cyd), and much shopping and cooking to do (mostly thanks to me), not to mention costumes to coordinate, and so on and so on. But the fete was fabulous. Many of our friends came, and we ate and drank and made much merriment. Cyd likes to invent a signature cocktail for such occasions, and this year's was the pumpkin pie shot made with Pumpkin Smash liqueur topped off with a little Godiva white chocolate liqueur to simulate the whipped cream on top of pumpkin pie! Fun! There were fun games and prizes as well, including a Halloween trivia contest, a Halloween version of Celebrities, and of course, a costume contest that Cyd, dressed as Elphaba the "Wicked" Witch of the West, won! I came as Galinda, the "Good" Witch of the North, and I was pleased to receive one vote (we also played the soundtrack to Wicked all night--it was a theme). But personally, my vote was for my friend, June, who at age 51 (is that wrong to reveal?), came as Buffy the Vampire Slayer! She looked AMAZING in her little denim mini-skirt (from the Juniors department--the b#tch!), celtic cross t-shirt, and knee-high leather boots, complete with wooden stake and her husband, Tom, in tow as her watcher. So cute! It was also June's birthday that night, and I managed to procure for her a Buffy lunchbox off of Ebay. Apparently, it was only sold in Australia? In any case, it seemed the perfect gift for the rabid Buffy fan that she is! But the highlight of the party for me was when my friend, Vicky, sang a macabre little ditty called "Rickety Tickety Tin" while she was dressed as Pippi Longstocking. Tee hee.

So now we're experiencing the post-party doldrums. It always seems like you work on something for weeks, and then it's over in 15 minutes! So I thought I'd share some of the memories with you, and show you some of the food from the party. Now, I must forewarn you, the pictures are not that good because I was preparing things right up until the guests arrived, and I didn't have the time to take the well-lit beauty shots. Then I served the food, and by the time I found my camera and made it back to the buffet table, the dishes had already been hacked into, so you'll have to just imagine what they looked like before. And I confess, friends, that it really was a Sandra Lee, semi-homemade Halloween. But when you're doing a big buffet with lots of different dishes, I think it's permissible to take a few shortcuts as needed. Nevertheless, I think I made some pretty amusing and tasty things,

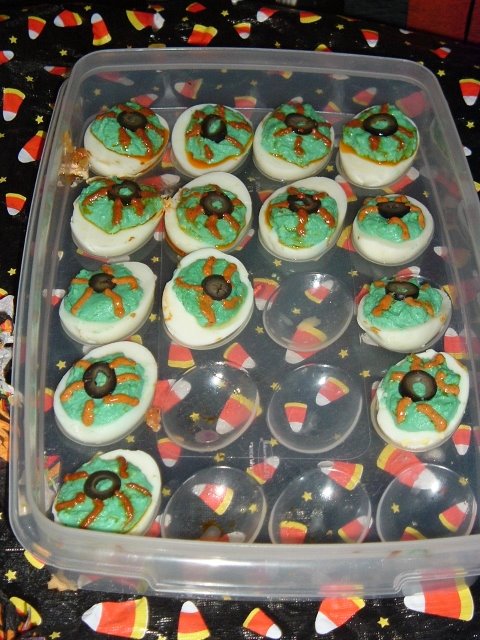
such as the bloodshot eyeballs (be-devilled eggs),

the spider's nest Mexican dip (layered dip in a trifle bowl with a sour cream spider's web and nest on top),


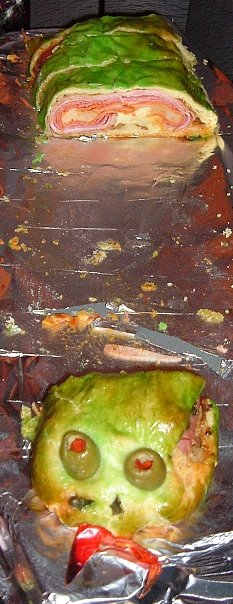
the goblin head cheeseball,


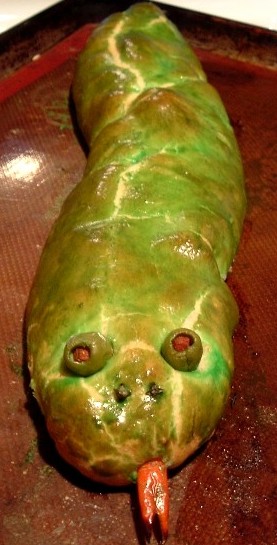
the snake bite sandwiches,


and the Vampire's Kiss bloody punchbowl.


But I have to give mad props to my multi-talented friend, Janice, and her equally creative daughter, Dominica, who made the wonderfully grotesque Cat's Meow (kitty litter) Cake made in a (new!) litter pan with layers of crumbled cake and pudding and topped with crushed ladyfingers and some disgustingly-molded Tootsie Rolls and served with a (new!) pooper scooper,


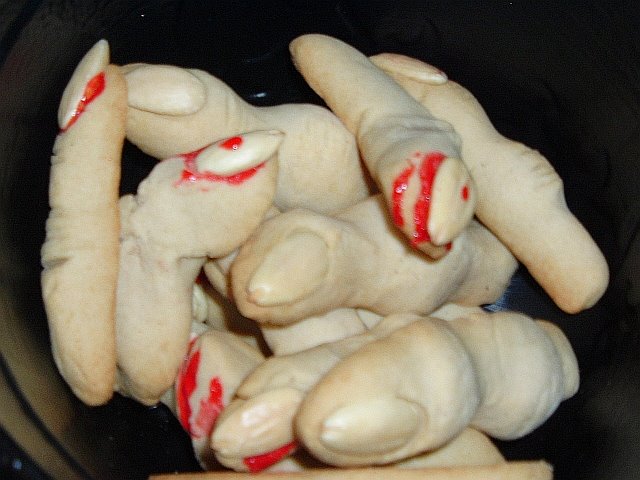
and also the frighteningly realistic (but yummy!) finger cookies. These were truly the most fabulously hideous dishes!

I have listed the complete menu and most of the recipes below. I hope everyone had a festive and frightening Halloween!

The Menu:

Crud(-ités) with Herb Curry Dip
Bloodshot Eyeballs (Be-devilled Eggs)
Spider’s Nest Layered Dip with Blue Corn Chips
Cheese Ball Goblin with Multigrain Crackers
Magical (Crab-Stuffed) Mushrooms
Tomato Tarts (made from the last of the tomato harvest--celebrate my victory over nature!)
Bloody Fleshballs (Maple-Cranberry Meatballs)
Snake Bites

Cat’s Meow Cake
Dismembered Finger Cookies
Espresso Brownies
Caramel Apple Bars

Vampire’s Kiss Punch
Wine (mostly red, of course!)
Beer (Magic Hat’s Hocus Pocus)
Pumpkin Pie Shots

The Recipes:

Curried Herb Dip (one of my old stand-bys)
(Source: Better Homes and Gardens Cookbook)


1 cup mayonnaise
1/2 cup sour cream
1 teaspoon fines herbs, crushed (I used Herbes de Provence)
1/4 teaspoon salt
2-3 teaspoons curry powder (to taste)
1 tablespoon fresh parsley, chopped
1 tablespoon onion, grated
1 1/2 teaspoons lemon juice
1/2 teaspoon Worcestershire sauce
2 teaspoons capers, drained (I chopped up some pepperocini instead)

Mix ingredients. Chill. Makes 1 1/2 cups.

Bloodshot Eyeballs (Be-devilled Eggs)
I like my devilled eggs with mayo, a little squeeze of yellow mustard, salt and pepper, and some finely minced nacho (jalapeno) slices or pepperocini. I tinted them an unnatural shade of blue with some paste food coloring, added a black olive slice for the pupil, and then I mixed paprika and dark chili powder into a little mayo and put it in a plastic squeeze bottle to make the bloodshot lines around the "eyeball."

Spider's Nest Layered Dip
(Source: adapted from Semi-Homemade Cooking)

Layer your dip in this order:
one can of refried black beans
shredded Mexican blend cheese (mixed with a little chili powder)
your favorite salsa, drained (I used a peach/pineapple/chipotle blend)
black olives, sliced or chopped
8 oz. cream cheese (softened) mixed with a cup of sour cream and a half a packet of taco seasoning
guacamole (I used three avocados mashed with some lemon juice, granulated garlic and salt to taste)
Then on top, make a small blob of sour cream for the "nest" and place a plastic spider on top of that, surrounded by concentric rings of sour cream that you draw out into a web pattern with a skewer. Serve with blue corn chips because they look dark and spooky!

Cheese Ball Goblin
(Source: adapted from Paula's Home Cooking)

2 8-oz. packages cream cheese, softened
4 tablespoons butter, softened
1 tablespoon milk
4 oz. blue cheese, crumbled
1 teaspoon worcestershire sauce
1 clove garlic, finely minched
2-3 tablespoons dried chives (feel free to use fresh if you have them--I didn't)
dash of cayenne (to taste)
salt and pepper (to taste)
1/2 cup walnuts, toasted and chopped
1 8-oz. container of whipped cream cheese

Mix the two packages of cream cheese with the softened butter and the milk. Then mix in the blue cheese, worcestershire, garlic, cayenne, and salt and pepper until well blended. Finally, add the walnuts. On top of a piece of waxed paper, form a large ball and chill for several hours (at least 4) until firm. "Frost" the chilled ball with the whipped cream cheese. Then fashion a face for him with some tortilla chip ears, curly parsley or shredded purple cabbage hair, stuffed green olive eyes, bell pepper eyebrows, a pepperocino nose, and carrot fangs. You can also make toes for him with more olives underneath the ball and pieces of pepper sticking out of the holes, but that's gilding the lily (also, I ran out of time to do this)!

Gary's Stuffed Mushrooms
(Source: adapted from www.allrecipes.com)

12 large fresh mushrooms, stems removed (I made 18 and there was still some stuffing left!)
1 (6 ounce) package chicken-flavored dry stuffing mix
1 (8 ounce) package cream cheese, softened
2 cans crabmeat, drained
one stick of butter
2 cloves garlic, peeled and minced
salt and pepper to taste
crushed red pepper to taste

1. Arrange mushroom caps on a medium baking sheet, bottoms up. Chop and reserve mushroom stems.
2. Prepare chicken-flavored dry stuffing mix according to package directions.
3. Preheat oven to 350 degrees F (175 degrees C).
4. In a medium saucepan over medium heat, melt the butter. Mix in mushroom stems and garlic and cook until tender, about 5 minutes. Strain the mushrooms and garlic, but reserve the melted butter.
5. In a medium bowl, mix together mushroom and garlic mixture, prepared dry stuffing mix, cream cheese, crabmeat and seasonings. Liberally stuff mushrooms with the mixture. Drizzle your sheet pan with the melted butter, then place the stuffed mushrooms on it, and drizzle them with more butter on top.
6. Bake uncovered in the preheated oven 10 to 12 minutes, or until stuffing is lightly browned. (It took mine more than 20 minutes!)

Maple-Cranberry Meatballs

I "cheated" and bought a bag of frozen Italian-style meatballs at Sam's Club. I defrosted them in the fridge overnight, and then filled the crockpot the next day. I made a sauce of one large onion sauteed with one clove of minced garlic, one cup maple syrup, 1/2 cup brown sugar, one can jellied cranberry sauce, one cup ketchup, about one tablesoon Worcestershire sauce, and about one tablesoon of whole-grained mustard. I poured this over the meatballs in the crockpot and left them to simmer all day until party time.

Snake Bites
(Source: adapted from Paula's Home Cooking)

1 can crescent rolls
Flour, for dusting
4 tablespoons spicy mustard
6 thin slices of ham
10 thin slices of Genoa salami
10 thin slices of sandwich-size pepperoni
1/2 cup grated cheese, your favorite kind (I used an Italian four-cheese blend)
green food coloring
1 whole egg, beaten
2 whole cloves
2 small pimiento-stuffed olives
piece of red pepper

Preheat the oven to 375 degrees F.
Line a cookie sheet with foil or a Silpat. Grease the foil and set aside (no need to grease the Silpat).

Dust a flat surface lightly with flour. Spread out the crescent dough - do not separate. Pinch together the seams so that you have 1 piece of dough (wetting your fingertips helps here). Roll out to make a large rectangle. Make sure the dough is not stuck to the surface at all.

Brush the dough with the mustard, leaving a 1-inch border. Layer the meats down the center of the rectangle, leaving a 1-inch border on either end. You can feel free to use your favorite cold cuts.

Top the meats with the cheese. Fold 1 side of the dough over the filling, lengthwise. Then, fold the other 1/2 over and press the seal the filling inside. Take the egg, and beat lightly with a fork. Brush the egg wash over the top of the dough. The egg will act as the glue to hold. Fold the dough in 1/2 again lengthwise. Pinch the seam with your fingers to seal. Press the outside of the dough to make sure everything is sealed tight and to make an even thickness for the body of your snake. Taper 1 end of the dough to form a tail shape. Form the other end into a head shape.

Transfer the snake to the sheet tray and form into an "s" shape so it looks like the snake is slithering. Add some green food coloring to the rest of the beaten egg. Using a pastry brush, "paint" the snake with the egg yolk/food coloring mixture. Insert 2 cloves into the head to look like nostrils and 2 stuffed olives for eyes. Create a mouth and forked tongue with red pepper. Bake the snake for 20-25 minutes, or until golden brown and cooked through. Slice and serve.

Espresso Brownies
(Source: Everyday Italian, Giada De Laurentiis)

nonstick vegetable oil cooking spray
1/3 cup plus 2 tablespoons water
1/3 cup vegetable oil
2 large eggs
2 tablespoons plus 2 teaspoons espresso powder (I used only 1 tablespoon and 1 teaspoon)
1 (19.8-ounce) box brownie mix (recommended: Duncan Hines--I used dark chocolate fudge)
3/4 cup semi-sweet chocolate chips
1 teaspoon vanilla extract
1 1/2 cups powdered sugar
1 tablespoon unsalted butter, room temperature

handful of mini-chocolate chips (1/4 cup?)

Preheat oven to 350 degrees F.

Spray a 9 by 13-inch baking pan with nonstick spray. Whisk 1/3 cup of water, oil, eggs, and 1-2 tablespoons espresso powder in a large bowl to blend. Add the brownie mix. Stir until well blended. Stir in the chocolate chips. Transfer the batter to the prepared baking pan. Bake until a toothpick inserted into the center of the brownies comes out with a few moist crumbs attached, about 35 minutes. Cool completely.

Meanwhile, dissolve the remaining 1-2 teaspoons of espresso powder in the remaining 2 tablespoons of water in a medium bowl. Whisk in the vanilla. Add the powdered sugar and butter and whisk until smooth. Pour the glaze over the brownies. Sprinkle with mini-chocoalte chips. Refrigerate until the glaze is set. Cut into small pieces. Arrange the brownies on a platter and serve.

Caramel Apple Bars
(Source:
Culinary in the Desert/Country, adapted from The King Arthur Cookie Companion)

For the crust:

1 cup brown sugar
3/4 cup butter
1 teaspoon cinnamon
3/4 teaspoon salt
1/2 teaspoon baking soda
1 cup all-purpose flour
1 cup ground pecans (I used half pecans and half walnuts)
2 cups rolled oats

For the filling:
3 1/2 cups sliced apples (about 24 ounces)
1/2 teaspoon salt
1/2 teaspoon cinnamon
1 cup homemade caramel*

Preheat your oven to 400 degrees. Line a 9x13 pan with foil and lightly spray with cooking spray.

In a medium bowl, beat the brown sugar and the next 4 ingredients (through baking soda) until thoroughly combined. Mix in the flour, ground pecans and oats until crumbly. Scoop out 1 cup and set aside. Place the remaining crumbs into your prepared pan and press down firmly to coat the bottom.

Toss the apples in a large bowl with the salt and cinnamon. Arrange them over the crust. Drizzle the warm homemade caramel over the top and then sprinkle with the remaining crumbs you set aside.

Bake for 35 to 40 minutes until bubbly and the apples are just tender. Remove and let cool until they are just warm to the touch. Cut into squares. Try and let the bars rest until the caramel has set before serving.

*Homemade Caramel

1 cup heavy cream
2 cups brown sugar
1/4 cup light corn syrup
4 tablespoons butter
1 teaspoon good quality vanilla extract
1/4 teaspoon salt

Mix all of the above ingredients into a 2 quart saucepan. Heat over medium, stirring constantly, until it reaches soft-ball stage (230-234 degrees). Remove and gently pour your 1 cup over the apple mixture.

This recipe makes more than you will use so pour the rest into a 8x8 pan lined with foil and let cool. Cut into squares and you have your own homemade caramel squares!

Vampire’s Kiss Punch
I mixed a pomegranate-sour cherry juice that I found at Wal-Mart (Sam's Choice brand) with a 2-liter of cranberry-flavored Sierra Mist. Then I floated some plastic fangs in the punch, and squeezed some fake blood on the sides of the bowl, letting it drip down in a gruesome fashion.


Tuesday, October 24, 2006

"It can't get any worse."

I know last time I said you'd never believe it. But I'm not kidding this time. Just when I thought that there was no way that the oven situation could get any worse, it went to a whole new horrific level.

Do you want the good news or the scary, terrible news first? It's either the Halloween season or you all have been reading too much Lemony Snicket, because I sense you want the bad first. Tough luck. First, the good. The oven is operational at long last. Why am I not doing the Dance of Jubilation, you may ask? Well, settle in with your cozy pumpkin latte and let me tell you what I hope is the final, but nearly-tragic chapter in this seemingly endless tale. ("She's going to tell, she's going to tell...." Reference, anyone?)

So I get up at the crack this morning (which for me, is 8:00am...tee hee) to be ready to meet the gas man who is scheduled to come repair the broken gas line. By 9:00am, I was beginning to get nervous, as I had seen hide nor hair of him. So I called the company, and they said he was on his way. Indeed, he showed up around 9:30, I'd say, which gave me the opportunity to get a lovely pork roast with garlic, onions and homemade applesauce in the crock pot (you may say that this showed a distinct lack of faith in the oven being repaired, and as Billy Joel put it so eloquently, you may be right). Now it should be said, the repair man who we'll call Jeff--because that is his name--is very nice. In fact, as he worked, we had a long and productive chat about the lack of good customer service in his field and the resulting deterioration of customer loyalty. And as he is to be promoted to manager in the next couple of months, he will soon be in a position to make substantive changes to a company that has, well, kinda sucked in the service department, to say the least. Also to his credit--and this must be underscored as a pivotal plot point in my story--he was very careful to check both the stove's burners and the oven temperature before he left. In fact, he even finessed the burners so that I could get the lowest of possible simmers without losing the flame. What a guy!

However, right after he left, I thought to myself, it can't be that easy. Given my track record over the past two months, I just had the sense that something was going to go wrong. And before the repair guy got too far out of range to be paged back, I was going to check the oven one more time. I turned the dial up to 350 degrees, and I was going to see if it came up to temperature while I got dressed for work. I didn't even make it around the corner to my bedroom before I heard a loud BOOM! I came running back into the kitchen and turned the oven off again, but not before huge flames started shooting out from behind the oven and up the walls to the cabinets above. I started to panic and grabbed a watering can and poured some water on the flame (DUH! ineffectual on the gas fire). So I grabbed the fire extinguisher from underneath the kitchen sink. It was still in the box after seven years, so I ripped off the cardboard, but as the flames grew higher, I didn't even have time to read the directions. I just started clawing at the apparatus until everything that could come off of it did, and then I started to spray until the fire was out, which didn't take long. Then I called 911, and told them that I thought I had the fire out, but that someone should maybe come and check it out. Finally, I called the gas company and had the repair man paged back to the scene of the crime. Within minutes, there was a fire engine or two, a water tanker, an ambulance, men in full fire suits, about four volunteer trucks, and even the fire chief who left his day job at the hospital to rush to the big "house fire." Then shortly after that, poor Jeff arrived back at the house to face what looked like the entire Chazy VFD.

Long story short (WAY too late!), with the use of a thermal camera, they determined that the fire was indeed completely out. And there was amazingly little damage--just a little scorching of the drywall behind the stove. The range itself was, remarkably, unharmed, other than a thick coating of baking soda covering it (did you know that that was what comes out of a fire extinguisher for the most part?). The fire chief signed off on the situation as long as Jeff agreed to switched out the faulty connection to the stove (apparently, the appliance store installed the new stove using the old connector) and also the power cord, just to be on the safe side, in case the chemical retardant should compromise it. So when I left for work, Jeff was making the required repairs, and my trusty next-door neighbor was supervising so that I could get off to class (a half hour late!). But before I ran out the door, I asked Jeff if I had not have checked the stove again, what would have happened? My first concern was my animals, and I asked if the fumes would have killed them. He said no, that the vapors aren't lethal. But that amount of gas build-up would be so highly explosive, that even someone coming home and flicking on a light switch would have been enough to blow up the whole house. I can't even dwell on that point! All I can say is, THANK GOD that I decided to turn that knob one more time for good measure.

Obviously, this is a pointlessly rhetorical question to ask, but CAN YOU EVEN BELIEVE THIS RIDICULOUS NIGHTMARE OF A STORY??? I know you can't. I know you think I've made it all up. But I have witnesses...namely, the entire hamlet of Sciota (all 18 houses' worth of folk) who came out to watch the goings-on this morning, much to my humiliation. And the punch line is this: the stove finally works and I could finally bake again, but I am scared to death to turn the thing on! So even as I type, I have a pot boiling on the nine-dollar Wal-Mart hot plate to make spaetzel (spatzen, to be precisely plural) to go with the yummy pork roast. Yes, yes, I will screw my courage to the sticking place sooner or later (especially as we are hosting a Halloween party this coming weekend), but during daylight hours when I won't have to wake up the volunteer firemen! ;-)

Saturday, October 21, 2006

Maple Cheesecake Experiment

I went to dinner last night with my friends from work, and as we had one vegetarian among us, we chose the one restaurant in our town that has a decent number of vegetarian offerings. It's called Livingoods. I find the menu a bit uneven (some items are excellent, some just ok) and some entrees are too pricey ($18), but it's about the best thing we have here in culinarily desolate Plattsburgh! I quite enjoyed my appetizer--crispy, spicy Thai spring rolls with a sweet chili dipping sauce. I also sampled an excellent pizza with tomatoes, goat cheese, mushrooms, and chunks of roasted garlic. And the best thing we shared was balsamic-marinated portabello mushrooms with some sort of crab and walnut stuffing. Fabulous! My entree was something called a Fiesta Wrap, a fairly uninspired chicken, corn and black bean-type sandwich, but it did come with some yummy, freshly-made sweet potato fries.

But the best thing of all was dessert. Now, I don't usually order dessert in restaurants because I think my bill is already too high and/or because I always vainly think that I can make better sweets myself (for a fraction of the price)! But Livingoods does make their own desserts in-house, and I had sampled a very good Jack Daniels chocolate pecan pie there previously. So when I heard the magical words "maple walnut cheesecake," I was all in! It was really tasty, and afterwards, I asked if the chef would mind sharing the recipe. Well, can you believe the arrogance? He would not share! I know, I know. It's his prerogative, of course, but I hate it when people aren't generous with what they have. All of my best recipes came from other people, great cooks who were kind enough to share with others who had the same passion, and I am trying to pay that kindness forward with this blog. And really, who besides me and a handful of others in this tiny city is actually going to bother to make a cheesecake from scratch anyway? It's not like I have a restaurant, so I'm not going to sell this product and steal their business! Geez! It's just silly, especially when you consider that famous chefs in nationally-rated restaurants frequently share recipes when asked. In fact, a few years ago, I was lucky enough to dine at the restaurant at The Mill at Simon Pearce, a Fodor's Choice Award winner for 2006. And when I contacted the chef a few days afterward to compliment him on the meal, he e-mailed me all of the recipes that he used! Isn't that amazing? I love it when people are giving of themselves and their talents like that.

Anyway, this episode just annoyed me and made me think, I don't need your stinking recipe! I'll make my own and make it BETTER! Truthfully, the texture of their cheesecake was a little off, like it may have been a tad underbaked? And though I liked the idea of a short crust base, theirs was really too sweet. So I made my first attempt at creating a very maple-ly cheesecake with a maple-walnut shortbread crust. If I were a different sort of person, or if company was coming over, I might top this with some cooked spiced apples. But seeing as I just made this for me, I prefer to let the maple-ly goodness shine on its own! It turned out very well, I think. The texture of the cheesecake was just right, and the crust wasn't so hard that you couldn't get your fork through it like some cookie crusts. And I think the level of maple flavor was spot-on. So my experiment was a success (even though I had to bake it over at my neighbor's house again!), and now I am happy to share the recipe with all of you. Harumph!

Maple Vanilla Bean Cheesecake with Maple-Walnut Cookie Crust

Crust:
1/2 cup butter, softened
1/4 cup brown sugar
1/4 cup maple sugar
1 teaspoon salt
1/4 teaspoon cinnamon
1 1/2 cups flour
1 cup walnuts, toasted and roughly chopped

Cheesecake Filling:
1 cup maple syrup
1/2 cup heavy cream
4 8-ounce packages cream cheese, softened
4 tablespoons maple sugar
1 vanilla bean, split and scraped (or 1 tablespoon vanilla extract)
1/4 teaspoon salt
4 eggs

In a stand mixer, cream the softened butter and both sugars. Add salt and cinnamon. Mix again. Add the flour and mix just enough to combine. Add in the walnut pieces and mix briefly once again. Spread the soft dough into the bottom of a large cheesecake pan with a removable bottom. Chill in the refrigerator for at least 15 minutes or so while you preheat the oven to 350 degrees. Bake the crust for about 20 minutes or until it is a pale golden color. Let cool from hot to warmish or even room temperature.

While the crust is baking, boil the maple syrup for about three minutes then remove from heat. Add the heavy cream to the hot, reduced syrup and whisk together. Chill until at least room temperature.

Beat the two pounds of cream cheese until very smooth. Mix in the maple sugar, vanilla seeds (or extract), and salt. Add in the maple cream and mix well. Then add the eggs, one at a time, mixing well after each. Pour the cheesecake filling over the cooled crust and rap the pan a bit to pop any little bubbles that may have formed. Bake at 350 degrees for about an hour or until the center of the cheesecake is no longer so wobbly as to appear liquid. Cool in the pan to room temperature, and then chill thoroughly for six to eight hours or overnight. Serve with a drizzle of maple syrup, some sweetened vanilla whipped cream, and a sprinkling of chopped, toasted walnuts.


Thursday, October 19, 2006

Hail to the hot plate!

I don't even know why I bother to tell this story. I mean, no one is going to believe me. And still, tell it, I must. So the appliance store called toward the end of last week and asked us when we wanted the new (new-new or second new!) stove delivered. They would prefer Tuesday, but as Cyd is off on Mondays, they kindly agreed to squeeze us in on Monday. But by 10am that morning, they had still not called to confirm a two-hour window of arrival. So as I was departing for work, I suggested that Cyd give them a call. As it turns out, though they called us to make the appointment, the range hadn't even arrived at their store yet. How did next week look for us for delivery, they asked. Well, I am not sure what possibly (highly likely) profane words were uttered by my roommate at that point, but the next thing I heard, they had decided to give us an upgraded stove that they had there at the store, and it would be delivered between 2-4pm! HALLELUJAH! Wouldn't that have been a fitting end to this never-ending tragic tale?

But it's never that easy for me. By the time I got home, eager to see the new appliance, dreaming that it might actually have a light and a clock/timer (ooh! deluxe!), there was a note taped to the garage door warning me first of wet paint inside and secondly, that now not only did the oven not work, neither did the stove/burners! Apparently, as they were installing the new range, the gas line was kinked and it broke. So they turned off the gas and directed us to call our gas company to schedule a repair. And of course, they can't come until next Tuesday! This news was so profoundly depressing to me, that I went directly to bed (at 9pm!) and did a fair amount of frustrated weeping before finally passing out from the emotional exhaustion. I mean, come on! How can this be happening? Most people I know around here only use their ovens to store pots and pans in. But even if they did use it, if it broke, they would just buy a new one, and within a week or so, they'd be back and and running, er, baking. But not me! This has now been going on for almost two months. TWO MONTHS! And not only are we lacking an oven, but now the stove as well! What have I done to so offend the gods that they continue to mock me thusly? Oh, the humanity!

So until next week, I am limited to what I can do with a microwave, a crockpot, an electric skillet, and a new single-burner hot plate that I picked up for less than nine bucks at the Wal-Mart. As it turns out, you can do quite a lot without a stove! In fact, Cyd had been bugging me to do something with the rest of the enormous cabbage that we bought at Windmill Point Farm a few weeks ago, so I decided to make Martha's mother's cabbage rolls. I don't even like cabbage as a general rule, and I love these. I first made them several years ago to welcome a new neighbor from the Ukraine, and she reviewed them quite favorably and said that they tasted authentic. This recipe from Mrs. Kostyra is Polish, of course. But I think it's like the plum dumplings--there aren't that many variations on the recipe, regardless of which Eastern European country the recipe originates from. Then again, I'm sure that none of those people ever had to cook their rice in the microwave (it takes longer, but surprisingly, turns out perfectly) or boil their cabbage on a nine-dollar hot plate, but one must do what one can do in times of suffering. ;-)

Stuffed Cabbage Rolls (Golabki)
(Source: adapted from Martha Stewart Living)
Serves 6 to 8

1 large green cabbage (about 2 1/2 pounds)
4 tablespoons butter
1 large (or 2 small) onion, finely chopped
2 garlic cloves, finely chopped
1 medium green pepper, finely chopped
2 celery stalks with leaves, finely chopped
2 cups cooked rice
8 ounces ground beef
8 ounces ground pork
salt and pepper
1 tablespoon dried parsley flakes
4 cups tomato purée (or a combo of crushed tomatoes and tomato sauce)
1 Granny Smith apple (or cooking apple of your choice), peeled, cored, and chopped
1 teaspoon (or 2!) granulated garlic
1/2 cup sour cream, plus more for garnish

1. Using a paring knife, remove center core of cabbage. In a large stockpot, bring 2 quarts water to a boil. Add cabbage, and cook until outer leaves are bright green and tender, about 2 to 3 minutes. Lift cabbage from water, and remove outer leaves. Return cabbage to boiling water, and repeat brief cooking and removal of leaves until all leaves are cooked. Reserve 2 cups cooking water. Trim thick center vein from bottom of each leaf. Reserve four large outer leaves to line bottom of pan. Set aside.

2. In a medium skillet, melt butter over medium heat. Add onion, garlic, green pepper and celery and cook until golden and tender, about 8 minutes. In a large bowl, combine vegetable mixture, rice, beef, pork, salt, pepper, and parsley flakes. Stir to combine.

3. Add about 1/3 cup rice filling to one cabbage leaf. Fold sides of cabbage over filling, and starting with the stem end, roll the cabbage up. Repeat with remaining leaves and filling.

4. Line a 5-quart Dutch oven or stock pot with reserved outside leaves. Transfer stuffed cabbage leaves to the pot.

5. In a large bowl, combine the tomato purée, apple, reserved cooking water, some additional salt and pepper (to taste) and the granulated garlic. Pour the tomato sauce over the cabbage rolls. Cover and bring to a gentle simmer for 1 hour or until cabbage is very tender. Remove cabbage rolls to a large, somewhat deep platter.

6. Add sour cream to the pot and whisk to combine with the tomato sauce. Ladle finished sauce over the cabbage rolls, and serve with additional sour cream and a sprinkling of parsley.


Monday, October 16, 2006

A slothful, er, restorative weekend...


I hope you enjoy more pictures taken from my office window, because that's all I have to offer today. I wish I had a better food-related post to share with you, my friends, but there hasn't been much to blog about coming out of my kitchen this weekend--mostly just leftovers. This is due to two main factors. One is, as usual, the lack of an oven. But, keep your fingers crossed and send up a little prayer--the second new oven should be delivered tomorrow. Whether it will work or not, well, that's another story. But I will just be despondent if I can't start baking again soon. I am missing the glory of the high apple season! The back fridge is filled to the brim with lovely heirloom baking apples such as Wealthy and Wolf River, just begging to be fashioned into crumbles and pies and bars and loaves. And I am feeling a real need to bake some other kinds of bread, too. [big sigh]

More significantly, and for the first time in quite a long time, I did nothing this weekend. No big food projects of any kind, other than my kind roomie picking the rest of the peppers from the garden. This means that more pepper jelly will happen soon, but as I was out of Certo and canning jars, not this weekend. On a side note, why do all of the grocery stores order canning supplies just for the summer, and not enough for the fall when you really need them--that is, during harvest time??! It makes no sense. The only thing that makes less sense and is more maddening is watching Sandra Lee make pear crepes with pre-fab crepes, vanilla pudding from a pudding six-pack, and CANNED pears! But she she did use a real vanilla bean, so I guess that was one small redemption in an otherwise hellish recipe. But I digress...

So back to my unapologetic sloth this weekend. And I had plans, too! Anthony and Michelle of Endless Banquet fame reported that there would be an impromptu produce sale by a very special farmer named Patrice Fortier from Kamouraska, Quebec (about four hours northeast of Montreal, I'd estimate). But I just couldn't find the will to make the drive. Truth to tell, I couldn't find the will to do much that didn't involve my bed or the comfy counch! You see, we are in the thick of midterms at school, and I had a hellish grading load this past week, and I'm facing another one starting tomorrow. So I guess I just needed to be comatose for a couple of days and catch up on the sleep that I missed last week. [zzzzzzz]

The one thing I did make this weekend that I was craving was homemade butter pecan ice cream. As the lovely and talented Bakerina once said, ice cream is the only thing that will save us now! Of course, she said that during the sweltering summer, but every season is ice cream season to me. As my friends will attest, I like to bake lots of sweet things, but I actually don't have a big sweet tooth myself...except when it comes to ice cream, that is. Heck, one of my guilty pleasures is ice cream for breakfast. ;-) What?? It's dairy and eggs, right? For this particular batch, I used a slightly less rich version of the Bakerina's vanilla ice cream base (four egg yolks instead of six), one of my recently-acquired vanilla beans, and about a cup and a half of whole pecans toasted in butter. Heaven help us! It's just sinful! And here's the recipe. Enjoy it, and get some sleep afterwards, won't you? You deserve it!

Butter Pecan Ice Cream
(Source: adapted from Prepare to Meet Your Bakerina)

2 cups heavy cream
2 cups whole milk
1 vanilla bean
3/4 granulated sugar, divided
4 egg yolks
pinch (or two!) salt

1 1/2 cups whole pecans
3 tablespoons butter
pinch of salt

In a 3-quart saucepan, combine the milk, cream and half the sugar, and stir to combine. Split the vanilla bean with a paring knife, scrape the seeds out of the bean with the blunt side of the knife, and add both seeds and the bean husk to the pot. Bring to the boil. While the milk and cream are coming to the boil, beat the egg yolks with the remainder of the sugar in a large bowl until the mixture has lightened and the color is a paler yellow (about two minutes by hand).

Once the milk and cream have come to the boil, whisk them very gradually into the yolks, then add the salt. Rinse the saucepan which held the milk and cream, pour the whole mixture from the bowl back into the pan, and return to the heat, using a medium-low heat. Have another large bowl and a strainer close by. Stir the custard constantly as it cooks. You want to cook this until it coats the back of a spoon.

Strain the custard into its waiting bowl. Place your bowl into an ice bath and stir occasionally until the mixture has chilled. Cover it with plastic wrap and chill completely in the fridge for at least four hours, preferably overnight.

In a saute pan over medium heat, toast the pecans in the butter until they just start to brown. Remove from heat, sprinkle with salt, and set aside to cool completely.

When you are ready to churn the ice cream, set up your ice cream machine, pour in the custard (tasting it to see if it needs more salt, as chilling dulls flavor) and follow the manufacturer’s directions. Churn it until it holds a shape but is still somewhat soft. Add the pecans and churn a bit more until the nuts are mixed in well. Transfer to a lined loaf pan or a plastic container with a lid and let "ripen" in the freezer for at least two hours until firm before scooping and serving
.

Thursday, October 12, 2006

I'm full of beans today!

(Bonus points for anyone that can get the reference in the post title!)

Friends, this morning saw service call #4 from the appliance store. And does the (brand new) oven work now, you may well ask? Oh, why would you continue to ask this pointless question? Of course, it still doesn't work! That would just be silly. However, my roommate figured out that if you turn it to 150 and prop the door open a certain amount, you can get somewhat close to 300 degrees. So, we're golden (brown and delicious)! Truly, it has become a comedy of errors, and I think we're at the point where we have to start from square one and order another oven and let the merriment begin again. [heavy sigh]

In lieu of the celebratory post about the repaired oven that may well never come, I will share a recent culinary coup that no one I know fully appreciates. But you, my foodie friends, will surely share my joy. I have been trying to find a decent source of vanilla beans for sometime now, but they are just SO expensive! Even my beloved Trader Joe's has a jar of four scrawny beans for about $4. A dollar a bean is a lot better than $2-3 a bean which is common, but I wanted to do better, and get a higher quality bean to boot. So I turned to the most obvious source for gourmet food acquisitions--EBAY! I found a vendor called greenerdog with an Ebay store so that you didn't even have to wait out an auction. He had a "buy it now" option for ten Madagascar bourbon vanilla beans for $1.99, and the shipping was $2.95 no matter how many lots you bought! I knew it was a bit of a gamble, but at $0.20 a bean, I figured it was worth the risk. So I bought five lots (50 vanilla beans!) for about $13 with shipping. WOW! Moreover, I had barely hit send on my order when the package seemed to materialize in my mailbox. Seriously, it was two days at the most from order placement to delivery. The beans vary in size a little bit, of course, but they are all of a decent size, very flexible and supple, and they smell fantastic! I haven't made use of them yet, but I will report back when I do. In the meantime, I just thought I'd share a great deal with all the bakers out there in cyberland!

Monday, October 09, 2006

Short Ribs, Long on Flavor

This is what happens when you stay home for a long holiday weekend; you watch too much Food Network, and you become obsessed with making things that you see on t.v.! Specifically, I saw Giada making Short Ribs with Tagliatelle that I just HAD to try immediately! So I found myself in the Wal-Mart at midnight Saturday night shopping for short ribs. Of course, because this is my life we're talking about, I ran into several problems. The first was that I could only find very large packages of short ribs--about three pounds at $2.68/lb., so it's not an inexpensive dish. Then again, it makes a TON, enough to freeze for another meal another day. Of course, if you can find a smaller package (a pound and a half), then you can halve the recipe below. But why would you want to? As it is, this fills a standard crockpot. And it's not that much more work to make the double batch and freeze the leftovers. But that's your call. Secondly, try finding tagliatelle in Plattsburgh! So I had to settle for some pappardelle from Trader Joe's that I still had rattling around in the pantry. (Maybe next time, I'll just make my own tagliatelle, which is an even wider pasta than pappardelle. Or I'll look for it the next time I'm in Montreal.)

But the biggest problem I had was getting the recipe off of Food Network's website when I needed it. Of course, it just came up for me just now, but I tried ALL DAY on Sunday, and I just got a blank screen when I clicked on that link. So I had to come up with an alternative recipe. I turned to a wonderful cookbook from the good people at Cooks' Illustrated called The Best Recipe: Italian Classics. In it, there was a recipe for Pasta and Rustic Slow-Simmered Tomato Sauce with Meat that was just the ticket. Of course, I had to put my own little twists on it here and there (like including some of the last peppers from my garden and using my crockpot to cook it all) and also a few things that I could remember from watching Giada make her version. And I believe that, in the end, I created something AMAZING! Seriously, this one is a keeper. So flavorful, and so hearty--a perfect dish for the nippier months. I served it with the beautiful beans that we picked up at Windmill Point Farm last weekend; although once you cook them, they change from looking like a vibrant Scarlet Runner Bean to a less appetizing greyish-green. But they still tastied delicious, especially cooked with a little bacon and some beef broth until tender. Delish!


Short Ribs in Rustic Slow-Simmered Tomato Sauce with Pappardelle
(Sources: Food Network and The Best Recipe: Italian Classics)

2 tablespoons olive oil
3 pounds beef short ribs (you may also wish to try pork spareribs or country-style ribs)
salt and pepper
2 medium onions, minced
2-3 large red peppers, cored, seeded and minced
6 medium cloves garlic, peeled and minced
1 cup red wine
1 28-oz. can diced tomatoes with juice (or better yet, use one 15-oz. can of regular tomatoes and one 15-oz. can of fire-roasted tomatoes)
1 small can tomato paste
1 1/2 cups beef broth
1 teaspoon dried oregano
pinch of hot pepper flakes (optional)

2 pounds pasta, cooked to al dente (according to package instructions)

parmesan cheese, freshly grated
fresh parsley, chopped (optional garnish)

Heat the oil in a large skillet. Season the ribs all over liberally with salt and pepper. Brown the ribs on all four sides in the skillet, about 8-10 minutes total. Remove the ribs to a plate and set aside. Add the minced onions, peppers, and garlic to the pan and saute until softened, 2-3 minutes. Add the red wine and deglaze for a minute or two, making sure to scrape up all the browned bits from the bottom of the pan. After the wine has reduced to something more like a glaze, add in the tomatoes, tomato paste, beef broth, oregano and red pepper flakes. Bring the sauce to a boil then remove from heat.

Add some of the sauce to the bottom of a preheated crockpot. Place the ribs in the pot next and cover them with the rest of the sauce. Cover and cook on high for four hours (or on low all day to have it ready when you get home from work!), or until the meat is literally falling off the bones. Place the ribs on a plate and remove the bones, tough cartilage and any excess fat. Using two forks, shred the meat, then add it back to the pot. Leave the meat and sauce to simmer together while you prepare your pasta. Serve with a generous sprinkling of grated parmesan and perhaps some chopped fresh parsley if you have it. MANGIA!

Sunday, October 08, 2006

Columbus Day Weekend


Ah, Columbus Day Weekend! This is my absolute favorite time of year, and after two years in a row of pretty crappy color, I am am enjoying every second of this magical and vivid season (behold a lovely tree on our local university's campus and the glorious view from my office window at the community college!). Normally, this is also my favorite time to take a road trip, but it just didn't work out this year. Mainly, we have so much work to do at home, from decorating for Halloween to harvesting everything that's left in the garden before the first killing frost, that it seemed like a better plan to stay home this year. Plus, school is just kicking my butt this semester, and getting lots of sleep over the three-day weekend sounded irresistible. As it turns out, we have had a very nice weekend without travelling. On Friday night, we had dinner with friends in their lovely little Mansard-style house in Peru, NY, the highlight of which was vanilla cake served with a brown sugar sauce on top. Yum! Then last night, my friend, Vicky, had a huge bonfire at her Adirondack cabin, and we ate bruschetta that I brought made from the last haul of tomatoes, campfire chili (both carnivorous and vegetarian varieties), cornbread with the last of the local sweet corn in it, hot dogs cooked on a stick, and of course, S'mores! We had so much fun! But perhaps the most fun was had by my dog, Grady. He got to run through the beautiful, colorful woods before sunset, play with my friend Terri's dog, Happy, steal food off the picnic table, and finally pass out by the roaring bonfire. Good times for a little hound!

With all the activities and projects (and, yes, the continued lack of an oven--though, there's supposed to be a man coming with a replacement part on Tuesday, but I'm not holding my breath), there hasn't been a lot of exciting cooking to talk about, but I do have two real time-saving ideas for quick meals to share. One comes from the ubiquitous Rachael Ray. Love her or hate her, the girl does come up with some clever shortcuts from time to time. The best one I've heard so far is using store-bought fresh or frozen ravioli to assemble a quick lasagna dish. I won't even bother posting a proper recipe. Just brown some hamburger and/or sausage (I like both), and add a jar of your favorite spaghetti sauce (I like Prego). Pour a little of the meat sauce into the bottom of an oblong baking dish, then place an even layer of cheese ravioli on top of it (it took 15 of them using the brand I bought). Add some more sauce over that, then a generous amount of shredded mozzarella and maybe some grated parmesan for good measure. Do another layer of ravioli (so probably 30 total for the casserole, depending on the size), more sauce, and top with lots more cheese. Bake it at 350 for about a half hour, and you have a quickie mid-week "lasagna." What a great tip for a working folks!

My second casserole comes from Gourmet Magazine by way of the guys over at Culinary in the Country. It is a remarkable recipe because it's comprised of just four main ingredients, but you'll be shocked at how much flavor the dish has, not to mention how easy it is to throw together. It's really just macaroni and cheese with an elegant and tasty twist. Here's the recipe:

Orzo with Ham and Goat Cheese
(Adapted from Gourmet)

1 lb. orzo
1/2 lb. (I used about 3/4 lb.) thickly-sliced ham, diced or coarsely chopped (I used a combination of maple ham and spicy capicola)
1/2 lb. mild soft goat cheese, crumbled
5 scallions, thinly sliced

Preheat broiler and lightly oil a flameproof three-quart shallow baking dish (two inches deep).

Cook orzo in a six-quart pot of boiling chicken broth until al dente. Reserve 3/4 cup pasta cooking broth, then drain orzo in a colander. Toss hot orzo with remaining ingredients, reserved cooking liquid (if needed), and salt and pepper to taste in a large bowl until cheese is melted.

Transfer orzo mixture to baking dish and broil two inches from heat until lightly browned, about four minutes.


Make either of these two easy casseroles, and you'll have plenty of time and no good excuse not to get out there and make the most of this gorgeous autumn season!

Friday, October 06, 2006

Happy Birthday, Tom!

Ok, so my friend Tom's birthday was a couple of weeks ago, and I missed it. But in my defense, I didn't know when it was until after the fact, and by then, I was already knee-deep in my preparations for Miss Vicky's affair. I figured that it was too late, but then at Pub Trivia last week, Tom said something that cut me to the quick. When I had the quizmaster lead the whole bar in a round of "Happy Birthday to You" for Vicky, he said, "My birthday was last week, and no one cared that much about me!" Now, you must understand that Tom is a cynical old curmudgeon but with a heart of gold, and that he wasn't being serious. All he really wanted to do was to get home to see his favorite t.v. show, "Eureka," so he was just vexed that we were taking extra time to sing to the birthday girl. Still, you cannot joke about birthdays around me! He might as well have said, "Gina, you are unkind to animals." In short, he got me right where I live. :-(

So I set about to rectify the situation. First of all, I did some sleuthing and found out Tom's favorite dessert. His national heritage is Slovenian, and his wife, June, told me that he ADORES plum dumplings, although she is only obligated to make them once a year because they are so labor-intensive. I was not at all familiar with this dessert, so I had to do some internet research. I guess I was thinking of dumplings cooked in a fruit puree such as blueberry or blackberry. But these are potato dumplings in which a whole fresh plum filled with cinnamon sugar is embedded. And not just any old plum, either--it has to be the small Italian prune plums, which are not that easy to find, let me tell you! And then the dumplings are boiled and served with a buttery, sweetened breadcrumb topping. I never did find a specifically Slovenian recipe, but it would seem that most Slavic and Germanic cultures have some version of the same thing. What I ended up making was an amalgamation of a Hungarian and a Serbian recipe that were almost identical.

My first batch turned out alright, despite using the wrong kind of potato for the dumpling. I used a waxy white potato, and you really want to use a starchy, Russet-type to make a smoother, lighter dough. So I decided to make a second batch with the right kind of potato, plus, I had read that the dumplings can also be made with apricots (as pictured), so I wanted to try that. And though all the recipes that I found called for fresh apricots to be used, I wondered why you couldn't use reconstituted dried apricots in the off-season? Well, not only can you do it, my official taster/roommate declared that she actually liked the dried apricot version better than the traditional plum dumpling! It certainly seems like the kind of thing to have in your fall and winter repertoire, because this dish is extremely hearty--a real stick-to-your-ribs affair. June told me that she and Tom eat these for a meal when she makes them, not just for dessert. They will certainly fill you up, that's for sure. They are just delicious, and I hope that Belated Birthday Boy, Tom agrees. (I haven't had a report back yet because they are saving the dumplings for the weekend when Tom's brother is coming for a visit, and apparently, he hasn't had plum dumplings for years and years!) So HAPPY BIRTHDAY, TOM...better late than never!

Hungarian/Serbian/Slovenian Plum Dumplings

Dough:
4-5 large potatoes (russet, starchy type), peeled and cut into large cubes/chunks
2 tablespoons butter
2 teaspoons salt, divided
2 eggs
1 teaspoon baking powder (optional, but makes a lighter dough)

3-4 cups flour (enough to make a soft, smooth dough)

Filling:
32 Italian prune plums, washed, dried well, split, and pitted*
½ cup sugar
2 teaspoons to 1 tablespoon ground cinnamon (to taste)

Topping:
2 cups fresh breadcrumbs
½ cup butter
½ cup sugar
2 teaspoons to 1 tablespoon ground cinnamon (again, to taste)

Fill a large saucepan with the chunks of potato and cover with water by an inch or two. Bring to a boil and throw in a couple of pinches of salt. Boil the potatoes until very tender and then drain. Add the potatoes to the bowl of a stand mixer and “mash” with the paddle attachment until fairly smooth. Add the two tablespoons of butter and the salt and mix in well. Let cool until almost room temperature (it can be warmish, but not hot). Add the eggs and mix again. Add the baking powder if you're using it, and the flour, cup by cup, just until you have a dough that is soft, smooth, and not too sticky to work with.

Flour your bench liberally, and roll out dough to about ½-inch thick**. (I like to divide the recipe in quarters before doing this—makes it a more manageable task, I think.) Your ultimate goal is 32 dumplings, maybe three or four inches square, so I cut each quarter into eight equal pieces. For each dumpling, take one plum, fill the cavity where the pit was with at least half but up to a full teaspoon of the cinnamon sugar. Close the plum, then place it in the center of a dumpling square. Fold the ends over the plum, and then pinch the edges to seal. Roll the dumpling around in your hands to smooth it out and even out the dough covering on the plum. Set aside on a pan liberally coated with flour, and don’t let any of the dumplings touch each other. Proceed making the rest of the dumplings—you might want to call a friend in to help. ;-)

Get a large pot of water boiling, and boil the dumplings in batches (no more than eight at a time, I’d say) for about 15 minutes. Meanwhile, toast the breadcrumbs in the butter until golden brown. Mix in the cinnamon and sugar. When the dumplings are done, roll each one in the sweetened breadcrumb mixture and serve hot. Three or four per person is plenty for a meal, while two would probably be enough for dessert.

These dumplings freeze beautifully. Just make sure they aren’t touching each other when you freeze them, and then just boil them for an extra four minutes or so past the regular cooking time when you’re ready to serve them.

*These dumplings can be made with fresh apricots, too, or with reconstituted dried apricots (or, if you must, canned apricots). To reconstitute dried apricots, place them in a saucepan, and cover with double the amount of orange juice. Bring the fruit to a boil, and then simmer for 10-15 minutes, or until the apricots are tender. Drain, pat dry, and cool before filling with cinnamon sugar and encasing each apricot in dumpling dough.

**The second time I made these, I decided not to roll the dough, but just divide it into 32 roughly equal pieces, and then press each out into a circle with my fingertips. Then I added the sugar-filled fruits, encased them in the dough, pressed the seams together, and then rolled the dumplings in my hands to make them more even. It was much easier to do it this way, I must say!

Tuesday, October 03, 2006

Notre-Dame-de-l'Île-Perrot

It was rumored that we might have one nice day this past weekend, so on Saturday morning, Cyd and I took off for an autumnal day trip to Quebec. We didn't even get out of Hemmingford, our tiny border crossing, before acquiring some of the biggest Wolf River apples I'd ever seen, two dozen fresh eggs, and four heads of local garlic along the Circuit de Paysan (the "peasant's route" or in English, I guess we'd say the scenic route). But our goal was to visit Notre-Dame-de-l'Île-Perrot, a lovely island about 30 minutes southwest of Montreal, near both the St. Lawrence River and Lac Saint-Louis. I had read about a very special organic farm located on the island called Windmill Point Farm, and I have been trying to get over there to check it out since the beginning of the harvest season, but it just hadn't worked out until now. So we thought we'd be there by noon, and then maybe we'd hit the Jean-Talon Market later that day. Little did we know that, due to either construction or that horrible overpass collapse in Laval or both, the traffic heading to the Mercier Bridge was backed up for hours and miles. After waiting for over an hour just to get to the beginning of the detour, we bailed and backtracked to Montreal to pick up Interstate 20 from the other direction. FOUR HOURS after we left home, we finally arrived at the beautiful Windmill Point Farm (it should have taken an hour and a half!). We were very lucky to find the farmer, M. Taylor, in residence, and he gave us a quick tour of the grounds, passionately professing his theories and methods of sustainable agriculture along the way. He strongly believes that Quebec should not be importing their food from as far away as Florida and California (losing most of their nutrients en route) when many things can be grown in the province with the continued cultivation of hardy varieties. Indeed, M. Taylor seems to take fiendish delight in growing things that people think can't be grown this far north. For example, he is growing a type of smooth-skinned kiwi that he was proud to show me. A kiwi! In Quebec! Can you imagine? He also specializes in several kinds of table grapes, and one of them which he refers to jokingly as "bubble gum grapes" were so tasty, that Cyd declared them well worth the four-hour drive! As for me, I was enchanted with his pears. He had one variety that is almost 300 years old called Ritson, and another one named North Brite that Cyd could not stop eating. When we got home, we did a blind taste test against some lovely Starkrimson (a red Bartlett, basically) that I picked up at the supermarket, and there was NO CONTEST! The two heirloom, organic varieties won the taste test by leaps and bounds. The Ritson has a wonderfully musky perfume, and the North Brite is so juicy and buttery and sweet that Cyd wouldn't even let me cook any of them, claiming them for fresh eating and nothing else! But I'm getting ahead of my story. We also managed to relieve M. Taylor of some chubby golden carrots, an enormous head of cabbage (both of which were promptly fashioned into cole slaw upon our return home), and some gorgeous beans that looked like Scarlet Runners, but were snap beans, not for shelling (he developed this kind of bean himself, of course). And lastly, we bought a bag of a kind of Japanese walnut called a "heart nut" because of its distinctive shape. I believe I am looking forward to trying these most of all. I am in a very walnutty place lately--I want them in or on everything!

After leaving Windmill Point Farm, we passed an orchard nearby called Le Verger Labonté. It was a chaotic scene of fall fun, teeming with children visiting their petting zoo, taking hay rides, exploring the corn maze, and picking their own apples. As for me, I fought my way into the crowded shop to try and buy some Spartan apples, great for baking and just in season now. But Cyd wouldn't let me, as I already have at least four varieties of apples in the back fridge which has now just become an apple cooler (the dysfunctional oven is creating quite a baking backlog!). But we did buy a cute little take-and-bake apple pie, although they had just sold out of their "legendary muffins." Oh well. Next time. Or if my oven is ever back online, I'm make my own damn muffins! By this point in our adventure, it was already past five o'clock, so we decided to just grab some dinner (a Chinese buffet near Dorval that was unremarkable, except for the inexplicable Tahitian-style bamboo decor) and head back to the Etats-Unis. The return trip was pleasantly uneventful and mostly traffic-free.

The next morning, I made some fabulous breakfast burritos with cheese, bacon and sausage, scrambled eggs, garden tomatoes, green onions, homemade tomatillo salsa, and sour cream. Then I got on with the big project of the day--pear butter. I used the Starkrimsons, the Ritsons, and a handful of the North Brites that were already starting to turn. I didn't get the yield that I was hoping for, but what I did produce was just heavenly...the very essence of autumn. I urge you to give it a try. After all, 'tis the season to be standing around a huge cauldron of spiced fruit when there's a nip in the air! I hope you all are enjoying this gorgeous fall season. It never lasts long enough, so drink it in (or taste it if you can)!

Maple Vanilla Pear Butter
(Source: adapted from Ball Blue Book)

7-8 pounds pears, peeled, cored, and cut into chunks
1/2 cup water
1 1/2 to 2 cups sugar (taste it!)
1/4 to 1/2 cup maple sugar (ditto)
1/4 to 1/2 cup maple syrup (ditto)
1 tablespoon vanilla
pinch salt

Add about a half cup of water to the chunked pears (just to keep them from sticking to the bottom) and cook over medium heat until the fruit is soft, about 20 minutes. Transfer to a food mill or food processor, and process until fairly smooth, but not completely liquified. Add the puree back to the pot, and add the sugars, syrup, vanilla, and salt. Cook over a low heat, stirring frequently, until thick enough to round up on a spoon. Fill sterilized jars and process for ten minutes in a water bath canner. The original recipe said the yield would be four pints, but I got just over half that. Perhaps I like my butter thicker than some folks?