I was reading GardenWeb's Harvest Forum, as is always my way, and someone calling herself Malna from New Jersey posted a picture of her new canner that her hubby surprised her with. It's from Ball (Jarden), and it's their new Elite stainless steel canner. Well, one look at that beautiful thing was all I needed! I decided to splurge and buy one for myself! (Some girls treat themselves to clothes or shoes or purses--I prefer kitchen equipment. Tee hee.) To be sure, the price tag was a bit daunting at $80, but I rationalized the purchase in two main ways.
First, my current (classic speckled enamel) canner--at 13 years old--was looking worse for wear, coated with mineral deposits inside and getting thin in spots on the bottom. And the uncoated rack was all but disintegrating due to rust! In fact, I had been considering buying a new stainless steel rack for my old canner (the kind with narrower concentric circles so that small jars don't fall through), but the rack was twenty bucks by itself. Which leads to my second justification, which was that the only replacement canner I could find around here was the whole Ball canning kit, including all the tools that I already have, and that one is $60! OK, OK...I could order just the canner and rack online for maybe $25, or to be truly frugal, I could go buy a big pot at the kitchen supply store for even less and fit it with a round cake rack in the bottom to serve as a rack. But DARN IT, I just wanted the new, fancy canner! And as my first one lasted thirteen years, the heavy-bottomed stainless steel one should last the rest of my natural life! I'll certainly get plenty of use out of it, as anyone who reads this blog knows that I can A LOT, and also teach canning classes at school from time to time.
Even though I thought I could probably get another season out of my old canner, I talked myself into ordering the lovely new model from a site called The Housewares Store. They had it on sale for $68.99, so with eleven dollars for shipping, that took it to $80, which is about how much it costs if you order it from Ball's website, but then you still have to pay shipping on top of that. So at least I saved a little there! However, I didn't have time to wait for the new canner to be delivered, as I still had three pounds of Black Velvet apricots getting overly-ripe in the fridge, and one of my projects for the weekend was to experiment with an aprium-pomegranate pepper jelly based on my favorite apricot pepper jelly recipe. So earlier today, I busted out the old canner and got to work. I had the jelly cooking on the stove, and the water in the canner was almost up to a boil when I heard a funny sound, like a hissing, and then smelled propane. As I bent down to examine the burner, I could see that the depression around the element was filling with water which had snuffed out the flame. My faithful old canner had sprung a leak, the day after I placed an order for the new one! DIVINE PROVIDENCE, I say! The universe clearly wanted me to have the fancy new canner!
I swear to you, I did NOT sabotage my old kettle with a screwdriver or anything to further justify my extravagant purchase. And if I did, I certainly wouldn't have filled it with very hot water that then leaked all over the kitchen for me to clean up! Furthermore, I had to process the pepper jelly in my pasta pot which wasn't really big enough for the job and kept boiling over, making even more of mess for me to deal with. By the hardest, though, I completed the two batches (having to process it in three!), and I must say, for all my trouble, the fruit combination was delicious and made a terrifically tangy and spicy pepper jelly! And it is a beautiful burgundy color as well! However, the first batch didn't set enough to my liking, so I'll give it a few days, and then decide if I need to reprocess it. By that time, the Cadillac of canners will probably have arrived, and that'll be a good excuse to break it in! In the meantime, here's the pepper jelly recipe if you want to give it try...if your canner is still sound and water-tight, that is!
Aprium-Pomegranate Pepper Jelly
1/2 cup dried apricots, chopped finely
1 cup pomegranate juice
1 large red bell pepper, seeded and chopped (I used a smaller yellow bell pepper, plus one Hungarian Hot Wax pepper from my garden to make up the size difference)
1/2 cup hot peppers, seeded and chopped (I used one Anaheim-type, two jalapenos, and two serranos)
9 fresh Black Velvet apricots (or any aprium or pluot variety), pitted and chopped
2 cups cider vinegar
6 cups sugar
1 pouch (3 oz) liquid pectin
Put the dried apricot bits into a microwave-safe bowl and pour the pomegranate juice over them. Microwave on high for four minutes, and set aside to let the dried fruit absorb the liquid. In the meantime, seed and chop the peppers and the fresh apricots.
Add the reconstituted dried apricots, peppers, fresh apricots, vinegar and sugar to a large pot and stir. Bring to a full rolling boil for about 20 minutes, stirring occasionally. Add the pectin and stir in. Bring back to a hard boil for 5 minutes. Check the set, and continue to boil at two-minute intervals until the desired set is achieved. Fill (seven or eight) half-pint jars, wipe the rims, adjust the lids and rings, and process in a boiling water bath for 10 minutes.
"At that time, Antony Fortuny still suspected that part of the boy's mental deficiencies were due to his diet, which was far too influenced by his mother's French cooking. It was a well-known fact that the richness of buttery foods led to moral ruin and confusion of the intellect." --The Shadow of the Wind, Carlos Ruiz Zafon
Friday, July 31, 2009
Tuesday, July 28, 2009
What the Heck is a Black Velvet Apricot?
My little friend, K, was in a musical recently, and though I hate going into town on the weekend and try to avoid it, I had to be there for her Saturday performance. Afterwards, since I was already out and about, I decided to take a drive to see if maybe I could find a house that I could afford to buy in an area where I might like to live. I had no such luck locating a house, but I did make two critical discoveries in my travels. First--and the importance of this cannot be overemphasized--I found pineapple Dole Whip being served at Sweet Treat in little old Peru, NY! Who would have thought I could have a little taste of Disneyland so close to home? Secondly, though I usually make an annual pilgrimage to Columbia County, NY for sour cherries (that's three hours from here), I discovered that my favorite local orchard, Northern Orchards in Peru, has them! Ok, so they didn't have many this year due to the non-summery weather and some very tenacious birds, but I did get enough for a couple of pies, and I'll know to get them there next year! Yeah!
As it's still so cool and wet and, well, spring-like here, I still have rhubarb that is thriving. So when my friends, June and Tom, invited me over for dinner on Sunday evening, I had originally envisioned a rhubarb-sour cherry cobbler. My friends enjoy very tangy desserts, and the sour cherries would also honor the return of our wayward Michigander friend, Vicky, who would also be in attendance. I had in mind to make a old-fashioned, comforting cobbler. Though I usually prefer a crisp, or better yet, a crumble, I thought maybe I had overlooked the merits of the humble cobbler, and I should give it another try.
However, when I was in Sam's Club last week, I spied a package of something called "Black Velvet Apricots" that were marked down to $1.88 for three pounds! They had lovely, dark purple, nearly fuzz-free skin, and I assumed that the markdown meant that they were getting too ripe. I had no idea what they were really, but I felt certain that they would make a tasty cobbler. (As I was to learn later, they are basically an aprium--50/50 apricot and plum.) Therefore, it was going to be a sour cherry and aprium cobbler...UNTIL I looked down from my bedroom window Sunday morning and spied a TON of raspberries waiting to be picked! I started with one five-dollar plant about five years ago, and now I have a whole fence line of them! And they must really be liking all this rain, because some of the berries this year were as big as my thumb!
Having picked a quart of raspberries (in three brief sessions between downpours) with many of them already being overly-ripe, I decided to leave the sour cherries in the freezer for another time and, at long last, finally settled on a Black Velvet Apricot and Raspberry Cobbler with Buttermilk Biscuit Crust. Does that sound DELISH, or what? Well, it was! The fruit flavor combination was terrific, and I enhanced it with a little crystallized ginger in the mix (and served it with a scoop of Haagen-Dazs ginger ice cream as well, which was a very complimentary pairing). However, in the interest of full disclosure, I have two complaints. One, by swapping out raspberries for sour cherries, I ended up with a LOT more juice, and though I added an extra tablespoon of thickener, my cobbler still ended up runny...tasty, but runny. Boo hiss. Secondly, though cobbler has its devout fans, I am going to stand by my conviction that a crisp or crumble is generally preferable. Sorry, haters, but I said it! Still, this was a very yummy and very homey dessert, and with all of the summer fruits that are available to us now, you might just want to try it for yourself!
Black Velvet Apricot and Raspberry Cobbler with Buttermilk Biscuit Crust
(Source: adapted from Food Blogga via Nick Malgieri's How to Bake)
Filling:
3 pounds Black Velvet Apricots, washed, pitted, and cut into eighths
1 pint (2 cups) fresh raspberries, rinsed
1/3 cup granulated sugar
1/3 cup light brown sugar
2 tablespoons all-purpose flour*
3 tablespoons tapioca flour* (or instant tapioca that has been ground in a food processor)
2 discs crystallized ginger (probably 2 tablespoons)
1 teaspoon vanilla
1/8 teaspoon almond extract
juice of half a lemon
2 tablespoons butter
Buttermilk Biscuit Crust:
3/4 cup all-purpose flour
3/4 cup cake flour
1/2 teaspoon salt
1 1/2 teaspoons baking powder
1/2 teaspoon baking soda
4 tablespoons cold butter
2/3 cups buttermilk
Glaze:
1 tablespoon buttermilk, cream, or milk
1 tablespoon sugar
Garnish:
2 tablespoons raw sugar crystals, for sprinkling on top
Place rack in the center of the oven and preheat to 400 degrees. Use a 9 or 10-inch pie plate or a 1 1/2 quart (8 x 8 square) oven-proof baking dish.
Place prepared fruit in a large bowl. Add sugars, flours, ginger, extracts, and lemon juice and stir VERY gently so as to not break up the fruit. Set aside while making the biscuit topping.
To make the crust, combine the dry ingredients in a mixing bowl. and stir well to combine. Cut the butter into 8 or 10 pieces and rub into the dry ingredients until the mixture resembles coarse meal. Make a well in the center and add the buttermilk. Stir gently with a fork, being careful not to overwork the dough (or it will become leaden.) Let the dough stand in the bowl for a couple of minutes to let the flours absorb the liquid.
Flour a work surface and turn the dough onto it. Fold the dough over itself 2 or 3 times, until smoother and less sticky. Lightly re-flour the work surface and roll the dough to about 1/4-inch thickness. For circles, using the top of a drinking glass or a round cookie cutter, make about 12 rounds.
Transfer the fruit mixture to the baking dish that has been sprayed with nonstick cooking spray. Place dots of butter over of the filling, then arrange the biscuit rounds on top, slightly overlapping the edges. Brush with glaze, and sprinkle with raw sugar crystals.
Alternatively, you could make a full top crust by rolling the dough out slightly larger than the size of your baking dish. Trim excess dough and flute the edges of the dough at the rim of the dish. Make 4 or 5 (1-inch) slashes in the center of the dough.
Bake for 25-30 minutes, or until the crust is deep golden brown and filling is bubbling gently. (For easy clean-up, you may want to place a sheet of tinfoil on the rack under the baking dish to catch any drips--or use a Silpat or parchment-lined sheet pan under the dish) Cool before serving. Cobbler is best served warm or at room temperature. It can be enjoyed plain or with some whipped cream or a scoop of vanilla (or ginger!) ice cream.
*I think I'd swap out corn starch for the AP flour next time, and I amended the original recipe and my first attempt at it to include three tablespoons of tapioca flour, too. That should fix my runny cobbler!
Friday, July 24, 2009
Summer Product Recommendations
Since I blatantly tried to snatch some money out of the corporate money-grubbers' hands in my last post, I thought I should balance things out with some new product recommendations (or maybe they're just new to me). First off, the item that should be on the top of everyone's grocery list: ICE CREAM! Haagen-Dazs has a new "reserve" flavor called Caramelized Hazelnut Gianduja that is just CRAZY GOOD, especially if you're a fan of Nutella. It's a mild hazelnut-flavored ice cream with a thick ribbon of gianduja (chocolate-hazelnut spread), and the best part, caramelized hazelnuts (toffeed hazelnuts, if you will).
Also, Haagen-Dazs has a new line of ice cream called FIVE, and each flavor has only five ingredients and no additives or preservatives. As another bonus, they have 30% less fat, and though the texture is not quite as decadently creamy as the full-fat version, it isn't enough of a difference that you would feel deprived, especially as the ice cream is so darn tasty! I tried the brown sugar flavor, which was delicious, kind of like the inside of my very favorite See's Candy, the butterscotch square. Or folks from the south might liken it to a type of fudge called penuche. I think it would be delicious paired with many different kinds of baked goods. In addition to the brown sugar flavor, they also have coffee, ginger, milk chocolate, mint, passion fruit, and vanilla bean. I think I'll try the coffee flavor next, but in my head, I am already planning some dessert pairings with the ginger flavor.
Now for a savory recommendation. When I was at Sam's Club yesterday, I was in a snacks-for-dinner mode, as I didn't feel like cooking when I got home. So I splurged on a delicious-sounding dip from Jimmy Buffett's Margaritaville restaurant called Artichoke Jalapeno Garlic Dip. It costs between five and six bucks, but it comes in a very large, party-sized container, and the product itself is very thick with a very spicy kick from a healthy amount of jalapeno pieces that are swirled into it. And I can tell you from personal experience, if you mix a good amount of the dip with a very ripe, mashed avocado, you will have an amazingly zippy guacamole-like dip! And I even have an recommendation for what to put it on...
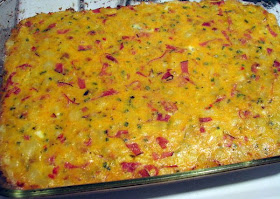
Last weekend, I was rummaging around in the back freezer and found a package of frozen southern-style hash brown potatoes, so I decided to throw together a fairly basic breakfast casserole. I was guided somewhat by a recipe on my friend, Jen's gluten-free blog. I got to know Jen when I was in grad school in Seattle in the very early 90's. She was/is the little sister of one of my dearest friends from college, Kim, and their family lived in my beloved Emerald City. (Of course, I don't call her Jen. I call her "Spike," because long ago, one of those girlie magazines like Glamour or Mademoiselle instructed young ladies to try on a new nickname for some summer fun, so I chose "Spike" for my cute little friend, Jen!) Anyway, flash forward years later...Spike is happily married with a beautiful little girl, and she has not one but TWO blogs--one all about her daughter, Danielle, and one about her struggles to convert to a gluten-free life. And I saw a version of this breakfast casserole on her blog, Feeling Better Gluten-Free. Here's my take on it:
Cheesy Hash Brown Casserole
2 to 4 tablespoons olive oil
1 medium onion, diced small
1 bell pepper, chopped (I used some roasted red peppers from a jar I had in the fridge)
2 lb. bag frozen southern-style hash brown potatoes (thawed a minute or two in the microwave)
6 to 8 oz. deli ham, sliced into thin strips (I used black forest ham)
8 large or 10 small eggs
1/4 cup milk or half-n-half
1 teaspoon salt
1/2 teaspoon black pepper
1/2 teaspoon granulated garlic
good pinch of cayenne (1/4 teaspoon?)
3 cups shredded cheddar cheese (or cheese of your choice)
handful of fresh herbs (1/4 cup?), chopped (parsley, oregano, thyme, basil--your call!)
Grease a 9 x 13 casserole dish* with non-stick cooking spray. Heat olive oil in a large skillet over medium heat, then add the onions and peppers to soften through.** Add the potatoes and saute' until heated through and lightly browned. Dump everything into a very large mixing bowl.
Meanwhile, crack the eggs and whisk them with the milk or cream and the seasonings. Pour the egg mixture over the potatoes and veggies, then mix gently. Stir in the shredded cheese and chopped fresh herbs. Transfer to the greased baking dish. Bake at 375 degrees for 30 minutes until set, puffed, and lightly brown around the edges. Let cool for about ten minutes before serving.
*Yes, a 9 x 13 pan makes a TON, which is perfect for a large family gathering or party. You can halve the recipe, of course, but I have to tell you that it makes great leftovers that can easily be warmed up for quick weekday breakfast. And the very best use for the leftovers is to fill a large tortilla or sandwich wrap with the warmed cheesy and eggy potatoes, top with fresh salsa and a good glob of the guacamole stuff that you made with the Margaritaville dip, and you've got some good breakfast/brunch eats, let me tell ya!
**I planted my garden late, so my summer squash is just coming on, but when it's ready, and overly-abundant, and I'm trying to find new uses for it, I will definitely be shredding or dicing some up and throwing it into this casserole along with the other sauteed veggies!
Tuesday, July 14, 2009
A Chill New Twist on Blue Smoke
So maybe we won't see a real summer in the North Country this year, but that won't stop me from sucking down the cold coffee drinks! Now, no one loves a Starbucks Mocha Frappuccino more than I, but my pocketbook cannot withstand a four-dollar hit every time! So I decided to fashion a homemade version, which not only would be a fraction of the cost, but with wonderful ingredients like my favorite Blue Smoke Coffee, I wagered that I could make something that tasted even better!
I found a few copycat recipes online, and I tried a few of them, but they all used chocolate syrup, which ultimately resulted in too wimpy of a chocolate flavor. I thought I might have some Ghirardelli cocoa in the cupboard to try, but in rooting around, I unearthed some Trader Joe's European-Style Sipping Chocolate. THAT WAS IT! It gave my chilly beverage a darker color and a richer, more complex flavor, though I did end up having to add a little extra sugar. My friends, I kid you not, you won't BELIEVE how delicious this drink is! And are you ready for the costs savings? According to an online recipe cost calculator that I used, I can make two "grande" mocha frappuccinos (or because I'm using my beloved Blue Smoke Coffee, I'm calling them Frozen Smok-accinos!) for about $1.80 for BOTH, which is less than a QUARTER of the Starbucks price! WHOO-HOO! You can thank me now....I'll wait.
(Photo Credit: Kevin Price --->)
Frozen Smok-accinos
1 cup double-strength Blue Smoke Appalachia blend*, brewed then chilled
3/4 cup half-n-half
3 tablespoons high-quality sipping chocolate (like Trader Joe's**)
3 tablespoons sugar (or to taste)
1/2 teaspoon vanilla (optional)
12 standard-sized ice cubes
Add everything except the ice to a blender and mix until the sugar and cocoa powder are fully dissolved. Add the ice cubes and blend until the ice is completely pulverized and the mixture is smooth. You may garnish with whipped cream, if you insist, but you needn't gild the proverbial lily. Makes two decadent frozen treats!
*You can substitute your favorite medium-roast coffee, but I love Blue Smoke's Appalachia for this, as it has complimentary notes of chocolate and spice! You could also try a darker roast (like my very favorite, Blue Smoke's Canopy) at one-and-a-half strength, or an espresso roast (like Blue Smoke's Crossroads) at regular strength.
**If you don't have access to a Trader Joe's, subsitute any high-quality, European-style sipping chocolate. I might also try Ghirardelli's Double Chocolate Hot Cocoa Mix or maybe even their Sweet Ground Chocolate and Cocoa, though I'm sure you'd have to add more sugar in that case. (For my local peeps, the Ghirardelli products can be found at Hannaford.)
Monday, July 13, 2009
The Land That Summer Forgot
As I sit here typing, the Weather Channel feature on my desktop tells me that it is 53 degrees (and dropping) on July 13th! Not that I'm complaining, mind you. Unseasonably mild weather suits me just fine! (Though the effect on my vegetable garden that I put in a month late...well...that may be another story!) It's also nice to be teaching the second summer session and not sweltering through the long class periods with only a wimpy window unit to provide a small modicum of relief.
Though the weather suggests spring rather than summer, still, the people must GRILL! Unfortunately, sometimes I'm having to dash out back between downpours to barbecue. So some quick grilling recipes seem in order, especially for easy weeknight dinners. How about this for an ethnically eclectic menu--an Asian-infused entree, a Tex-Mex side dish, and for dessert, classic Americana! OH YEAH! And though these are really flavorful dishes, they are all quick and easy, employing some helpful shortcuts.
Teriyaki Salmon Burgers with Lime-Ginger Aioli on Crispy Grilled Buns
I know I should have made my own (fresh) salmon burgers, but I bought frozen ones at Sam's Club (gasp!).
This recipe makes four burgers.
Teriyaki Marinade:
2/3 cup soy sauce
1/4 cup honey
2 teaspoons sriracha (red chile paste)
Whisk together the soy sauce, honey and sriracha. Marinate the (frozen) burgers in the soy mixture for 10 or 15 minutes.* In the meantime, thinly slice some red onion, thickly slice an avocado (or two) and toss it with a little lime juice to keep it from browning, and slice four bakery buns in half.
Lime-Ginger Aioli:
1/2 cup mayonnaise
1 tablespoon lime juice
4 cloves minced garlic (normal people might prefer just two cloves!)
1 inch fresh ginger, peeled and finely-grated
Grill the salmon burgers for about four minutes on each side, basting with the teriyaki glaze every so often. Toast the buns on the rack above until they are brown and crisp. To assemble, spread the bottom bun with aioli and add some red onion slivers, then the grilled salmon patty on top of that, then several slices of avocado, then the top bun, also spread liberally with aioli. SO YUMMY!
*This recipe is also delicious using boneless/skinless chicken breasts instead of salmon patties, but you'll need to marinate longer--at least two hours or, preferably, overnight.
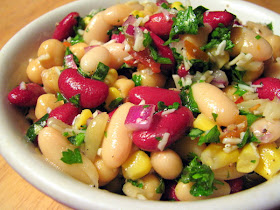
Pecos Bean Salad
(Source: adapted from "Whole Food Chef" via ifood.tv)
4 cups cooked beans (pinto, kidney, garbanzo, or mixed beans--I used one 15 oz. can each dark red kidneys, cannellini, and garbanzos)
1 onion, sliced thinly
4 cloves garlic, crushed
1 green pepper, sliced (I used a couple of roasted red peppers from a jar instead)
2/3 cup oil (I used olive oil)
1/2 cup cider vinegar or lemon juice (I used cider vinegar this time)
2 teaspoons sea salt (I used kosher salt)
*I also added about a cup of (drained) canned corn because I had some leftover in the fridge, and about 1/4 cup of chopped, fresh parsley.
Place the (drained) beans in a bowl. Add the onion, garlic, pepper, oil, vinegar, and salt (and corn and parsley, if using). Toss the ingredients together and allow the beans to marinate at room temperature for one hour. Toss again and serve.
Ok, so we have our entree and side dish. Now we need a sweet finish. While strawberry season may be over or drawing to a close in other parts of the country, ours has only been in full swing for about two weeks. I have a few plants stuck in here and there throughout my herb garden that have yielded a few handfuls of lovely berries in this, their first year of bearing fruit. (The berries pictured above are from my own garden.) But I have also had to resort to picking more at Rulf's, one of my favorite local orchards and farmstands. And it's a great year for picking-your-own, as the weather is so pleasant (when it's not raining, that is)! My absolute favorite way to enjoy the summery berries is to make strawberry-buttermilk ice cream, which has such a wonderful interplay of sweetness and tanginess. It's so easy, and it's the perfect dessert to accompany meals from the grill in the warmer months...even if your months aren't all that warm!
Strawberry-Buttermilk Ice Cream
1 pint ripe strawberries
1 (generous!) cup of sugar
juice of half a lemon
1 teaspoon vanilla
pinch of salt
2 cups heavy cream
1 cup buttermilk (preferably REAL buttermilk!)
Rinse, hull, and mash the strawberries. (I like to puree them in the food processor and then strain them to get rid of most of the seeds, but if you don't mind them, skip this step.) Whisk in the sugar, lemon juice, vanilla, and salt. When the sugar is fully dissolved, gently stir in the cream and buttermilk.
Pour the mixture into the canister of an ice cream maker and churn according to the manufacturer's instructions. When the ice cream has reached a soft serve consistency, you can eat it right away, but I prefer to transfer it to another container and harden in the freezer for a few hours. Either way, it's SO GOOD!
*Here's a tip to preserve these perfectly ripe berries for future batches of ice cream. While you're hulling and mashing and straining, you might as well do a quart instead of a pint, and freeze the extra half of the strawberry puree that has been mixed with a cup of sugar and the juice from the other half of the lemon. Then when you're ready to make more ice cream, you can thaw the fruit mixture and add it to the other ingredients which are available year-round. Clever, eh?
Tuesday, July 07, 2009
"Hello in there!": Treats for the Unborn
This is my friend and colleague, Willow, with her cutie-patootie little daughter. Willow works in Continuing Education at the college where I teach, and she is also approximately 15 months' pregnant with her second child and no delivery in sight. Ok, just kidding. Her sonogram suggests that she may have a few more days before she's actually due, but people at work have really been giving her the business about baby #2 taking his/her own sweet time coming. Rather than goading the poor mother into labor, I decided to take a different approach: I would woo the baby with sweets!
I happen to know that Willow LOVES homemade pie, and her favorite variety is raspberry. So instead of giving her a traditional baby shower gift, I chose to shower mama and baby on the inside. Tee hee. Here is the raspberry pie that I made for Willow and her family. It's still too early for fresh raspberries here, but a couple of bags of frozen berries (Wyman's) served the purpose quite well. Of course, when the fresh summer berries are ripe, this pie would be even more fabulous!
Raspberry Pie
1 recipe pastry for 9-inch double-crust pie
1 quart fresh raspberries (or two 12 oz. bags Wyman's frozen raspberries)
1 cup granulated sugar
2 tablespoons cornstarch
2 tablespoons tapioca flour (or quick-cooking tapioca ground in a food processor)
1 tablespoon fresh lemon juice
1 teaspoon vanilla
pinch of salt
2 tablespoons butter
1 small egg
1 tablespoon heavy cream
Mix together raspberries, sugar, cornstarch, tapioca, lemon juice, vanilla and salt. Set aside for fifteen minutes or so to let the filling get juicy (and to let the berries thaw a bit if using frozen).
Put berry mixture in bottom crust, and scatter bits of butter (2 T) on top. Position the top crust and crimp the edges. Make slits or cut-outs in the crust to allow the steam to escape. (Or form a lattice top as I did instead.) Whisk together the egg and cream and brush the top pie crust with the egg wash (optional).
Bake at 425 degrees F for 15 minutes. Reduce heat to 350 degrees F, cover the edges with a pie shield, and bake for 45 minutes to an hour more, until the filling bubbles in the very center. Let the pie cool for at least two hours to let the filling set before cutting and serving.
I made this pie for Willow and baby during the last week of June, but apparently, it did not do the trick, as it is about two weeks later, and she's still pregnant! So today, I had to bring out the big guns--CHOCOLATE! I saw an enticing recipe on my pal, Anna's blog recently for chocolate brownie scones, and I have been dreaming about them ever since. The recipe makes eight huge scones, which is more temptation than one person should have lingering around her kitchen! So I decided to treat not only Willow, but her very good friend, Meg, another dear colleague of ours in the Alumni Foundation Office at work who is also expecting (but not yet so GREAT with child like Willow!). Meg reported that the chocolatey goodness of the scone made her wee fetus do cartwheels inside her tummy, and we can only hope that Willow's baby will be lured out by the promise of more chocolate treats that the outside world has to offer!
These scones are really delicious--a bit crisp around the edges, so moist and tender inside, and deeply chocolatey (well worth the splurge to use high-quality chocolate and cocoa here). I only made one small change to the recipe, as I realized too late that I only had three ounces of unsweetened chocolate on hand. So I added an extra tablespoon of cocoa powder and an extra tablespoon of butter, and it worked out just fine. Though I might consider making one more change to the recipe when I make them again. I wasn't crazy about the strong flavor of molasses in the finished scones which seemed to compete with the chocolate (although it did mellow a bit over time). So I might either use light-flavored molasses or even dark (Karo) corn syrup instead. Nevertheless, these scones ROCKED, and as a bonus, they came together in no time. I actually made these this morning before work, which I can rarely pull off. But they were fast and easy, and oh-so-YUMMY! Maybe you have some pregnant friends or co-workers who need a little chocolate love right about now?
Chocolate Brownie Scones
(Source: Nicole Rees, Baking Unplugged via Cookie Madness)
4 ounces unsweetened chocolate, coarsely chopped (oops, I forgot to chop mine!)
1 cup all-purpose flour
1 cup cake flour
2/3 cup granulated sugar
1/4 cup unsweetened cocoa powder (I used half Scharffenberger and half Hershey's Special Dark)
1 tablespoon baking powder
3/8 teaspoon salt
7 tablespoons cold unsalted butter, diced
1 large egg
1/3 cup plus 2 tablespoons heavy whipping cream, divided
2 tablespoons molasses
1 teaspoon vanilla
3.5 ounces semi- or bittersweet chocolate, finely chopped or 2/3 cup chocolate chips (I used bittersweet Ghiradelli chips, but I chopped them up a bit)
Sugar for sprinkling (I used Sugar in the Raw/demerara sugar--nuts would be another option)
Preheat oven to 375 degrees F. and line a cookie sheet with parchment paper or a Silpat. Melt the 4 oz unsweetened chocolate in microwave or in a small bowl set over barely simmering water; set aside.
Combine both flours, sugar, cocoa powder, baking powder, and salt in bowl of food processor and pulse to combine. Add butter and pulse until mixture is a coarse meal. Dump into a mixing bowl.
Whisk 1/3 cup of the cream, molasses, egg, vanilla, and melted unsweetened chocolate together in another bowl. Pour over the flour mixture. Mix until everything starts to come together. There will be flecks of unmixed flour mixture here and there, but don’t overwork the dough by trying to mix them all the way in. At this point, mix in the bittersweet chocolate (chips).
Turn dough onto a lightly floured or parchment lined surface, knead quickly to bring the dough together, then divide in half. Shape each half into a 5 inch 1 1/2-inch thick square. Cut each square into four triangles. Carefully move the triangles to the baking sheet, placing them at least an inch apart. Brush with reserved whipping cream and sprinkle with sugar. Bake for 14-16 minutes. Cool at least three minutes on the baking sheet, and then cool thre to four additional minutes on a rack.
Makes 8 large scones.