There has been this Tip Hero video going around Facebook for a caramel and chocolate-drizzled popcorn that looked so easy and so good, that I just had to try and make it myself. Actually, I made it for some friends for a post-holiday get-together and gift exchange, and now I think I might make it every year! It would certainly be perfect for a treat for my work colleagues...or just for ME! Mwa-ha-ha!
Holiday Popcorn
(Source: Tip Hero)
To make the popcorn:
2/3 cup popcorn kernels
1/3 cup vegetable oil (or 6
T)
1. Heat the oil in a large pot with a lid over med heat. Add three or four of
the kernels to the pot and put the lid on.
2. When they pop, add the rest of
the popcorn kernels and put the lid on again. Immediately remove the pot from
the heat for 30 seconds. (This is to ensure the kernels are all about the same
temperature so that they will pop almost at the same time).
3. Put the
popcorn back on the burner, shaking the pot back and forth. It should take about
two minutes for the popcorn to pop without burning or leaving too many spare
kernels. When it takes several seconds between pops, it’s ready.
4.
Immediately pour into a large bowl and cool to room temperature. This should
make about 12 cups of popped popcorn.
To make the caramel corn:
12 cups
popped popcorn
2 cups almonds (also good: peanuts, hazelnuts, cashews)
1
cup firmly packed brown sugar
3/4 cup (6 oz) salted butter
1/2 cup light corn
syrup
1 teaspoon baking soda
1 cup 60% chocolate chips
2 teaspoon vegetable oil
1.
Heat the oven to 250F.
2. Once the popcorn is made, combine the following
ingredients in a medium saucepan over medium heat: brown sugar, butter and corn
syrup. Stir while the butter and sugar melt together and let the mixture come to
a boil, about eight minutes, then let it boil for two minutes.
3. Stir in the baking
soda and remove the pan from the burner.
4. Put the popcorn and the nuts in a
large bowl and pour the sauce over and mix well. Line two half-sheet pans with
foil and spray with non-stick spray. Divide the popcorn mixture between the two
trays.
5. Bake 60 minutes, stirring each pan every 15 minutes. Remove from
the oven.
6. Put the choc chips and vegetable oil in a bowl or microwave-safe
measuring cup and microwave 50% power two to three minutes, stirring every 45 sec or so,
until completely melted.
7. Drizzle the chocolate evenly over the caramel
corn on both pans. Let the pans sit at room temperature for three to four hours while the
caramel corn cools down and the chocolate sets, then break apart into clusters.
"At that time, Antony Fortuny still suspected that part of the boy's mental deficiencies were due to his diet, which was far too influenced by his mother's French cooking. It was a well-known fact that the richness of buttery foods led to moral ruin and confusion of the intellect." --The Shadow of the Wind, Carlos Ruiz Zafon
Showing posts with label homemade gifts. Show all posts
Monday, December 28, 2015
Tuesday, December 30, 2014
A Staggered, Ongoing Christmas...
I had SUCH a busy semester, that I feel like I'm still constantly behind on everything and always playing catch up. So here we are, looking at New Year's, and I'm not even finished with Christmas gifts yet! I have a whole bunch of friends--both local and distant--who have yet to receive holiday treats from me. And I didn't even take cookies to the neighbors like I have done every year since moving here. *sigh* Well, thank goodness that there are 12 days of Christmas! I pray I'll be finished by Epiphany.
To celebrate my friends at karaoke last night, I made a huge bucket of very special snack mix to take a share. It's based on a recipe from Bon Appetit, but I had to make some substitutions based on the ingredients that I could find locally. For example the recipe called for small whole wheat circles, but who can find such a thing in this town? Also, I could only find Wasabi peas which the recipe warned against, so I swapped out those pea pod crisp thingies. I used mostly cashews instead of peanuts (personal preference), and since I could only find Terra Chips and not Terra Stix, I swapped out veggie straws. But those are basically colored Styrofoam, so next time, I will use the Terra Chips or try to find the Stix in Burlington or order them online.
BA Party Mix
4 cups Bugles (original flavor)
Melt butter in a small saucepan over low heat. Add garlic and gently cook to infuse butter, about five minutes. Strain into a small bowl, pressing to extract garlic juices; discard garlic. Stir in Worcestershire, Dijon mustard, mustard powder, salt, paprika, and pepper. Pour over mixture in bowl and gently toss to coat.
DO AHEAD: Can be made 1 week ahead. Store airtight at room temperature.
Update (1/1/15): My friends liked this mix so much, that I actually made a third batch! This time, I used mixed nuts and Terra Chips, which added great pops of color. I also pureed the garlic in the butter and added it to the marinade instead of straining it out (NEVER TOO MUCH GARLIC!), and I added the veggie stix (I had a bag left over) to the mix before baking so they soaked up some of the marinade and acually tasted like something in the end. Lastly, I added a big squeeze of sriracha to the marinade to give the snack mix a bit of a kick. These were definite improvements that I would repeat.
In addition to baggies of the special snack mix, I wanted to make mini loaves of the most awesome banana nut bread in Christendom to take to some of my friends at trivia tonight. But I couldn't find any disposable loaf pans at the store. I was perusing the holiday clearance aisles when I spotted some cute silicone baking molds in the shape of little Christmas village houses and churches--and they were 50% off! (There are some perks of procrastinating on your Christmas baking.) Aren't these little cakes just PRECIOUS, especially after a snowstorm of powdered sugar??
To celebrate my friends at karaoke last night, I made a huge bucket of very special snack mix to take a share. It's based on a recipe from Bon Appetit, but I had to make some substitutions based on the ingredients that I could find locally. For example the recipe called for small whole wheat circles, but who can find such a thing in this town? Also, I could only find Wasabi peas which the recipe warned against, so I swapped out those pea pod crisp thingies. I used mostly cashews instead of peanuts (personal preference), and since I could only find Terra Chips and not Terra Stix, I swapped out veggie straws. But those are basically colored Styrofoam, so next time, I will use the Terra Chips or try to find the Stix in Burlington or order them online.
BA Party Mix
(Source: Bon Appetit)
Yield: 12 cups
Yield: 12 cups
4 cups Bugles (original flavor)
3 cups whole wheat sesame pretzel rounds or other small pretzels
2 cups roasted unsalted peanuts
1 cup raw shelled pumpkin seeds (pepitas)
1 cup store-bought roasted green peas (not wasabi flavor)
6 tablespoons (3/4 stick) unsalted butter
12 large garlic cloves, crushed
2 tablespoonsWorchestershire sauce
1 tablespoon Dijon mustard
1/2 teaspoon English mustard powder
1/2 teaspoon kosher salt
1/2 teaspoon paprika plus more for sprinkling
1/8 teaspoon freshly ground black pepper
3 cups Terra Stix
Preheat oven to 250°. Combine the first 5 ingredients in a large bowl. Set
aside.
Melt butter in a small saucepan over low heat. Add garlic and gently cook to infuse butter, about five minutes. Strain into a small bowl, pressing to extract garlic juices; discard garlic. Stir in Worcestershire, Dijon mustard, mustard powder, salt, paprika, and pepper. Pour over mixture in bowl and gently toss to coat.
Divide mixture between 2 baking sheets and spread in an even
layer. Bake, stirring every 15 minutes, until dry and toasted, about 1 hour.
Sprinkle mixture with a few pinches of paprika. Toss and let cool completely on
baking sheets (party mix will become crispy as it cools).
Transfer party mix to a large bowl. Add Terra Stix and toss to mix well.
DO AHEAD: Can be made 1 week ahead. Store airtight at room temperature.
Update (1/1/15): My friends liked this mix so much, that I actually made a third batch! This time, I used mixed nuts and Terra Chips, which added great pops of color. I also pureed the garlic in the butter and added it to the marinade instead of straining it out (NEVER TOO MUCH GARLIC!), and I added the veggie stix (I had a bag left over) to the mix before baking so they soaked up some of the marinade and acually tasted like something in the end. Lastly, I added a big squeeze of sriracha to the marinade to give the snack mix a bit of a kick. These were definite improvements that I would repeat.
In addition to baggies of the special snack mix, I wanted to make mini loaves of the most awesome banana nut bread in Christendom to take to some of my friends at trivia tonight. But I couldn't find any disposable loaf pans at the store. I was perusing the holiday clearance aisles when I spotted some cute silicone baking molds in the shape of little Christmas village houses and churches--and they were 50% off! (There are some perks of procrastinating on your Christmas baking.) Aren't these little cakes just PRECIOUS, especially after a snowstorm of powdered sugar??
Thursday, December 25, 2014
Christmas Karaoke and Cookies
This year has had its ups and downs with more than our fair share of downs, I would say. One of the pervasive issues has been my roommate's almost constant illness for which, after countless tests, the doctors still can't form an apt diagnosis nor an effective treatment plan. As she is often down for the count, that leaves me on my own a lot, and as a very gregarious and highly extroverted person, that is a real bummer.
So last summer, I auditioned for a musical revue at the college where I teach and made friends with lots of people in the large cast. I started going to karaoke with them one or even two nights a week, and then this semester, I performed with most of the same gang in Legally Blonde the Musical, which was a BLAST! Though I've had some tough times this year, the best and happiest moments have had one common denominator: I spent them with these amazing theatre geeks that welcomed me into their strange little family of friends, even though I am the decrepit old lady of the group. (Tee hee.)
Sadly, Cyd was sick again today, so I spent Christmas in the kitchen alone, baking cookies while listening to the Into the Woods soundtrack. But later, I will join my theatre pals to see Into the Woods, and then attend a special Christmas karaoke night. To show my appreciation to my friends for accepting me into their crazy gang, I wanted to make festive packages of homemade cookies for them. I could have made something very fancy, but I recently participated in a discussion on Facebook, and when asked to name their favorite Christmas cookie, almost everyone in the thread mention the same one, though by many different names: Mexican Wedding Cookies, Russian Tea Cakes, Butternuts/Butterballs, Polvorones, or Snowballs. So that's what I decided to make...with much love to friends at the holiday season.
Snowball Cookies
1 cup butter, softened
2/3 cup powdered sugar
1/4 teaspoon salt
2 teaspoons vanilla extract
3 tablespoon cornstarch
2 cups all-purpose flour
1/2 cup finely chopped pecans (I used a whole cup)
1 1/2 - 2 cups powdered sugar, for coating
So last summer, I auditioned for a musical revue at the college where I teach and made friends with lots of people in the large cast. I started going to karaoke with them one or even two nights a week, and then this semester, I performed with most of the same gang in Legally Blonde the Musical, which was a BLAST! Though I've had some tough times this year, the best and happiest moments have had one common denominator: I spent them with these amazing theatre geeks that welcomed me into their strange little family of friends, even though I am the decrepit old lady of the group. (Tee hee.)
Sadly, Cyd was sick again today, so I spent Christmas in the kitchen alone, baking cookies while listening to the Into the Woods soundtrack. But later, I will join my theatre pals to see Into the Woods, and then attend a special Christmas karaoke night. To show my appreciation to my friends for accepting me into their crazy gang, I wanted to make festive packages of homemade cookies for them. I could have made something very fancy, but I recently participated in a discussion on Facebook, and when asked to name their favorite Christmas cookie, almost everyone in the thread mention the same one, though by many different names: Mexican Wedding Cookies, Russian Tea Cakes, Butternuts/Butterballs, Polvorones, or Snowballs. So that's what I decided to make...with much love to friends at the holiday season.
Snowball Cookies
Source: Cooking Classy
Yield: 2 1/2 dozen (I only got about two dozen)
1 cup butter, softened
2/3 cup powdered sugar
1/4 teaspoon salt
2 teaspoons vanilla extract
3 tablespoon cornstarch
2 cups all-purpose flour
1/2 cup finely chopped pecans (I used a whole cup)
1 1/2 - 2 cups powdered sugar, for coating
Preheat oven to 350 degrees. In the bowl of an electric stand mixer fitted
with the paddle attachment, mix butter on medium speed until creamy, about 20
seconds. Blend in 2/3 cup powdered sugar and salt. Mix in vanilla. Sprinkle
cornstarch over mixture (just so it doesn't blend into one area), then with mixer
set on low speed slowly add in flour and mix just until combine. Stir in pecans.
Scoop dough out one tablespoon at a time and roll into a ball, then place balls on
Silpat or parchment paper lined baking sheets and bake in preheated oven for 15-17 minutes, until bottom edges are lightly golden (don't underbake these). Remove from oven and allow to cool several minutes then
while cookies are still warm, pour two cups powdered sugar into a bowl and roll
cookies in powdered sugar. Transfer to a wire rack to cool then once cookies are
cool, roll in powdered sugar once more, this time to generously coat. Store cookies in an
airtight container.
Friday, December 20, 2013
In which I create blackberry beer jam...
Back in September at a meeting of my book club, I sampled some blackberry beer jam that a friend acquired at a microbrew festival in Quebec. When I mentioned the jam in passing online, my beer connoisseur and brewmaster friend, Mike, got all excited and wanted to try some. So I thought I might buy a couple of jars for him as a Christmas gift. But it's not available online, and even a trip to the Unibroue Brewery in Chambly, QC proved, err, fruitless. So I thought, fine then, I'll make my own dang blackberry beer jam! How hard could it be? Well...it was a bit of a challenge, mostly because I searched the entire internet for a recipe that I could use or at least follow somewhat closely and modify, but I couldn't find much. Was this a bad sign? Is the sweet pairing of berries and beer that uncommon and far-fetched?
As it turns out, I ended up morphing together a recipe for rhubarb beer jam (yes, that's a thing) and a methodology for making seedless blackberry jam without commercial pectin, and I was shocked that my Franken-jam actually turned out GREAT! It was delicous, and it set up perfectly using natural pectin from green apples. I ended up with 14 half-pint jars of the stuff, and I mailed quite a few of those all over the country for friends at Christmas who were enticed by just the idea of blackberry beer jam, and by some of the pictures that posted on Facebook, no doubt. I used frozen fruit at this time of year, of course, but I can't wait to try this again next summer when the local berries are ripe, and maybe make a raspberry beer jam, too!
I recommend making this jam over two days to split up the work and spare the cook, and also to enhance the flavors. I completed Phases I and II of Operation Blackberry Beer Jam in one evening session. Last night, I crushed four pounds of blackberries with a potato masher and cooked them with five cups of chopped Granny Smith apples (cores, seeds, peels and all) in three pints (four cans) of Long Trail Blackberry Wheat Beer for about 25 minutes until soft and pulpy. I pressed all of this through a fine mesh sieve, removing most of the seeds and skins. To the resulting ten cups of puree, I added an equal amount of sugar (I might cut this down to 75% next time), two split vanilla beans, and the zest and juice of three lemons.
At that point, I put the whole pot in the fridge and let it macerate overnight. Then today, I cooked it down until it reached 220 degrees (and passed the frozen plate test*), and then I jarred it up, processed it in a boiling water bath for ten minutes, and prayed that it would set without commercial pectin. And it did! YAY! I swear, I may have to go into business selling this stuff--it's a hot commodity!
*When you start cooking your jam, put a small glass plate in the freezer. Once the jam hits 220 degrees on a candy thermometer, place a teaspoonful on the frozen plate, let it cool for a minute, and then press it a bit gently with your fingertip. If it wrinkles, you're good to go. Alternately, run your fingertip through the middle of the jam, and if the furrow stays clear and the two halves of the jam don't run back together, you're good to go. If not, keep cooking the jam another five minutes and try the test(s) again.
LOOK at the gorgeous color of that purée!
I got 14 jars--PLENTY to share with friends as tasty little Christmas gifts!
Clinging to the spoon as it cooled--a PERFECT set!
As it turns out, I ended up morphing together a recipe for rhubarb beer jam (yes, that's a thing) and a methodology for making seedless blackberry jam without commercial pectin, and I was shocked that my Franken-jam actually turned out GREAT! It was delicous, and it set up perfectly using natural pectin from green apples. I ended up with 14 half-pint jars of the stuff, and I mailed quite a few of those all over the country for friends at Christmas who were enticed by just the idea of blackberry beer jam, and by some of the pictures that posted on Facebook, no doubt. I used frozen fruit at this time of year, of course, but I can't wait to try this again next summer when the local berries are ripe, and maybe make a raspberry beer jam, too!
I recommend making this jam over two days to split up the work and spare the cook, and also to enhance the flavors. I completed Phases I and II of Operation Blackberry Beer Jam in one evening session. Last night, I crushed four pounds of blackberries with a potato masher and cooked them with five cups of chopped Granny Smith apples (cores, seeds, peels and all) in three pints (four cans) of Long Trail Blackberry Wheat Beer for about 25 minutes until soft and pulpy. I pressed all of this through a fine mesh sieve, removing most of the seeds and skins. To the resulting ten cups of puree, I added an equal amount of sugar (I might cut this down to 75% next time), two split vanilla beans, and the zest and juice of three lemons.
At that point, I put the whole pot in the fridge and let it macerate overnight. Then today, I cooked it down until it reached 220 degrees (and passed the frozen plate test*), and then I jarred it up, processed it in a boiling water bath for ten minutes, and prayed that it would set without commercial pectin. And it did! YAY! I swear, I may have to go into business selling this stuff--it's a hot commodity!
*When you start cooking your jam, put a small glass plate in the freezer. Once the jam hits 220 degrees on a candy thermometer, place a teaspoonful on the frozen plate, let it cool for a minute, and then press it a bit gently with your fingertip. If it wrinkles, you're good to go. Alternately, run your fingertip through the middle of the jam, and if the furrow stays clear and the two halves of the jam don't run back together, you're good to go. If not, keep cooking the jam another five minutes and try the test(s) again.
LOOK at the gorgeous color of that purée!
I got 14 jars--PLENTY to share with friends as tasty little Christmas gifts!
Clinging to the spoon as it cooled--a PERFECT set!
Wednesday, December 18, 2013
Cookie Party 2013: Christmas in Tuscany

How AMAZING is this wreath made of rosemary branches topped with a olive medley and marinated sundried tomatoes? So clever!
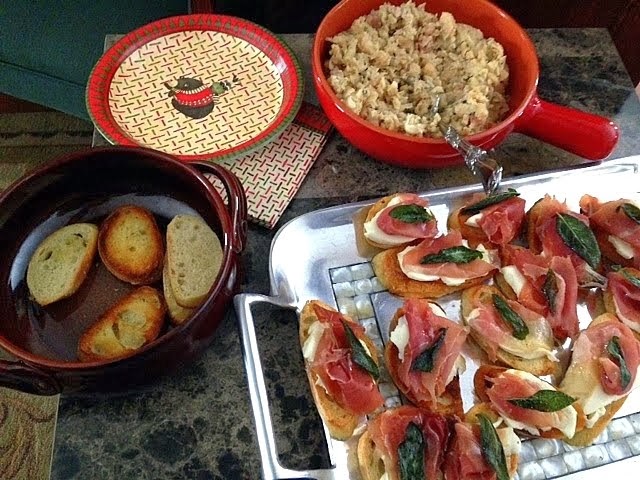
Appetizers: White bean and pancetta spread on crostini and more crostini stopped with fresh mozzarella, prosciutto and fried sage. YUM!
The lovely luncheon tablescape.
The place settings--a tiny crock of homemade cinnamon honey butter made with Amish
butter from Pennsylvania. Domenica said, "Like Texas Roadhouse, but BETTER!" Ha ha.
The main entrée was the world's BEST chicken and dumplings, or rather, homemade ricotta gnocchi that were light as a feather! I will have to make this delectable dish for myself at home. But in the meantime, here's the link to the recipe in Bon Appétit.

As if the cookies weren't enough, Domenica baked a showstopping dessert: An Italian cream cake filled with fresh orange curd and topped with toasted coconut and candied pecans. WOW!
THE COOKIES! (Thank you, Google, for the holiday "auto awesome" twinkle effect. Tee hee.)
As for my contribution to the festive exchange, I made Almond Roca Cookies. Apparently, Emeril had a cookie contest one year, and Lynn Scully of Rancho Sante Fe, CA was the winner. Well, I can tell you, these cookies are big winners! They look really fancy, but they are very simple, and I banged out six dozen of these bad boys in no time flat.
I only made one substantive change to the recipe. It calls for coarse ground almonds, so when I went to the store for ingredients, I bought almond meal or flour. Then when I looked at the pictures more carefully, I could see that they meant sliced almonds that you chop up further (I used a pastry cutter) in which to roll the dough. But I already had the almond meal, so I decided to use it, swapping out one cup of the AP flour. Then I doubled the baking soda to one teaspoon, as the nut flour is heavier than wheat flour. The cookies turned out nutty and crispy and absolutely delicious!
Oh, and I ran out of milk chocolate for drizzling at the end, so I did the last few with bittersweet, and though I am usually a fan of the darker chocolate, milk is the way to go to make these cookies taste similar to Almond Roca. However, my roommate and chief taster preferred the ones with bittersweet chocolate. So you do as your heart leads. ;-)
Almond Roca Cookies
(Source: adapted from The Cooking Channel)
2 1/2 cups all-purpose flour (I swapped out one cup of almond meal/flour)
1/2 teaspoon baking soda (increase this to one teaspoon if using almond meal/flour)
1/4 teaspoon salt
1 cup dark brown sugar
1/2 cup sugar
1 cup butter, room temperature
2 eggs, room temperature
2 teaspoons pure vanilla extract
1 package toffee bits (I used the English toffee bits with milk chocolate)
1 cup coarsely ground almonds (I used sliced almonds that I broke up more with a pastry cutter)
4 ounces milk chocolate
1/2 tablespoon vegetable oil
1/2 teaspoon baking soda (increase this to one teaspoon if using almond meal/flour)
1/4 teaspoon salt
1 cup dark brown sugar
1/2 cup sugar
1 cup butter, room temperature
2 eggs, room temperature
2 teaspoons pure vanilla extract
1 package toffee bits (I used the English toffee bits with milk chocolate)
1 cup coarsely ground almonds (I used sliced almonds that I broke up more with a pastry cutter)
4 ounces milk chocolate
1/2 tablespoon vegetable oil
Preheat oven to 300 degrees F.
In a medium mixing bowl, whisk together flour(s), baking soda, and salt. Set aside. In the bowl of an electric mixer, blend sugars together on medium speed. Add butter and mix to form a grainy paste. Add eggs and vanilla and mix at medium speed until light and fluffy. At low speed, slowly add the flour mixture and then the toffee bits. Mix until just blended; do not over-mix.
Place ground nuts in a small bowl. Using hands, roll balls of dough into 1 to 1 1/2-inch balls, then roll in the ground nuts. Place on cookie sheets several inches apart. Bake approximately 22 minutes and then transfer cookies to a cooling rack.
Melt the chocolate with the vegetable oil in a double boiler or in a bowl set over a pan of simmering water. Drizzle melted chocolate over cooled cookies. Place cookies on a cookie sheet and place in freezer or refrigerator until chocolate is firmly set.
Thursday, January 03, 2013
Might be taking that 12 Days of Christmas thing a bit too seriously...
One would assume that all the holiday baking est fini, n'est-ce pas? AU CONTRAIRE, mon frère! The lady who won one of my silent auction prizes at a benefit concert back in September is having a game night or card party or some such tonight, and she ordered small platters of sweet treats for the event. She specifically asked for those pretzel Rolo treats that are (aside from unwrapping all of the Rolos) super-easy and quite yummy--especially when topped with a cinnamon almond. Then I also made this white chocolate peanut butter krispie candy from a recipe I found on Pinterest, and lastly, the Pioneer Woman's minty brownie bites. Initial taste-testing proved more than satisfactory (tee hee), but I hope the party hostess agrees.
For the pretzel Rolo treats, you simply unwrap some Rolo candies, place them on top of small pretzels, and bake in a 300-degree oven for three or four minutes, until the Rolo is soft but not melting to the point of losing its shape (yes, I realize that I screwed up that part on mine...oh well). Then remove them from the oven and immediately place a toasted pecan (or in my case, a cinnamon almond!) on top of the Rolo and press down lightly. Let the treats cool, and that's it! At Christmas, you might also choose to use red and green M and M's for the tops of the treats. Use your imagination!
White Chocolate Peanut Butter Krispie Candy
(Source: Plain Chicken, via Pinterest)
2 cups Rice Krispies cereal
2 cups dry roasted peanuts
2 cups miniature marshmallows
1 cup peanut butter
2 pounds white chocolate chips (2 12-oz packages plus 1 1/3 cups)
In a large bowl, combine cereal, peanuts and marshmallows. In a microwave-safe bowl, melt chocolate and peanut butter on High for 1 minute and then in 30 second intervals until fully melted. Stir chocolate into cereal mixture. Mixture will be slightly runny. Drop by tablespoons onto waxed paper. Let set until firm, 2 hours. Store in an airtight container.
Pioneer Woman's Chocolate Mint Brownie Bites
(Source: The Pioneer Woman Cooks!)
50 whole Andes Mints, unwrapped
1 stick (1/2 cup) butter, softened
1 cup sugar
2 ounces unsweetened chocolate
2 whole eggs
3/4 cups all-purpose flour
1/4 teaspoon mint extract
1 tablespoon butter
1 ounce bittersweet chocolate, chopped finely*
Preheat oven to 325 degrees. Spray mini muffin pan generously with baking spray. Melt unsweetened chocolate in a bowl in the microwave. Remove from microwave and stir in 8 Andes mints until all melted. Let cool slightly.
In a mixer with the paddle attachment, cream one stick of butter and sugar. Beat in eggs one at a time. With the mixer on low, drizzle in the cooled chocolate mixture slowly, mixing until it's combined. Add flour and mix thoroughly. Scrape the sides of the bowl with a rubber spatula, add mint extract, then mix again.
Using a tablespoon or cookie scoop, scoop batter into mini muffin tins. Bake until done, about 13 to 15 minutes. Turn upside down out of pan and allow to cool.
Combine 25 unwrapped Andes mints in a bowl with the tablespoon of butter and chopped bittersweet chocolate. Microwave and stir until melted and smooth. Dip the brownie bites in the chocolate, concentrating on the top "cone" part. Allow to set for a few minutes. Chop the remaining Andes mints and sprinkle them on the top.
Set in the freezer for 10 minutes if you need them to set right away. Yum!
*I think one ounce of bittersweet chocolate must be a typo, as I used about a cup of bittersweet chocolate chips melted with one tablespoon of butter and the 25 Andes mints, and it was just barely enough to dip the 24 brownie bites that this recipe yielded for me.
For the pretzel Rolo treats, you simply unwrap some Rolo candies, place them on top of small pretzels, and bake in a 300-degree oven for three or four minutes, until the Rolo is soft but not melting to the point of losing its shape (yes, I realize that I screwed up that part on mine...oh well). Then remove them from the oven and immediately place a toasted pecan (or in my case, a cinnamon almond!) on top of the Rolo and press down lightly. Let the treats cool, and that's it! At Christmas, you might also choose to use red and green M and M's for the tops of the treats. Use your imagination!
White Chocolate Peanut Butter Krispie Candy (Source: Plain Chicken, via Pinterest)
2 cups Rice Krispies cereal
2 cups dry roasted peanuts
2 cups miniature marshmallows
1 cup peanut butter
2 pounds white chocolate chips (2 12-oz packages plus 1 1/3 cups)
In a large bowl, combine cereal, peanuts and marshmallows. In a microwave-safe bowl, melt chocolate and peanut butter on High for 1 minute and then in 30 second intervals until fully melted. Stir chocolate into cereal mixture. Mixture will be slightly runny. Drop by tablespoons onto waxed paper. Let set until firm, 2 hours. Store in an airtight container.
Pioneer Woman's Chocolate Mint Brownie Bites(Source: The Pioneer Woman Cooks!)
50 whole Andes Mints, unwrapped
1 stick (1/2 cup) butter, softened
1 cup sugar
2 ounces unsweetened chocolate
2 whole eggs
3/4 cups all-purpose flour
1/4 teaspoon mint extract
1 tablespoon butter
1 ounce bittersweet chocolate, chopped finely*
Preheat oven to 325 degrees. Spray mini muffin pan generously with baking spray. Melt unsweetened chocolate in a bowl in the microwave. Remove from microwave and stir in 8 Andes mints until all melted. Let cool slightly.
In a mixer with the paddle attachment, cream one stick of butter and sugar. Beat in eggs one at a time. With the mixer on low, drizzle in the cooled chocolate mixture slowly, mixing until it's combined. Add flour and mix thoroughly. Scrape the sides of the bowl with a rubber spatula, add mint extract, then mix again.
Using a tablespoon or cookie scoop, scoop batter into mini muffin tins. Bake until done, about 13 to 15 minutes. Turn upside down out of pan and allow to cool.
Combine 25 unwrapped Andes mints in a bowl with the tablespoon of butter and chopped bittersweet chocolate. Microwave and stir until melted and smooth. Dip the brownie bites in the chocolate, concentrating on the top "cone" part. Allow to set for a few minutes. Chop the remaining Andes mints and sprinkle them on the top.
Set in the freezer for 10 minutes if you need them to set right away. Yum!
*I think one ounce of bittersweet chocolate must be a typo, as I used about a cup of bittersweet chocolate chips melted with one tablespoon of butter and the 25 Andes mints, and it was just barely enough to dip the 24 brownie bites that this recipe yielded for me.
Saturday, December 01, 2012
Time for the kitchen elves to get to work!
Over Thanksgiving break, I took the opportunity to bust out my canner and start working on some holiday treats for friends and colleagues. First up was a lovely apple butter that I made in my crock pot. Usually, I make an apple butter that is highly spiced, but I ran across a recipe for a maple vanilla apple butter that sounded heavenly, and it skips the traditional spices that would surely mask the subtler flavors of the maple and vanilla. In fact, the taste reminds one of a caramel apple. Yum! And making it in the crock pot is so easy, and saves you from being burned by the spattering! I highly recommend this apple butter for a holiday gift-giving idea.
Maple Vanilla Apple Butter
(Source: adapted from Good Cheap Eats)
Yield: 3 pints
12 Granny Smith apples, about 3 pounds, peeled, cored, and sliced (I used Macs and Cortlands)
1 cup apple cider (or juice)
1 cup brown sugar
1/2 cup maple syrup
1 teaspoon vanilla extract
Place the apples and cider or juice in a five quart slow cooker. Set on high and cook for three hours. Puree apple mixture until smooth using an immersion blender or in a food processor.
Stir in brown sugar, maple syrup, and vanilla extract. Continue to cook on high for another three hours. The sauce should thicken and darken and mound up on a spoon. (It won’t spread out across the spoon when you scoop some up.)
Pour apple butter into hot, sterilized jars. Fit with metal lids and bands. Place in hot water bath and process for 10 minutes. Remove jars from water bath and allow to cool undisturbed overnight on a towel on the counter, spacing them at least an inch apart. Once cool, remove bands and check lids for seal. Store in a cool, dark place.
My second holiday gift idea was inspired by a company that I just love that I discovered on our vacation to Maine last summer, Raye's Mustard, I had originally thought to order some of their sampler packs for Christmas presents for some of my colleagues, but then I became inspired by my friend, Carl, who reportedly makes a mean Oktoberfest beer mustard. I decided to make two varieties: a double batch of a sweet, fruity cranberry mustard, and then the German mustard that packs a real punch. I canned them in those cute little four-ounce jelly jars, and I ended up with two dozen gifts for folks at work that haven't been naughty. ;-)
Cranberry Mustard
(Source: Ball Canning)
Yield: at least 7 (4 oz.) jars
1 cup red wine vinegar
2/3 cup yellow mustard seeds
1 cup water
1 tablespoon Worcestershire sauce
2-3/4 cups fresh or frozen cranberries (about 2 12-oz bag)
3/4 cup sugar
1/4 cup dry mustard
2-1/2 teaspoons ground allspice
1.) BRING vinegar to a boil in a medium saucepan. Remove from heat and add mustard seeds. Cover and let stand at room temperature until seeds have absorbed most of the moisture, about 1-1/2 hours
2.) PREPARE boiling water canner. Heat jars and lids in simmering water until ready for use. Do not boil. Set bands aside.
3.) COMBINE mustard seeds and liquid, water and Worcestershire sauce in a food processor or blender. Process until slightly grainy. Add cranberries and blend until chopped.
4.) BRING cranberry mixture to a boil in a medium saucepan, stirring constantly. Reduce heat and simmer for five minutes, stirring frequently. Whisk in sugar, dry mustard and allspice. Continue to simmer, stirring frequently, until volume is reduced by a third, about 15 minutes.
5.) LADLE hot mustard into hot jars leaving 1/4 inch headspace. Remove air bubbles. Wipe rim. Center hot lid on jar. Apply band and adjust until fit is fingertip tight.
6.) PROCESS in a boiling water canner for 10 minutes, adjusting for altitude. Remove jars and cool. Check lids for seal after 24 hours. Lid should not flex up and down when center is pressed.
Oktoberfest Beer Mustard
(Source: adapted from Ball Canning)
Yield: at least 5 (4 oz.) jars
1-1/2 cups beer (Carl uses Guiness; I used a pumpkin ale)
1 cup brown mustard seeds (I used half brown and half yellow seeds)
1 cup water
1/2 cup malt vinegar
1/2 cup lightly packed brown sugar (I used a whole cup)
1/4 cup dry mustard
1 tablespoon onion powder
1.) COMBINE beer and mustard seeds in a medium saucepan. Bring to a boil. Remove from heat, cover and let stand at room temperature until seeds have absorbed most of the moisture, about two hours.
2.) PREPARE boiling water canner. Heat jars and lids in simmering water until ready for use. Do not boil. Set bands aside.
3.) PLACE mustard seeds and remaining liquid in a food processor or blender. Process until chopped and slightly grainy.
4.) TRANSFER mixture to a large saucepan. Whisk in water, vinegar, brown sugar, dry mustard and onion powder. Bring to a boil. Reduce heat and simmer, stirring frequently, until volume is reduced by a third, about 15 minutes.
5.) LADLE hot mustard into hot jars leaving 1/4 inch headspace. Remove air bubbles. Wipe rim. Center hot lid on jar. Apply band and adjust until fit is fingertip tight.
6.) PROCESS in a boiling water canner for 10 minutes, adjusting for altitude. Remove jars and cool. Check lids for seal after 24 hours. Lid should not flex up and down when center is pressed.
Maple Vanilla Apple Butter
(Source: adapted from Good Cheap Eats)
Yield: 3 pints
12 Granny Smith apples, about 3 pounds, peeled, cored, and sliced (I used Macs and Cortlands)
1 cup apple cider (or juice)
1 cup brown sugar
1/2 cup maple syrup
1 teaspoon vanilla extract
Place the apples and cider or juice in a five quart slow cooker. Set on high and cook for three hours. Puree apple mixture until smooth using an immersion blender or in a food processor.
Stir in brown sugar, maple syrup, and vanilla extract. Continue to cook on high for another three hours. The sauce should thicken and darken and mound up on a spoon. (It won’t spread out across the spoon when you scoop some up.)
Pour apple butter into hot, sterilized jars. Fit with metal lids and bands. Place in hot water bath and process for 10 minutes. Remove jars from water bath and allow to cool undisturbed overnight on a towel on the counter, spacing them at least an inch apart. Once cool, remove bands and check lids for seal. Store in a cool, dark place.
My second holiday gift idea was inspired by a company that I just love that I discovered on our vacation to Maine last summer, Raye's Mustard, I had originally thought to order some of their sampler packs for Christmas presents for some of my colleagues, but then I became inspired by my friend, Carl, who reportedly makes a mean Oktoberfest beer mustard. I decided to make two varieties: a double batch of a sweet, fruity cranberry mustard, and then the German mustard that packs a real punch. I canned them in those cute little four-ounce jelly jars, and I ended up with two dozen gifts for folks at work that haven't been naughty. ;-)Cranberry Mustard
(Source: Ball Canning)
Yield: at least 7 (4 oz.) jars
1 cup red wine vinegar
2/3 cup yellow mustard seeds
1 cup water
1 tablespoon Worcestershire sauce
2-3/4 cups fresh or frozen cranberries (about 2 12-oz bag)
3/4 cup sugar
1/4 cup dry mustard
2-1/2 teaspoons ground allspice
1.) BRING vinegar to a boil in a medium saucepan. Remove from heat and add mustard seeds. Cover and let stand at room temperature until seeds have absorbed most of the moisture, about 1-1/2 hours
2.) PREPARE boiling water canner. Heat jars and lids in simmering water until ready for use. Do not boil. Set bands aside.
3.) COMBINE mustard seeds and liquid, water and Worcestershire sauce in a food processor or blender. Process until slightly grainy. Add cranberries and blend until chopped.
4.) BRING cranberry mixture to a boil in a medium saucepan, stirring constantly. Reduce heat and simmer for five minutes, stirring frequently. Whisk in sugar, dry mustard and allspice. Continue to simmer, stirring frequently, until volume is reduced by a third, about 15 minutes.
5.) LADLE hot mustard into hot jars leaving 1/4 inch headspace. Remove air bubbles. Wipe rim. Center hot lid on jar. Apply band and adjust until fit is fingertip tight.
6.) PROCESS in a boiling water canner for 10 minutes, adjusting for altitude. Remove jars and cool. Check lids for seal after 24 hours. Lid should not flex up and down when center is pressed.
Oktoberfest Beer Mustard
(Source: adapted from Ball Canning)
Yield: at least 5 (4 oz.) jars
1-1/2 cups beer (Carl uses Guiness; I used a pumpkin ale)
1 cup brown mustard seeds (I used half brown and half yellow seeds)
1 cup water
1/2 cup malt vinegar
1/2 cup lightly packed brown sugar (I used a whole cup)
1/4 cup dry mustard
1 tablespoon onion powder
1.) COMBINE beer and mustard seeds in a medium saucepan. Bring to a boil. Remove from heat, cover and let stand at room temperature until seeds have absorbed most of the moisture, about two hours.
2.) PREPARE boiling water canner. Heat jars and lids in simmering water until ready for use. Do not boil. Set bands aside.
3.) PLACE mustard seeds and remaining liquid in a food processor or blender. Process until chopped and slightly grainy.
4.) TRANSFER mixture to a large saucepan. Whisk in water, vinegar, brown sugar, dry mustard and onion powder. Bring to a boil. Reduce heat and simmer, stirring frequently, until volume is reduced by a third, about 15 minutes.
5.) LADLE hot mustard into hot jars leaving 1/4 inch headspace. Remove air bubbles. Wipe rim. Center hot lid on jar. Apply band and adjust until fit is fingertip tight.
6.) PROCESS in a boiling water canner for 10 minutes, adjusting for altitude. Remove jars and cool. Check lids for seal after 24 hours. Lid should not flex up and down when center is pressed.
Subscribe to:
Posts (Atom)