Sunday, February 25, 2007

Tardi Gras

IT'S OVER! IT'S OVER! The play was a rousing success, but it's over at last, and I can reclaim my life! Whoo-hoo! So maybe next weekend, I'll have more intricate food projects to blog about. In the meantime, I have two things to share. First, I engaged my trusty crockpot yesterday so that it could be doing the cooking while I was otherwise dramatically occupied. You see, what I really wanted was more of the red beans and rice that June prepared for her Mardi Gras celebration last week. In a truly heartbreaking scheduling conflict, I got to be there for appetizers, but had to leave for a dress rehearsal before dinner was served. But as June is the kindest of friends, she saved me a portion which I gratefully accepted and gobbled down much later that evening. But it was so good that I wanted more! So I decided to make some on my own.

The problem is, I have never made red beans and rice before. Well, I'm an expert on rice thanks to my Hawaiian father, but the red beans are new to me. I consulted dozens of recipes, and no two were exactly alike. I compiled an exhaustive list of all the possible additions and decided to include every single thing that appealed to me. This threatened to produce an inedible hodgepodge, but it actually turned out great. Even Cyd, who does not enjoy rice-based dishes, had to admit that it was very good. The only part that was troublesome was the crockpot method. Several recipes recommended 8-10 hours on low, but after EIGHTEEN hours, the beans were still hard! So I cranked that bad boy up to high, and three hours later (that's 21 hours total for those following along at home!), they were perfectly done...tee hee. So be guided by my folly and also your familiarity with your own crockpot to correct the timing issue. But as luck would have it, mine were done just in time to enjoy while watching the Oscars! And since Ellen was hosting, the New Orleans fare seemed fitting, even if we are almost a week past Mardi Gras. ;-)

Red Beans and Rice

1 lb. dried red beans
1 ham bone or about a cup of country ham, small dice
1 large onion, diced
1 bell pepper, diced (I used an Italian frying pepper)
1 large stalk celery, diced
4 cloves garlic, minced
2 bay leaves
2-4 tablespoons Cajun seasoning (I used "Joe's Stuff")
1 tablespoon Worcestershire sauce
1 tablespoon hot pepper sauce (or to taste)
1 tablespoon dried parsley
2 teaspoons cumin
1 teaspoon dried red pepper flakes (or to taste)
1 teaspoon chili powder
1/4 teaspoon thyme
1/4 teaspoon sage
1/4 teaspoon marjoram
1/4 teaspoon oregano
salt and pepper, to taste

1 pound sausage (preferably, andouille, but smoked will do)

steamed white rice

Rinse the beans and discard any floaters. Place in the crockpot and cover with water to an inch or two above the beans. Add all other ingredients except the sausage and cook until the beans are tender.

Remove the ham bone (if using) and the bay leaves and discard. Also remove a couple of cups of the beans and mash them into a thick pulp with a potato masher. Add the mashed beans back to the pot to thicken the sauce.

Slice the sausage 1/4 to 1/2-inch pieces and brown the slices on both sides in a frying pan. Add sausage back to the beans and serve over rice.*

*I would offer a rice-making tip here. I used to always make my rice on a stovetop, but when I got my latest microwave, it had a rice-cooking mode. I thought you couldn't possibly make good rice in the microwave, but you can! For a small batch, I rinse a cup of long-grained white rice three times until the water is fairly clear. I drain it and add about a cup and a half of water and a good pinch of salt to the rice. I cover the microwave-safe dish with a good-fitting lid, and then nuke it for about 18-20 minutes. Then I let it sit with the lid on for another five minutes or so before fluffing with a fork and serving. I doubled the amount of rice tonight, and the cooking time was more like 30 minutes. I know, it's a long time, but it makes perfectly fluffy rice every time!

And if that weren't enough, I even managed to squeeze in some canning this evening when I got home from the play. I didn't really mean to can--it was accidental canning. I had unearthed a one-pound package of haricot verts from the fridge when I was digging for something else. Yes, these are the same beans from our Superbowl menu three weeks ago. Clearly, something needed to be done with them, and fast! And I remembered that I had recently run out of my beloved dilly beans that I usually make each summer. I adore anything pickled, but dilled beans hold a special place in my heart (and in my Bloody Mary!). So I decided to throw together a few pints using my favorite, tried-and-true Kerr recipe. Here it is:

Dilly Beans
(Source: Kerr Home Canning and Freezing Book)
Yield: 8-10 pints

4-5 pounds green or yellow beans, ends trimmed

8-16 heads fresh dill (or 1/2 to 1 cup dill seed)
8 cloves garlic, peeled
4 cups white vinegar (5% acidity)
4 cups water
1/2 cup canning or pickling salt
1 teaspoon hot red pepper flakes

Wash and trim ends from beans. Cut into four-inch lengths (smaller beans can be left whole). In a four-quart saucepan, combine vinegar, water, pickling salt and pepper flakes. Bring to a boil over high heat. Meanwhile, in each hot pint jar, place 1 to 2 heads of fresh dill (or two teaspoons of dill seed) and one clove of garlic. Firmly pack beans upright in jars, leaving 1/2-inch of headspace. Pour hot vinegar mixture into jars, leaving 1/2-inch headspace. Carefully run a nonmetallic utensil down inside of jars to remove trapped air bubbles. Wipe jar tops and threads clean. Place hot lids on jars and apply screw bands (fingertip tighten only). Process in a boiling water bath for 10 minutes.

*These beans are best after sitting for a month or so to achieve their full flavor--if you can wait that long!

Still no time for proper baking...

Well, the big weekend is upon us. I have, thus far, completed two performances of the play with one left to go tomorrow afternoon. Soon my life will be my own again! YIPPEE! Not that I haven't enjoyed the experience, mind you. I'm just exhausted from my extra-curricular commitments! And what's worse, we've run out of dessert in the house--quel horreur! With little time to devote to proper baking, I am forced to turn, once again, to a shortcut treat. In fact, this one is almost an embarrassment to discuss. It's from my friend, Anna, over at Cookie Madness, and even she seemed a bit chagrined to share the recipe. It's truly the tackiest thing that you'll ever make (even more than any of those cream of _______ soup casseroles that one might crave on occasion), but if you love the sweet-and-salty thing like I do, this may prove your undoing. Think of it as the poor, trailer trash cousin of the delicious but laborious almond toffee. In fact, let's go ahead and name the confection Trashy Toffee, as that name is a perfect fit for this addictive, junk food-based candy. But--God help me!--it's sooooooo good!

Trashy Toffee
(Source: adapted from
www.cookiemadness.net)

2 cups pretzels (I like the thinner, waffle-weave squares)
1 cup Fritos (spring for the real ones!)
8 mini peanut butter cups (again, only Reese's will do)
1 stick butter (8 tablespoons)
1/2 cup brown sugar
1 1/2 cups semi-sweet or bittersweet chocolate chips
Optional: 3/4 cup chopped mixed nuts or peanuts for the top

Preheat oven to 350 degrees F and line a 13x9 inch pan with parchment paper or no-stick (Release) foil. Break up the pretzels and Fritos by hand. Unwrap peanut butter cups and cut each one (at least) in half and toss them in with the pretzels and Fritos.

Place butter in a low or nonstick saucepan and melt over medium heat. When butter is melted, stir in brown sugar. Bring mixture to a full boil and boil for 1 minute, stirring once or twice. Pour over Frito mixture and bake for 8 minutes.

Remove pan from oven and sprinkle chocolate chips over hot candy. Return to oven for 1-2 minutes to soften chips. Spread softened chocolate chips over bars. Sprinkle with chopped nuts if desired. Let cool to room temperature (you might even choose to chill it at this point), then break up into pieces by hand. Store in an airtight container.

Tuesday, February 20, 2007

Laissez les bon temps rouler!

HAPPY MARDI GRAS, everyone! :-D

Behold the king cake that I fashioned late last night in celebration of today's holiday. Before you are too terribly impressed, let me tell you that this is a TOTAL fake-out recipe. A quickie. A cheater. A Sandra Lee, but actually comes to us by way of the High King of Mardi Gras, Emeril Lagasse (so it must be legit). If you dig into the archives from last February and read about my struggles with last year's king cake, you may understand why I've chosen the easy route this time around. Not only am I consumed with play rehearsals this week, my beloved friend, June, who hails from The Big Easy originally, is hosting a Mardi Gras dinner tonight, and she is making a proper king cake for us to enjoy. This quickie version is made with....wait for it....drumroll, please...CRESCENT ROLLS--my favorite cheater ingredient of all! (Crescent rolls for the Crescent City...it's a stretch, I know, but go with it!) In all my practicing for the Pillsbury Bake-Off over the years, I have reached the conclusion that there is nothing that can't be made with a good old can of crescent rolls. It's not traditional, true, but every king cake I've tried has been on the dry side, just shy of inedible, despite taking hours and hours, or even days to make. This can be made, start to finish, in under an hour, and is truly yummy, rather like a cheese Danish. I also think it would be a great food project for kids to make. As is my way, I have made some additions, deletions, and conversions, but I highly recommend this very simplified recipe for your Mardi Gras celebration when you don't have the time or strength of will to make a king cake from scratch.

Emeril's Quick King Cake
(Source: adapted from www.recipezaar.com)

1 can crescent rolls (I used the larger ones--6 rolls instead of 8)
1/4 cup cinnamon (whoa! that's a LOT of cinnamon--I used more like a generous tablespoon)
1/4 cup butter, softened
8 oz. cream cheese, softened
1/2 cup powdered sugar (this is half of what the originally recipe called for, but trust me, with all the decorative sugar that you'll be putting on top, 1/2 cup is more than enough!)
1 small can fruit pie filling, your choice of flavor (I omitted this as I like the filling to be unadulterated cream cheese!)

a tiny baby or bead or bean
icing (recipe follows)
colored crystals in purple, gold, and green (or granulated sugar mixed with a few drops of food coloring)
  1. After opening the can of crescent rolls, unroll in one piece. With your fingers, press seams together to form one piece of dough.
  2. Mix together butter and cinnamon, gently spread over the dough.
  3. Mix together cream cheese and powdered sugar. Drop teaspoons over the top of the dough.* Drop teaspoonfuls of pie filling (cherry, blueberry or peach) over the dough as you did the cream cheese.
  4. Starting on the long end, carefully roll the dough, horizontally, with the filling and cream cheese inside. Insert plastic baby/bead/bean at any place within the dough.
  5. Place on lined baking pan with the seam side down in a circle, pinching the ends together.**
  6. Bake at 350 for 15-20 minutes or until golden brown.
  7. While the cake is baking, use the food coloring to dye the sugar.
  8. When cake is cool, pour icing over the top of the cake. Sprinkle with the colored sugar, alternating the three colors as you go around the circle.
  9. For icing: Combine 1 cup of powdered sugar, 1 tbsp lemon juice and 1 tbsp water (and I like a splash of vanilla for good measure) until smooth.
*I spread the cream cheese mixture evenly over the dough. And I must tell you, I like cream cheese as well as the next person (by reading this blog, you'll know that that is a laughable understatement!), but I think that this makes too much cream cheese filling for this small cake. It ends up being too thick and rich (and yes, that is possible--when it becomes too goopy). I think half as much would do just as well, and certainly no more that 6 oz. of cream cheese at most.
**If I were making this cake for more than just myself and my roommate (and/or if we didn't still have leftover cinnamon rolls!), I might double the recipe, using two cans of crescent rolls, and joining the two pieces together to make a bigger circle for a party-sized king cake.

Sunday, February 18, 2007

(Not As) Dark and (Even More!) Dangerous Cinnamon Buns

With the play performances looming in a week, we are into crunch time on our practices. So faced with double rehearsals this weekend, I didn't think I'd have time for any big food projects. But then I was reading one of my favorite blogs, Culinary in the Desert (or it might be Culinary in the Country now that they've moved from the Southwest to the East Coast), and damn them, they sucked me in with their cinnamon rolls from the King Arthur Whole Grain Baking Book! They just looked too good not to try. I was very curious as to whether a whole-grain cinnamon roll could maintain a desirably soft interior. And guess what? It can! I credit that to the potatoes and milk in the dough, and perhaps the honey, too. And I love the addition of rolled oats...yum!

Of course, I ended up making some adjustments due to the ingredients that I had on hand. But they really turned out well--certainly equal to the traditional cinnamon rolls that I've made in the past in terms of texture, and I believe more flavorful overall. The main difference was that instead of using part whole wheat and part whole wheat white flours, I used all whole wheat white, as I had LOTS of that on hand and needed to use a good bit of it up. So these are not as dark as the original version. (I will try it that way in the future, to be sure.) Also, they seemed to be making an attempt to make the rolls lower in fat but omitting butter in the filling, but I cannot support that! I want my cinnamon buns rich, decadent, and life-threatening, or why bother? Moreover, I am all about a cream cheese frosting, so I converted their icing recipe as well, just to make it that much tastier...and deadlier. ;-) However, I will reprint the original version of the recipe below for you to try, and just note my changes. Then you can decide which way you want to go.

Dark and Dangerous Cinnamon Buns (Adapted from KAF Whole Grain Baking Book via Culinary in the Desert/Country)

For the dough:
3/4 cup plus 2 tablespoons lukewarm water (I needed an additional 2 T making a full cup)
1/4 cup fresh squeezed orange juice
5 tablespoons honey
1 large egg, yolk and white separated (I used the whole egg)
4 tablespoons butter, softened, cut into chunks
2 1/4 cups white whole wheat flour
1 1/4 cups whole wheat flour (I used all whole wheat white=3 1/2 cups)
1/2 cup rolled oats
1/2 cup dry potato flakes
1/4 cup nonfat dry milk
1 1/2 teaspoons salt
2 teaspoons instant yeast

For the filling:
1 cup packed dark brown sugar (I used light)
1 large egg white (I used this in the dough)
2 tablespoons cinnamon
scant 1/8 teaspoon salt

*softened butter (optional)

For the icing:
2 cups confectioners' sugar
2 teaspoons vanilla extract (I used vanilla bean paste and extract)
2 tablespoons butter, melted
pinch of salt
2-4 tablespoons milk
*I added 4 oz. softened cream cheese and only needed 1-2 T of milk

To make the dough :
In a large mixing bowl, mix together water, orange juice, honey, egg yolk (or egg), butter, flours, oats, potato flakes, dry milk, salt and yeast just until the ingredients are thoroughly combined. Cover the dough and let rest for 45 minutes so the flour can absorb the liquid and the yeast can get a head start.

Knead the dough on a lightly floured surface until you have a medium-soft and smooth dough. Place in a large lightly greased bowl and cover - let rise until it is very puffy, but will most likely have not double in size - about 1 to 2 hours. (I almost gave up after 2 1/2 hours and was ready to pitch the non-rising dough. But after FOUR HOURS, it was perfectly doubled.)

To make the filling:
In a medium bowl, stir together brown sugar, egg white, cinnamon and salt until completely combined. (I omitted the egg white, spread the dough with softened butter instead, and then sprinkled on the cinnamon-sugar-salt mix.)

To assemble the rolls:
Gently punch down the dough and place it on a lightly greased surface. Roll the dough out until it is a 12 x 16" rectangle. Scoop the filling onto the dough and use an off-set spatula or wet fingers to spread it evenly over the dough, leaving a 1" margin along one of the edges. Roll the dough into a log (not too tight to allow for rising), starting with the long end that has the filling all the way to the edge, turning it so the seam will be flat against the surface. Use plain dental floss and cut the dough into 16 1" pieces. You can use a very sharp knife, but the dental floss makes for clean cuts without smooshing the dough.

Preheat the oven to 350 degrees. Evenly space the buns into a 9 x 13" baking dish lightly coated with nonstick spray. It is okay if they don't touch each other. Cover and let rise for 1 to 1 1/4 hours - they will not double in size, but should rise by about half as large as they started out. (I let my rise in the refrigerator overnight instead.)

Place in the oven and bake until they are a deep golden brown on top, about 24-28 minutes. Remove the pan and set on a wire rack for about 3 minutes. Carefully turn the rolls out onto a wire rack and then flip them back again (so the tops are up) onto another wire cooling rack. (I just left mine in the baking dish and did not turn them out before icing them.)

To make the icing:
In a large mixing bowl, mix together confectioners' sugar, vanilla, butter, salt and 2 tablespoons milk (and some cream cheese if you like). Add in additional milk, if necessary, to achieve a creamy spreadable icing. Spread the icing over the baked rolls while still warm.

Makes 16 buns.


Thursday, February 15, 2007

Snow Day II: Electric Bugaloo

As I suspected we might, we had another snow day today. (My first clue was that I couldn't even open the back door late last night to let the dogs out because it was blocked by a deep drift of snow!) Still, I've lived here for seven years, and the double snow day is heretofore unprecedented! This called for a special snow day breakfast, and I knew just the thing! Some years ago, I visited the Vermont Maple Festival, and there was a very popular fellow there named Ernie making something he called Finnish Pancakes. Luckily for me, he was distributing a handout with the recipe on it that I have since toyed with and merged with a couple of others. It closely resembled the "Dutch Baby" that I had been making from a King Arthur Flour recipe. And then I saw something very similar on Martha which she called Puffy Maine Pancakes, although she made smaller, individual pancakes from the batter. I have also heard this called a German pancake, and it is clearly the sweet cousin of the savory English side dish to roast beef, Yorkshire Pudding. More recently, I came across someone on the Cook's Illustrated message boards who shared the same type of recipe which she called "Huffy Puffy." That may be my favorite name, especially if you're making breakfast for children.

Whatever the nationality or moniker, this is a delicious and almost magical dish. When it comes out of the oven, it will have puffed up to double or even triple the height of the pan, though it deflates within a few minutes as it cools. Then the tender, eggy, custardy creation is served with maple syrup or fruit preserves or--and this is my preference--a drizzle of browned butter and a thick snowdrift of powdered sugar. That's why I think that this is the perfect breakfast during a blizzard! (Though it would be just as tasty in tropical climes, I'm sure.) Some folks might even prefer this as a dessert, especially with a fresh berry sauce or maybe some fried apples instead. Yum! You could pop it in the oven just as you and your guests are sitting down to dinner, and have that big "wow" moment as you pull the puffy, golden beast from the oven and bring it to the table. And the applause will turn to grateful tears and perhaps hugs for the chef once they taste it. Don't believe me? Try it and see what happens!

Snow Day Baked Pancake
(serves 4, or 2 if it's for me! tee hee)


4 large eggs, lightly beaten
1 cup all-purpose flour
1 1/4 cup milk (or better yet, half-n-half!)
2 tablespoons vanilla sugar (or granulated sugar and a splash of vanilla extract), optional
pinch of salt
*a little nutmeg or cinnamon would be optional, but I don't prefer it
4 tablespoons butter
confectioners' sugar, for dusting

1. Heat oven to 425° Place eggs, flour, milk, sugar, and salt in a medium bowl; whisk until combined. Batter may still be slightly lumpy. The batter may be made a day ahead and chilled overnight, but it's just fine if you don't.

2. Melt the butter in a 9 x 13 pan in the preheated oven (you could halve this recipe and make it in n 8 x 8 pan, too). Once melted, pour the batter into the hot pan and return to the oven. Bake until pancake is golden brown and very puffy, 15-20 minutes. Drizzle with a little browned butter and dust liberally with confectioners' sugar; serve immediately.

Wednesday, February 14, 2007

The Valentine's Day "Blizzard" of '07


(The was the view from my front porch earlier today. The house is right on a very busy rural highway, and this was early in the day before the snow really started accumulating! Can you see the snowmobilers there at the four corners? Click on the picture to enlarge it for a better view.)

Well, this has been an odd day! I stayed up half the night making some 90-odd Oreo truffles for my colleagues at work as a Valentine's Day treat only to have school cancelled due to a huge Nor'easter snowstorm! On the one hand, this is nothing short of a nightmare, as Wednesday is the absolute worst day to miss. You see, I have two classes that are Monday-Wednesday only and one once-a-week night class on Wednesday. So it is going to be hideous trying to figure out how to get those classes caught up.

But that's the grown-up teacher in me talking. The kid in me was delighted to have a snow day! I woke up around 8am, heard the news that school was cancelled, and went right back to bed for a long winter's nap! When I arose much later, I decided that a special Valentine's Day meal was in order for dinner. First, Cyd helped me assemble an icebox cake, as she has been bugging me to make her another one since we polished off the first. This time, I tried to make it look like the version that I just saw in the display case at Billy's Bakery this weekend, with the edges of the cookies sticking out of the cake. And since I had leftover chocolate from the truffles, I topped it with both bittersweet and white chocolate shavings. Pretty, huh?

Then for dinner, I made the short ribs that Cyd has also been harrassing me about for weeks, and I served it over another of the Rossi pastas from my Christmas stash, the wild mushroom linguini. Scrumptious! And of course, we sopped up the delicious sauce with some of the amazing Pane Pugliese from Sullivan Street Bakery. I was worried that it may have gone stale, but after five minutes in a hot oven, it crisped right back up. The interior is tender and holey and stretchy and replete with a tangy, sourdough-like flavor. If there is a better bread on the planet, I haven't found it yet!

Well, however you dined this evening and whatever the menu, I hope you all had a lovely Valentine's Day, and that you enjoyed some romantic time with your special someone!

Oreo Truffles

16 oz. Oreo cookies
8 oz. cream cheese, softened
2 cups bittersweet (or semi-sweet or milk) chocolate, melted
1 cup white chocolate, melted (optional)

Crush Oreos in a food processor. Mix softened cream cheese for a minute or two in the bowl of a stand mixer until completely smooth. Add in the crushed cookies and mix thoroughly. Shape into small balls, about one teaspoon's worth apiece. Freeze for about an hour or until very firm (I just put mine on the roof of my car out in the garage at this time of year!). Melt the bittersweet chocolate, dip each cold truffle, and place on a lined sheet pan to firm up. Once set, drizzle with melted white chocolate as a contrast. Store the truffles in a covered container in the refrigerator. Makes about 50, depending on size.


Tuesday, February 13, 2007

The long, sad tale of our NYC weekend....

As the great Mary Chapin-Carpenter once sang so poignantly, “Sometimes you’re the windshield, sometimes you’re the bug.” Those lyrics perfectly sum up the events of my weekend in NYC. Sometimes you are lucky and get the best of the Big Apple, and sometimes, the City has its way with you, and you get the worm! I started with the best of intentions. I would head down early Saturday morning to attend the PBGV Specialty at the Meadowlands in Secaucus, NJ held annually the weekend just before Westminster, then spend that evening and the next day in NYC before heading home Sunday. But before we even departed the North Country, there were bad signs. First off, I had some trouble with the car that had to be repaired before the road trip (new tires and an alignment, and I still feel something’s funny under there!). Of course, this caused some concerns about the financial viability of travel plans. Then both our arrangements for a place to stay in the City Saturday night and our pet-sitter fell through at the last minute. So I managed to Priceline a room in Secaucus (for $65 total—whoo-hoo!), find another pet-sitter, and throwing all caution to the wind, off we went. We were supposed to pick up some friends in the Bronx on the way to the Meadowlands, but when we took the exit that they said to take, we were in Nyack, NJ and not the Bronx! With the help of a friendly patron at a Mobil station (that unfriendly New Yorker thing is a stereotype that does not usually bear out), we got back on track and made it to the show on time and got to see all the wonderful PBGVs. (We'll be rooting for our girl, Fairchild, tonight at Westminster!) But that was about the last thing that went well all weekend. :-(

After the dog show, we bussed into the City, hopefully, for dinner and theatre. I had my heart set on seeing “Spring Awakening” (hailed as the new “Rent,” and I am the most devout Renthead!), but there were no tickets. My second choice was “Grey Gardens,” but I really couldn’t afford to do two shows this time, and the TKTS guy felt confident that they would have “Spring Awakening” tickets the next day. So I decided to wait and put all my eggs in the Sunday matinee basket, and we headed to Chinatown for some dinner and a little shopping. I had printed out all 18 pages of The Village Voice’s Top 100 Inexpensive Restaurants in New York, and I had a particular restaurant picked out called Great NY Noodle Town. However, I couldn’t make out whether it was at 28 ½ Bowery or 281 Bowery. Naturally, I chose the wrong direction, and after walking forever in the freezing cold, we were still only in the 100’s and leaving Chinatown heading toward Soho! We were cold and hungry, so we just decided to eat at some place we passed on the way back; it was good but nothing remarkable. After the dinner debacle, it had become late, and I began to stress out because all the shops were closing, and I hadn’t yet found the scarf that I came looking for. But we managed to find the perfect Valentine’s Day, red-and-pink, rose motif, velvety, fringy scarf at the last stall before the subway! So it seemed like things were looking up. But then it took nearly two hours to get all the way back to the hotel in North Rutherford, and we were exhausted by the time we showered and fell into bed. Then I was so worried about getting up in time to get to the theatre to try to procure show tickets, that I really didn’t sleep much, keeping one eye on the clock all night.

Sunday was a study in chaos and disappointment. I’ll spare you all the boring details—too late— but the short version is, we weren’t able to get tickets to either show (my greatest heartbreak), and in making various attempts to procure the tickets (from theatre to theatre and from the midtown TKTS to the South Street Seaport one which we never could find!), we managed to suck up the best part of the day, so that we weren’t even able to connect with our friends for breakfast, brunch or lunch (compounded by the fact that I think I left their phone number at the hotel back in NJ in my morning haste and had no way to contact them). After tears were shed and the dream of seeing a show was finally abandoned, we shifted into Plan B mode, which was to pop in on some of our favorite food places in the City, and procure provisions to cart home to Plattsburgh. But there was inordinate amount of traffic for a Sunday (hence, no parking anywhere), and we seemed to have an extraordinarily difficult time of finding some of the places, and when we finally did, many of them were closed! BOO HISS! So we barely made a dent in our to-do list, but we did manage to procure at least a few goodies from several of our favorite haunts.

From Balducci’s, we got coffee and olives. From Balthazar, we got a loaf of brioche and some of their divine chocolate bread. From Billy’s Bakery, we tried a vanilla-vanilla cupcake to see what all the fuss is about and to compare them to the ones I made at home. The cupcake was still a bit on the dry side (though not quite as much as mine), and the frosting was still sickeningly sweet to my taste (although a little creamier than mine). We also tried the red velvet cupcakes (at $2.50 apiece! OUCH), and though they were superior to the vanilla-vanilla and a glorious color, they were still a bit on the dryish side. We definitely preferred the boiled icing to the powdered sugar stuff. But still, nothing to rave about. At Porto Rico in the Village, we acquired more coffee. And though I nearly got a ticket for double parking, no trip to NYC would be complete without a stop at Jim “No-Knead” Lahey’s Sullivan Street Bakery (which is now, strangely, not on Sullivan Street in Soho, but in Hell’s Kitchen). The Sullivan Street Bakery is like a temple to foodies and breadheads, and even if I get that ticket in the mail at a future date, it may well have been worth it. I grabbed a loaf of their legendary Pane Pugliese, a large ciabatta, two pieces of my personal Achilles heel, the Potato Pizza (a crispy dough topped with just thinly-sliced potatoes, onions, olive oil, sea salt and maybe a little rosemary—sounds like nothing, but it is EVERYTHING!), and also two pieces of the Pizza con Pecorino with hunks of pecorino cheese stuffed inside the dough. LORD HELP US! And then I also decided to try their Carta, which is just a crispy flatbread cracker-type of deal, but it’s quite delicious. Oh, and of course, we popped into the Chelsea Market for some of Jimmy’s Gelato (though their name has now changed to L’Arte del Gelato). Sadly, they did not have the beloved Chocolate Cayenne flavor of blessed memory, but I enjoyed some stracciatella (vanilla with shaved chocolate pieces) and Cyd had peanut butter. They were both good, but not anything close to the spicy chocolate variety.

After all the running about, we decided to make one last Hail Mary attempt to find our friends in The Bronx. We did not have their phone number, but I had my Mapquest directions with their address on it. It seemed doubtful, given the day’s frustrations, that we would get there without incident, but so we did, and we even managed to get a parking spot near their building! However, as they had show tickets that night (for “Spam-a-Lot” which we saw last year), and we didn’t have time to go back down into the City and all the way back up, we settled on a quick dinner at a local pub called the Piper’s Kilt (tee hee….”We have a piper doon!”). But at least we had that time together, though we were not able to check another NYC restaurant off our “to-try” list. (Sigh.) But before you get to pitying me too much (which, naturally, was my goal), I must report that the day ended on an upbeat note with a stop at Stew Leonard’s in Yonkers where I procured many tasty things, including freshly-baked challah, homemade tortillas and garlic croutons, flavored pankos (paprika, mustard), ginormous shallots, sugar snap peas, a mixed bean salad, marinated boccocini balls, Stew’s own cream cheese and their smoked mozzarella, their own in-house dried soppresata and also some fresh provolone and parsley sausages, and even a King Cake for Mardi Gras!

We didn’t arrive home until 2:00am with our souls (and pocketbooks!) more than a bit depleted. But I suppose the worst weekend in New York City is always better than the best weekend in Plattsburgh. And there will always be a next time… (Great, the way my luck’s going, I’ve just tempted fate by saying that, and now I’ll probably get hit by a bus…SHEESH!) ;-)

Thursday, February 08, 2007

Lee Ann's Sweet and Salty Birthday Treats

My dear friend and officemate, Lee Ann, had a birthday this week, and she requested the same extreme lemon cake that her husband, Steve, had back in September. But to add a different--pun intended--twist for Lee Ann, I made it in my fairy cottage bundt pan that I got on clearance after the holidays. Isn't it cute? :-)

Then, for a fun birthday present, I ordered her party pack of new Kettle Chip flavors (thanks to my buddy, Randi, for the idea and for a picture of the goodies). The company hosted a "People's Choice" contest recently to choose their newest flavor, and customers could buy a sampler of five different kinds: Royal Indian Curry, Island Jerk, Dragon 5 Spice, Twisted Chili Lime, and Aztec Chocolate. (Island Jerk won, by the way, and will soon be on store shelves near you!) The five bags of chips also came with some cute postcards that have food pairing suggestions (tee hee), a metal bookmark, and a sampler of world music entitled, "Putumayo: Music for Every Palate." Neat, huh? And here's the best part...the whole party pack from Kettle Foods, including shipping, is only 15 bucks! Better yet, if you want to order some for a friend and keep a set of chips for yourself, it's just $25 for the double pack. (You don't have to ask...of course that's what I did!) And yes, you can still order some for yourself, but hurry, as these are limited edition trial flavors, and since the contest is already over, I suspect they will be gone very soon.

Sunday, February 04, 2007

Lions and Colts and Bears, OH MY!

There are occasions for sophisticated, elegant dishes, and then, there's SUPERBOWL SUNDAY, the national holiday for tacky, heart-clogging cuisine. It's all about meatballs and wings and devilled eggs and seven-layer dips and ribs and nachos and cocktail weenies and pulled-pork sandwiches with spicy slaw and so on. Then again, it's just me and the roommate today, so that menu might be a bit of overkill...literally! Tee hee. Ironically, I loathe sports, but I love a Superbowl party. During the big game, I am always to be found in the kitchen, preparing a steady stream of snacks, only popping into the living room to catch the commercials and the halftime show. Today, I made just three savory dishes and one sweet dessert (but recipes for my favorite seven-layer dip and salsas can be found in previous posts, FYI). Continuing on in my kitschy, retro meatball theme (because I still had half a bag left over from the Hawaiian meatballs of recent memory), I decided to make that church potluck classic with the grape jelly and chili sauce. I added a tablespoon of Dijon mustard to give it a little something extra, but that was it. Easy peasy! Instead of traditional hot wings, I thought I might like something more like the lemon, garlic and oregano house wings at the Lebanese restaurant in town, Aladdin's, so I adapted one of my favorite recipes for Rao's Lemon Chicken from the famous restaurant in New York City. And then because I have been tormented by the recent commercials for T.G.I. Friday's (we don't have one here), and because I was unwilling to make a three-hour round trip just to have their green bean fries, I tried my hand at making my own after reading a thread about it on the Cook's Illustrated message boards. Finally, in honor of the big game being played in Florida, I made some tangy little key lime tartlets. I hope you all enjoyed your game-time grub, too, and that your team won!


Superbowl Meatballs

half a bag (about 3 lbs.) of frozen meatballs, thawed in fridge overnight
32 oz. jar grape jelly
2 12 oz. bottles chili sauce
1 tablespoon Dijon mustard (preferably, whole-grain)


Fill crock pot with meatballs. Add grape jelly, chili sauce, and mustard. Stir to combine. Heat on low for 5-7 hours.

Lemony Chicken Wings
(Source: adapted from Rao's recipe for lemon chicken via www.marthastewart.com)

1 1/2-2 lbs.chicken wings
2 tablespoons chopped fresh Italian parsley (or one tablespoon dried)

Lemon Sauce:
1 cup fresh lemon juice
1/2 cup olive oil
1 tablespoon red wine vinegar
2 cloves minced fresh garlic (of course, I used four!)
1 teaspoon dried oregano
salt and pepper to taste

Preheat broiler for at least 15 minutes so it has its maximum heat.
Broil chicken wings, turning once, for 10-15 minutes or until skin is golden-brown and juices run clear when you pierce the pieces with a fork; don't overcook or chicken will be dry. Remove chicken from broiler, but leave broiler on.

Place chicken pieces on a baking sheet with sides. Pour lemon sauce over the wings and toss to coat well. Put pan under broiler and broil chicken for 2 minutes; turn pieces and broil for 1 minute more. Place chicken pieces on a large, warmed, serving platter.

Pour sauce remaining in pan into a saucepan over high heat; stir in parsley; cook for 1 minute. Pour over chicken and serve with lots of crusty bread to sop up sauce.

To make lemon sauce, combine all sauce ingredients in a bowl and whisk together. Refrigerate until needed; whisk again before using.

Green Bean Fries
(Source: adapted from a recipe by Eric aka Veal Boy via the Cook's Illustrated message boards)

1 pound fresh green beans (I used thinner, straighter haricots verts)

1 1/2 cups beer, open and let sit for a couple hours (I didn't wait, and it was fine)
1 1/2 cups self-rising flour (or you could use cake flour and baking powder instead)
1/2 teaspoon kosher salt
1 teaspoon Hungarian paprika (I used smoked, bittersweet)
a few dashes of hot pepper sauce (optional)

Mix the flour, salt and beer together using a whisk until smooth. Then add paprika and pepper sauce, mixing just until incorporated. Wash and dry green beans and break off the end. Deep fry in vegetable oil at 370-375 until golden. Drain and sprinkle lightly with kosher salt. Serve with an aioli (or your favorite) dipping sauce.

Note: They will stick to bottom if you just drop them in, so lower slowly by hand.


Key Lime Tartlets

1 package graham crackers, crushed
6 tablespoons butter, melted
pinch of salt
sprinkle of ground cinnamon

1 can sweetened condensed milk
1/2 cup key lime juice
3 egg yolks
1 teaspoon vanilla

Combine crushed graham crackers, melted butter, salt and cinnamon. Press equal amounts into the bottoms of a regular muffin tin to make 12 little crusts. Bake at 350 degrees for about ten minutes until lightly browned.
Mix together the sweetened condensed milk, key lime juice, egg yolks and vanilla. Divide the batter equally on top of each graham cracker crust and bake the tarts for about 15 minutes at 350 degrees until just set. Let cool in the pan for ten minutes before refrigerating until completely chilled. Serve the tarts with a dollop of whipped cream and a decorative twist of lime!


Note: Of course, this recipe can be made into a regular 9-inch pie if preferred.

Saturday, February 03, 2007

"But monsieur, it is only WAFER thin!"


I'm still trolling my Magnolia and Buttercup Bakery cookbooks for fun treats to make. Their famous cupcakes didn't do much for me, but I figured that there would be something that would float my boat, and I found just the thing! Let me preface this by saying that I am amazed that these bakeries in NYC have people lined up around the block to buy desserts for tip-top dollar that are just the simplest and homiest recipes that one could imagine. In fact, this one is the cheatin'est of all cheater recipes. This is the grandpappy of all sham cookery! This one would make Sandra Lee wet herself with excitement. There is no baking or cooking of any kind required to make this "cake." It is merely assembly of cookies and whipped cream. In fact, I was thinking that this would be an excellent cake to make with kids, if you have any of those grubby little snifflers underfoot. You can even simplify it further by making the cake with Cool Whip, but I strongly advise against it. I mean, come on! You can't even whip up some proper cream? It's the only real food preparation that you have to do! Jeesh!

Now some people remember this dessert fondly from their childhood, although it was usually in a log shape. My mom never made this one at all. Banana nut bread was her game. But what's not to like? It's whipped cream and Oreos, basically...and who doesn't enjoy cookies n' creme? Moreover, it's a magic cake. It starts with crispy wafer cookies, but after it has been refrigerated for at least five hours or overnight, the cookies soften up and create the cake-like texture. Fun!

Chocolate Wafer Icebox Cake
(adapted from The Magnolia Bakery Cookbook)

3 cups heavy cream
3 tablespoons sugar (I used vanilla sugar, and more like 4-5 tablespoons of it)
1 tablespoon vanilla extract (I added one additional teaspoon of vanilla bean paste)
2 (9-ounce) packages chocolate wafer cookies (I used about 1 1/2 packages of Nabisco Famous Wafer cookies...you know, the ones that are like thin, unfilled Oreos)
Unsweetened cocoa or chocolate shavings (I used the latter)

In a large bowl, beat cream, sugar and vanilla with an electric mixer on high speed until soft peaks form.

On a flat serving plate, arrange 7 cookies side by side in a circle, keeping 1 cookie in the center.

Spread with 1/2 cup whipped cream, making a 7-inch circle. Repeat with remaining cookies and cream, making 11 layers of cookies and ending with a layer of cream (there will be a few cookies left over). Cover with plastic wrap and refrigerate overnight.

To serve, dust top lightly with cocoa powder or chocolate shavings.

Saturday, January 27, 2007

Happy (Triple) Birthday!

Photo Credit: Marion Quaggatuggu

It's a triply special day around my house today. First of all, my roomie's friend, Rachel, is spending the weekend with us, and it's her birthday. I made her the special French toast this morning by request. And it also happens to be my beloved boy, Grady, the PBGV's birthday. He's three today and still acts like a demon puppy! (But I gave him a piece of birthday French toast, too.)


Lastly, and most germaine to this space, it is also the one-year anniversary of this fine blog! That's right. Exactly one year ago today, as I was holed up in the back bedroom during a stretch of subzero weather, sitting in front of the one working heat source in the house at the time, I made the serendipitous decision to start my own food blog. And 130 posts and almost 12,000 hits later, and here we are! It has been a great experience writing about my adventures (and misadventures) with cooking and baking, and it has been fun and rewarding to be a part of such a vibrant online community and network of foodie friends and bloggers. So, thanks everyone for your readership, your comments and e-mails, and for your wonderful support. I truly appreciate it!

Ok, so...onward to post 131 and year number two! :-)

Friday, January 26, 2007

Potluck Puzzler

So...I auditioned for a play back in December, and now that the new semester has begun, the cast is getting together for a potluck to get acquainted and to coordinate the rehearsal schedule. Now, Lord knows I love a potluck better than most folks, but this one really had me flummoxed. The e-mail we received said that we should all bring an appetizer or side dish. What is the vision here? Who will be bringing entrees or, more to the point, desserts?! Very odd. Nevertheless, I have been racking my brain to come up with an appetizer that I could throw together tonight after getting home late from taking the old basset hound to the vet, and that could easily be transported tomorrow and be held at work in some fashion until the appointed hour for the gathering. I considered many different hors d'oeuvres, but they all seemed too complicated. It is my fervent belief that you can get as fancy as you want, but when you get down to it, people at potlucks and Superbowl parties just want their deviled eggs and crock pot cocktail weenies in a grape jelly-laden sauce! And this thought--of crock pot-based meats--reminded me of a great recipe that I got a few years ago from my friend and colleague at work, Carey.

You see, every year, my officemate, Lee Ann, throws a party at her house in Saranac Lake, celebrating the annual Winter Carnival held in their town (complete with parade, precision rhythmic lawn chair performers, and an honest-to-goodness castle made of ice blocks from the lake). After watching the parade with other folks crazy enough to brave the sometimes subzero temps, people make their way back to Lee Ann's to warm up and share a potluck feast. The theme of the Winter Carnival is oftentimes ironically tropical, so one year, our friend, Carey, showed up to the party bearing a crock pot full of one of her mom's favorite recipes, Hawaiian Meatballs. Man, were they good! And they are so easy because you can cheat and use frozen meatballs (which can be acquired for a reasonable price at your local Sam's Club--at least, that's where Carey and I get ours). Trust me, people will gobble them up and be none the wiser. Now my crockpot isn't huge, so I only make about half of the following recipe at one time. And sometimes, I half it again to make the meatballs for a delicious dinner served over steamed rice. But for the affair tomorrow night, it will be the standard crock pot full. Oh, and one of my chocolate buttermilk pound cakes because I couldn't help my damn self. Tee hee. ;-)

Hawaiian Meatballs

6 pounds frozen meatballs (I prefer the smaller 5/8-ounce ones to the larger one-ouncers)
2 tablespoons vegetable oil
2 cups pineapple juice (can use reserved juice from canned pineapple)
6 tablespoons cornstarch
6 tablespoons soy sauce
6 tablespoons white vinegar (I like to use rice wine vinegar, too)
12 tablespoons water
1 cup sugar (next time, I might try brown sugar for at least half of this)
1 teaspoon ground ginger
2 cans all-natural chunk pineapple (Dole, unsweetened)
4 green peppers, cut into strips (optional--but they add flavor and color and just look nice in there!)
Other optional additions that I favor: an inch of finely-grated fresh ginger, 2 minced garlic cloves (or a teaspoon of granulated garlic), lots of black pepper, and maybe a dash of cayenne

Defrost meatballs in store packaging in the refrigerator overnight. Add meatballs to the crock pot when ready to make the sauce. Heat the oil and pineapple juice together on medium high in a medium saucepan. While it is heating, in a bowl, whisk together the corn starch, soy sauce, vinegar, water, sugar, and ginger (and black pepper and cayenne, if using). Add the slurry to the saucepan when the oil and juice are hot. Whisk constantly (so that the sauce does not get lumpy) until it thickens. When it is thick, remove from the heat and immediately stir in the pineapple and peppers (and the fresh ginger and minced garlic, if using). Pour this mixture over the meatballs in the crock pot. Mix up the meatballs and sauce. Cover and heat on low to medium for at least two hours. It will sufficiently stay 4-5 hours on low heat with an occasional stir.

Sunday, January 21, 2007

Now THAT'S a cupcake!

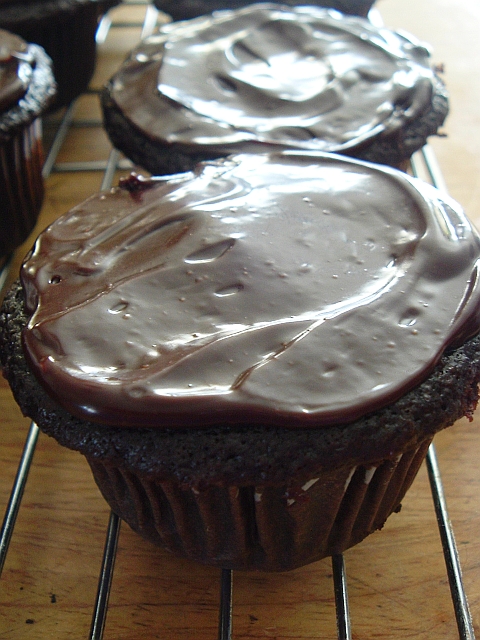
As usual, I have hit the ground running for spring semester 2007! So, of course, all significant cooking and baking projects have come to a screeching halt--except for one. This past weekend, I was still trolling the favorite Epicurious recipes thread on the CI message boards. One recipe that garnered repeated mention was Gourmet's Double Chocolate Layer Cake. There are actually over 800 reviews of this recipe on the Epicurious site, almost entirely favorable (four forks!) and mostly gushing about how it's the best chocolate cake and frosting in the universe and how everyone can call off the search for the definitive chocolate cake--this is it! Well, I don't know about all that. I still long for the whisper-soft, cloud-like texture of my beloved Chocolate Velvet Cake. But I can say that the cupcakes that I made from this recipe are superlative. They are extremely dark and chocolately, like an old-fashioned Devil's Food cake, and though the texture looks coarse to the eye with its somewhat open crumb, it's very springy, tender and moist.

Moreover, the ganache frosting is just decadent! Some Epicurious reviewers found it "too chocolately" and concluded that it took the focus off of the deep chocolate flavor of the cake itself. But I don't get "too chocolately" when you're making a chocolate dessert! So I disagree. The frosting makes the cake, and I don't even really like frosting as a general rule. However, I made one big mistake. I decided to try and whip the ganache, thinking that it might make a creamy, fluffy topping. But actually, in the chill of my winter kitchen, it quickly became hard like a truffle. Now some might enjoy that, but it's really all about a shiny, supple layer of bittersweet ganache, particularly when allowed to come up to a normal room temperature before serving. So I actually ended up scraping off the ganache, remelting it (whisking to reincorporate the butter), and refrosting two dozen of the cupcakes! Ugh! But it was well worth the extra effort to correct the problem. And the best thing about this cake is, it seems to get better--moister, more flavorful--a day or two (or three!) after you make it. Good thing, too, as I made WAY too many! Next time, I will half the recipe and make 18-20 cupcakes instead. Or I might try this as a bundt cake, which I think would be faaaaabulous.


Double Chocolate Cupcakes
(Source: Gourmet, March 1999)

For cupcakes:
3 ounces fine-quality semisweet (or bittersweet) chocolate
1 1/2 cups hot brewed coffee (you can substitute plain hot water, but you don't really taste the coffee, just a dark chocolate flavor)
3 cups sugar
2 1/2 cups all-purpose flour
1 1/2 cups unsweetened cocoa powder (as with the chocolate, the better the cocoa, the better the cake!)
2 teaspoons baking soda
3/4 teaspoon baking powder
1 1/4 teaspoons salt
3 large eggs
3/4 cup vegetable oil
1 1/2 cups well-shaken buttermilk
3/4 teaspoon vanilla

For ganache frosting:
1 pound fine-quality semisweet (or bittersweet) chocolate
1 cup heavy cream
2 tablespoons sugar
2 tablespoons light corn syrup
1/2 stick (1/4 cup) unsalted butter

Special equipment
three 12-cupcake pans

Make cupcakes:
Preheat oven to 300°F. and line bottoms of pans with cupcake papers. Finely chop chocolate and in a bowl combine with hot coffee. Let mixture stand, stirring occasionally, until chocolate is melted and mixture is smooth.

Into a large bowl sift together sugar, flour, cocoa powder, baking soda, baking powder, and salt. In another large bowl with an electric mixer beat eggs until thickened slightly and lemon-colored (about 3 minutes with a standing mixer or 5 minutes with a hand-held mixer). Slowly add oil, buttermilk, vanilla, and melted chocolate mixture to eggs, beating until combined well. Add sugar mixture and beat on medium speed until just combined. Fill cupcakes two-thirds full (no more!) and bake in middle of oven until a tester inserted in center comes out clean, about 25 minutes.

Cool cupcakes in pans on racks. Run a thin knife around edges of each cupcake and invert them onto the racks. Cool completely. Cupcakes may be made 1 day ahead and kept in an air-tight container at room temperature.

Make frosting:
Finely chop chocolate. In a 1 1/2- to 2-quart saucepan, bring cream, sugar, and corn syrup to a boil over moderately low heat, whisking until sugar is dissolved. Remove pan from heat and add chocolate, whisking until chocolate is melted. Cut butter into pieces and add to frosting, whisking until smooth. Transfer frosting to a bowl and cool, stirring occasionally, until spreadable (depending on chocolate used, it may be necessary to chill frosting to spreadable consistency).

Spread frosting (fairly thinly) on cupcakes. Cupcakes keep, covered and chilled, 3 days. Bring to room temperature before serving.

Makes 36-40 cupcakes.

Tuesday, January 16, 2007

BRRRRRR!!!

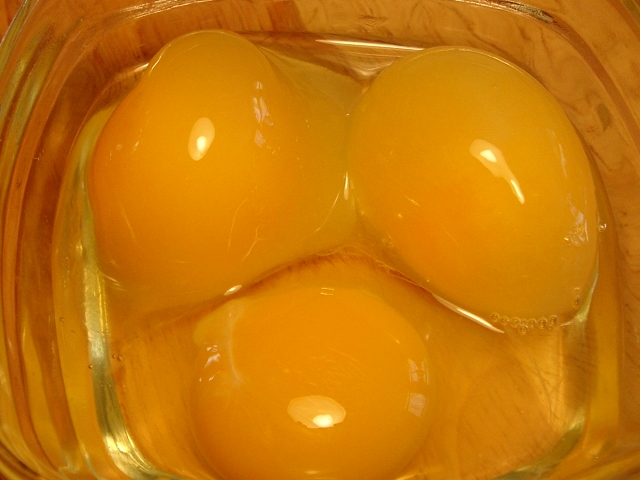
You think it's a little COLD? I don't know if you can tell from this picture, but if you look closely, you can see what happened to the eggs this morning. The one in the lower/center is normal, but the top two eggs were frozen in their shells--whites and yolks together--and retained that shape. I guess it's payback time for all that griping about the unseasonably warm winter! We are currently at -1 and dropping! And to top it all off, my vacation officially ends today--BOO HISS! I'm due at school in the morning at 8:30am--GACK!! So I better open the cabinets where the pipes are so that the heat can get to them, turn on the taps to the diameter of a pencil, and head to bed. A typical but brutal start to "spring" semester! UGH!

Sunday, January 14, 2007

A spicy, mid-winter meal...

I'm afraid that I don't have an exciting "what I made for dinner last night" report to share with you today. (Why do people suggest that that is the worst kind of blog entry, anyway? I love to hear about what folks are making, especially everyday foods, because I like to steal ideas for my own dinners! I don't get it.) Anyway, I have no real dinner recipe to share, but I will offer an unpaid product endorsement. We finally got around to trying some of the Rossi pasta that my friend, Kurt, gave me for Christmas, along with the jar of vodka sauce that came with the gift assortment. So I browned up some garlic and cheese sausage that I unearthed from the freezer, added the jar of vodka sauce and some heavy cream, and served it over Rossi Italian spice linguini. It was FANTASTIC! It was the best pasta dish either one of us has had in a long time--we both kept commenting on it through dinner. It was really excellent. Check them out at www.rossipasta.com. The website also has lots of recipes.

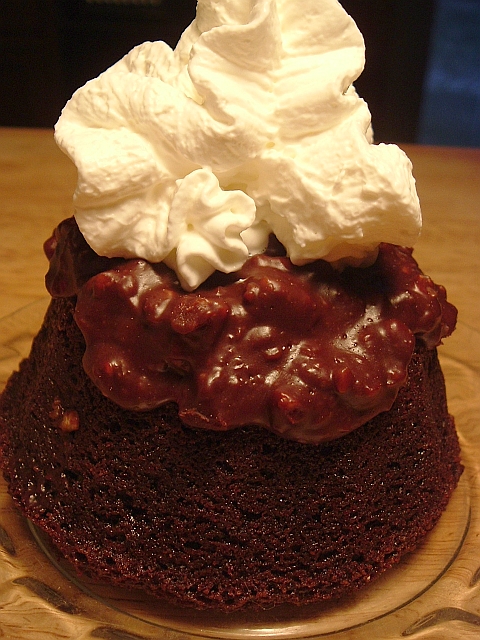
Now I may not have had an entree recipe for you, but I have one for dessert! Sadly, I'm getting down to the wire on my leisure baking time. But yesterday, Cyd and I decided that we needed something chocolatey, and I have had this recipe in the hopper of things to try for quite some time. Instead of making a whole cake, I made mini-bundts instead. And though the recipe called for covering the whole cake with a pecan glaze, the cakes came out so delightfully crispy on the outside (like a brownie!), that I decided to just fill the little depression in the mini-bundts and let it go a little bit over the sides, but not all over. Topped with a good dollop of whipped cream, and we were in spicy chocolate heaven! I'm sure that these would make excellent cupcakes as well.

Mexican Chocolate Mini-Bundts
(Source: adapted from
www.epicurious.com, Gourmet April 2004)

For cakes:
2 sticks (1 cup) unsalted butter
1/2 cup Dutch-process unsweetened cocoa powder
3/4 cup coffee or espresso
2 cups granulated sugar
2 large eggs
1/2 cup well-shaken buttermilk
2 teaspoons vanilla
2 cups all-purpose flour
1 teaspoon baking soda
3/4 teaspoon cinnamon
1/8 (up to 1/4) teaspoon cayenne
1/4 teaspoon salt

For glaze:
1 1/2 cups chopped pecans
1/2 stick (1/4 cup) unsalted butter
1/2 cup half-and-half
1/2 cup confectioner's sugar
5 oz fine-quality bittersweet chocolate (not unsweetened), finely chopped
1 teaspoon vanilla
1/4 teaspoon salt

Special equipment: a 9-inch tube pan or 12-cup bundt pan or 10-12 mini-bundt pans

Make cake:
Put oven rack in middle position and preheat oven to 350°F. Butter cake pan well and dust with flour, knocking out excess.
Melt butter (2 sticks) in a 3-quart heavy saucepan over moderately low heat, then whisk in cocoa. Add water and whisk until smooth, then remove from heat. Whisk in separately sugar, eggs, buttermilk, and vanilla.

Sift together flour, baking soda, cinnamon, cayenne and salt into a bowl, then sift again into cocoa mixture and whisk until just combined (don't worry if there are lumps).

Pour batter into cake pan and bake until a wooden pick or skewer comes out with a few crumbs adhering, 40 to 55 minutes (the mini-bundts took just 25 minutes).

Cool cake in pan on a rack 20 minutes (15 minutes is plenty for mini-bundts, until pans are no longer to hot to touch), then loosen edges with a thin knife and invert onto a plate.

Make glaze:
Spread pecans in 1 layer in a shallow baking pan (1 inch deep) and bake until fragrant and a shade darker, 6 to 8 minutes. Cool pecans slightly in pan on a rack, about 5 minutes.

Melt butter in a 2-quart heavy saucepan over low heat, then stir in half-and-half and confectioners sugar. Add chocolate and cook, stirring, until smooth. Remove from heat and stir in pecans, vanilla, and salt. Cool glaze until slightly thickened, about 5 minutes.

Spoon glaze over top and sides of cake (cake will still be warm) and spread with a small offset spatula or knife.

Cooks' note:
Cake (with glaze) can be made 2 days ahead and kept at room temperature in a cake keeper or covered with an inverted bowl.

Makes 10 to 12 servings.

Saturday, January 13, 2007

One Resolution Keeper, One Resolution Buster

Sigh...what to do with that regular, old mid-week chicken for dinner? It's the culinary conundrum that plagues the nation on a daily basis. And I got some beautiful bone-in, skin-on breasts at the grocery store recently that were buy one package, get one free...yippee! So I was reading through some recent posts on the Cooks Illustrated message boards, as I am wont to do, and someone started a thread about the most popular recipes on those boards. One that came up was the so-called Cornell Chicken. According to a very informative post on www.roadfood.com, the recipe was created in 1946 by a young professor at the University of Pennsylvania, Bob Baker, for a dinner in honor of the governor of Pennsylvania at that time, Edward Martin. A few years later, Professor Baker joined the faculty at Cornell, and eventually, the recipe was printed in a university publication, and from that point forward became known as "Cornell Chicken." This is the same chicken that is served up to thousands of patrons--presidents included!--every September at Baker's Chicken Coop Barbecue Stand at the New York State Fair in Syracuse. But you can make it yourself at home. At the fair, they grill up chicken halves, and I made bone-in, skin-on breasts myself. But if you've made some health-related New Year's resolutions, this would also give excellent flavor to boneless, skinless breasts, not to mention, the brining function of this marinade would help keep them moist. Now keep in mind, this is not a quick fix, as you'll want to marinade your chicken for at least a couple of hours, and up to 12. Actually, I ended up marinating mine even longer than that, and it was fine. It will taste stronger of the marinade, of course, and I confess that I was worried that it would be pickled with all that vinegar! But interestingly, it ended up tasting like it was flavored with white wine. The next time I make this recipe, I think I will also add some dijon mustard to the marinade, and of course, some garlic, as is my way. Professor Baker just died this past March at age 84, but it is great to think that this delicious recipe is his legacy.

To serve with the Cornell Chicken, I decided to make my very favorite potato dish on this earth called Melting Potatoes from Barbara Kafka's definitive cookbook, Roasting: A Simple Art. Be forewarned, this is certainly NOT a low-cal dish, and I don't want to play a role in derailing anyone's diet resolutions. So if need be, I admonish you to walk away from the computer now before it's too late. Don't even look at the recipe! Just walk away! Ok, for those naturally-thin or fearless chubby people who are still reading, let me assure you that, if you make these potatoes, you be a hero--nay, a god--to your family, friends, or whomever you choose to serve them to, IF you can bring yourself to share them, that is! The technique, while a little time-consuming, is easy, and the results, simply divine. The potatoes come out crispy on the outside and so tender and flavorful on the inside that they almost melt in your mouth--hence, the name. Along with the Cornell Chicken, all you need to do is throw together a green salad or your favorite veggies as a side dish, and that's a dinner worth crowing about!


Cornell Chicken
(Source: Professor Bob Baker, Cornell University)

1 egg
1 cup cooking oil
2 cups cider vinegar
3 tablespoons salt
1 tablespoon poultry seasoning
1/2 teaspoon pepper
chicken (this makes enough for ten halves!)

Put egg and oil in blender, blend to emulsify. It will have the consistency of mayonnaise. (Note that if there is any water at all in the blender, this will not happen.) Add vinegar, continuing to blend. Add seasonings and blend until dispersed throughout. Marinate chicken for at least three hours and up to 12. Grill as usual. You may also use the marinade as a basting sauce.

Melting Potatoes
(Source: Roasting: A Simple Art, Barbara Kafka)
Yield: 8 -10 servings

3 tablespoon butter cut in 6 pieces, plus 1 tablespoon reserved in the refrigerator
3 tablespoons olive oil
6 large baking potatoes (about 3 pounds)
1 teaspoon kosher salt
freshly-ground black pepper
2 cups chicken stock (homemade is best, but you can also use low-sodium canned)

Place rack on top third of oven. Heat oven to 500 degrees. Put the 3 tablespoons of butter into an 18-by-12-by-2-inch roasting pan. Set pan over medium heat just until butter has melted. Remove. Add olive oil. Peel potatoes. Cut in half lengthwise, then cut each in half again. Cut each quarter into 3 wedges. Put in roasting pan. Roll wedges in butter and oil until evenly coated. Arrange so they touch as little as possible. Sprinkle with salt and pepper. Roast for 15 minutes. Turn wedges with a pancake turner. Roast 10 minutes more. Turn again. Roast 10 minutes more. Remove pan from oven. Turn wedges again and making sure to turn white sides on each wedge face up. Add stock. Return to oven for 15 more minutes. Dot wedges with small pieces of reserved butter then serve.


*Note: After the last fifteen minutes in the oven (before adding the last pat of butter), the potatoes can be held for 4-6 hours if necessary. When ready to serve, add the butter and roast for another 15 minutes if the potatoes were at room temperature, or for just five minutes if the potatoes were still warm.
**Another Note: This recipe also works well with the broth from a braised pot roast. And throw some chunks of carrots in there to roast along with the potatoes--they come out SO sweet! YUM!

Friday, January 12, 2007

"Hit up Magnolia and mack on some cupcakes!"

I got some great Christmas/Hanukkah gifts from my sweet friend, Rosanne, who has been so supportive of my fledging efforts at catering and baking for the farmers' market. Her new vision for me is to jump on the cupcake craze that started with the Magnolia Bakery in NYC and is still sweeping the nation. To encourage me in this endeavor, she sent me four cookbooks from three different bakeries in the City: The Magnolia Bakery Cookbook, The Buttercup Bake Shop Cookbook, More from Magnolia: Recipes from the World Famous Bakery and Allysa Torey's Home Kitchen, and Sweet Serendipity: Delicious Desserts and Devilish Dish.

Serendipity is the Upper East Side gift shop and cafe' that is home to the infamous Frrrozen Hot Chocolate made even more famous by Oprah and which I've blogged about previously. Then, of course, I had heard of the Magnolia Bakery--I mean, who hasn't--especially after the Andy Samberg and Chris Parnell homage to the cupcakes in their video, "Lazy Sunday" on SNL, and the bakery was also referenced on "Sex in the City" and in the movie, Prime. As for the Buttercup Bake Shop, the name was vaguely familiar, and I think I remember reading in a guide book or on a web page somewhere that, if you couldn't get your hands on Magnolia cupcakes, then try the ones at the Buttercup Bake shop, that they were equally delicious. Well, it wasn't until I received these cookbooks and started to read up about the bakeries that I realized the reason for the similarity. Their recipes are, in fact, identical, because the owners of the two bakeries used to be co-owners of the Magnolia before an apparently ugly split. If you're interested in the whole tawdry story, read this fascinating article. What I find the most interesting is that, not only are Magnolia and Buttercup spin-offs of one another, it would seem that almost every cupcake bakery in the City is related to all the others like the characters in a soap opera or, given all the lawsuits and bad feelings, a more appropriate comparison may be the Bloods and the Crips!

Despite all the bakery politics and infighting down south, I thought I'd try my hand at baking up a batch of both bakeries' most popular cupcake, the vanilla-vanilla. I hate to have to say it, but I don't see what all the fuss is about! The cupcakes were okay, I guess. Truthfully, the cake was a bit on the dry side for me and a bit coarse in texture. And admittedly, I have never been a friend of frosting, especially if there's no cream cheese involved in it, but I found the vanilla "buttercream" overly sweet, and it dries out far too quickly and becomes unappealingly hard. Still, I will try to keep an open mind and try their chocolate cupcakes next. But they would have to be pretty phenomenal to be worth $1.75 apiece! Jeesh! If you want to judge for yourself, here's the recipe used by both Magnolia and Buttercup:

Vanilla-Vanilla Cupcakes
(Source: More from Magnolia by Allysa Torey)
Makes about 2 dozen cupcakes, depending on the size of your cupcake papers and muffin tins

1 1/2 cups self-rising flour
1 1/4 cups all-purpose flour
1 cup (2 sticks) unsalted butter, softened
2 cups sugar
4 large eggs, at room temperature
1 cup milk
1 teaspoon vanilla extract

Preheat oven to 350 degrees. Line two 12-cup muffin tins with cupcake papers.

In a small bowl, combine the flours. Set aside. In a large bowl, on the medium speed of an electric mixer, cream the butter until smooth. Add the sugar gradually and beat until fluffy, about 3 minutes. Add the eggs, one at a time, beating well after each addition. Add the dry ingredients in three parts, alternating with the milk and vanilla. With each addition, beat until the ingredients are incorporated but do not overbeat. Using a rubber spatula, scrape down the batter in the bowl to make sure the ingredients are well blended. Carefully spoon the batter into the cupcake liners, filling them about three-quarters full. Bake for 20–25 minutes, or until a cake tester inserted in the center of the cupcake comes out clean.

Cool the cupcakes in the tins for 15 minutes. Remove from the tins and cool completely on a wire rack before icing. Ice the cupcakes with either vanilla buttercream (recipe below) or chocolate buttercream.

Note: If you would like to make a layer cake instead of cupcakes, divide the batter between two 9-inch round cake pans and bake the layers for 30-40 minutes.

Vanilla Buttercream:
Makes enough for one 2-layer 9-inch cake or 2 dozen cupcakes*

1 cup (2 sticks) unsalted butter, softened
6 to 8 cups confectioners’ sugar
1/2 cup milk
2 teaspoons vanilla extract

Place the butter in a large mixing bowl. Add 4 cups of the sugar and then the milk and vanilla. On the medium speed of an electric mixer, beat until smooth and creamy, about 3-5 minutes. Gradually add the remaining sugar, 1 cup at a time, beating well after each addition (about 2 minutes), until the icing is thick enough to be of good spreading consistency. You may not need to add all of the sugar. If desired, add a few drops of food coloring and mix thoroughly. (Use and store the icing at room temperature because icing will set if chilled.) Icing can be stored in an airtight container for up to 3 days.

*Note: If you are icing a 3-layer cake, use the following recipe proportions:
1 1/2 cups (3 sticks) unsalted butter
8 to 10 cups confectioners’ sugar
3/4 cup milk
1 tablespoon vanilla extract


Thursday, January 11, 2007

It's almost over...boo hoo.

There's no denying it now. Winter Break is quickly drawing to a close. I'm down to one more week before the insanity begins again. It all just flew by so fast! But I'm feeling good about about the projects that I managed to accomplish around the house. There are a few left, as always, but I think I can still get them in under the wire. In the meantime, with the countdown clock ticking, I've had my teeth cleaned, my hair cut, did a premature spring cleaning of the whole house, had the heater repaired, made a vet appointment for Rosie the basset and Pudge the cat, cleaned the chicken coop, and even squeezed in two trips to Montreal less than a week's time. Whew!

Part of heading north has to do with trying to check off the Golden Globe-nominated films that don't play in our one cineplex town. If it's not animated or it doesn't star Jim Carrey, Will Farrell, or Steve Carell, it just doesn't come here. Sometimes, it boggles the mind why certain films don't play locally, such as the one we saw tonight, Dreamgirls. With that cast? With Beyonce' and Eddie Murphy and Jamie Foxx?? Who knows. It was faaaaabulous, by the way. People actually broke out into applause after some of the big numbers in the film. And that Jennifer Hudson, WOW! What a stroke of genius in casting her as Effie! She'll bring you to your knees with "You're Gonna Love Me." Look for her come Oscar time! And to think, she LOST on "American Idol." That'll teach 'em!

Anyway, after the movie, my friends and I decided to continue our Smoked Meat Tour of Montreal. Maybe a month ago, we tried to go to Schwartz's Deli, reputed to be the definitive smoked meat establishment in Montreal. (Smoked meat, for the uninitiated, is a close kin to say, our pastrami or even corned beef.) We attempted to eat at Schwartz's, but the omnipresent line outside was too darn long. So we opted to go directly across the street to The Main Deli, reported to be the second-best smoked meat operation in the city. But tonight, we lucked out. It was very cold (currently, 11 degrees F.), and it was a bit past the ideal dinner hour on a weeknight, and there was no line at Schwartz's, and there were actually seats inside! It's a tiny little joint, and you have to dine family-style, sharing a table with other patrons, but we were excited just to have made it inside. So here's our review, comparing the two. The homemade french fries at Schwartz's were incredible, and personally, I was enamoured of their pickles (a brand called Putter's?), but all of us agreed that both the cole slaw AND the smoked meat were preferable at The Main! This is one of those classic Montreal debates like St-Viateur's bagels versus Fairmount's, but as for me and mine, no waiting in line at Schwartz's for us! Moreover, at The Main, you can get kreplach (dumpling) soup and authentic varenyky (like Polish pierogi, but of Russian or Ukrainian tradition), and you can use a credit card (helpful to us Americans)--so why wait in line out in the elements across the street?

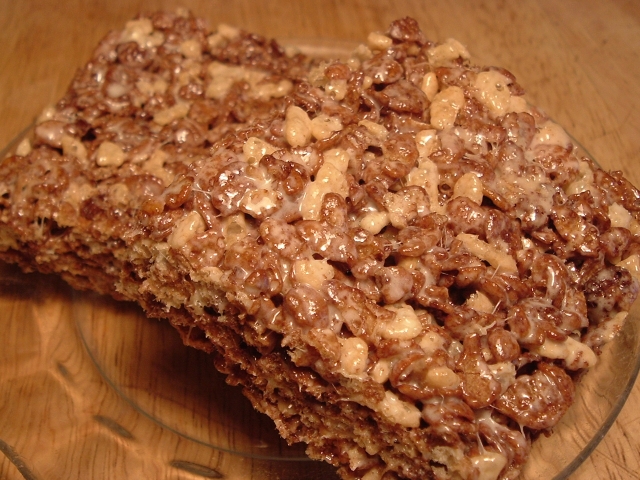
Lest you think I'd end this post without a recipe, I'll share one silly one (no, not for smoked meat!). I am still enjoying some leisurely baking while I have a little more time off, and it doesn't get any easier or more childish than this one. But hey--school's still out, and this kid is still at recess! This is an older Martha recipe (via daughter, Alexis) for a jazzed-up Rice Krispie treat that also includes Cap'N Crunch and Froot Loops. Hey, I wonder what a chocolate version would be like--you know, with Cocoa Krispies or Cocoa Pebbles or Cocoa Puffs (or all three)? Hmm...I should try that next time!

Confetti Squares
(Source: www.marthastewartliving.com
)

9 tablespoons unsalted butter (you'll hate me for saying so, but margarine makes a more tender treat)

1 teaspoon salt (very important to cut the sweetness)

12 cups (2 1/2 bags) miniature marshmallows (I prefer large ones that have less of the powdery stuff that keeps them all separate as I believe it makes for a creamier marshmallow coating)

6 cups Rice Krispies cereal

6 cups Cap'n Crunch cereal

6 cups Froot Loops cereal

vegetable-oil cooking spray

1. Lightly spray a 9-by-9-by-2-inch baking pan with vegetable-oil cooking spray; set aside. Melt butter in a large pot over medium heat. Add salt and marshmallows; stir with a wooden spoon until melted. Remove from heat. Add Rice Krispies, Cap'n Crunch, and Froot Loops, and stir until combined.

2. Transfer the mixture to the prepared pan. To prevent sticking, coat your hands with vegetable spray, and press the mixture evenly into the pan. Let cool, about 30 minutes.

3. Cut into 3-by-3-inch bars. Store in an airtight container for up to 3 days.

*This recipe makes nine GINORMOUS, tall bars. I usually half this recipe and use a 9x13 pan.


*Follow-up: LOOK! I tried them with Cocoa Pebbles (about 2/3 Cocoa Pebbles and 1/3 Rice Krispies because I didn't have enough Cocoa Pebbles to do a whole batch), and I think this is my favorite combination ever!

Friday, January 05, 2007

Midnight Pasta

So I'm on winter break and my sleeping schedule is all screwed up. I've reverted to my very nocturnal ways like I always do when I'm on vacation (check the times on some of my posts lately!). Moreover, I have been plagued recently with severe carpal tunnel at night. In short, I'm not sleeping much, and when I do, I'm sleeping at weird times. This also tends to mess up my meal schedule. Like today, I ended up eating my lunch at an odd hour (3pm), and when my roommate got home from work and was ready for dinner, I wasn't that hungry. So she made a sandwich and later, I just had a smoothie and thought I was done for the night. But around 11pm, when I was watching some backlogged Martha tapes (another critical goal for my winter break--getting through the stack of Marthas and Oprahs!), that woman sucked me in, d#mn her! Her guests on the episode that I happened to be watching were Johanne Killeen and George Germon of the famed Al Forno restaurant, and they were there to promote their new cookbook, On Top of Spaghetti.

Part of this book chronicles a friendly competition between the couple who often get home very late at night after working at the restaurant. The game is to come up with simple "midnight pasta" dishes made of few ingredients that can be completed by the time the water boils and the pasta cooks. The one that grabbed me tonight and drove me to the kitchen at an obscene hour was called Fettucine with Mascarpone and Egg. It's not unlike Fettucine Alfredo, but with mascarpone instead of butter. The problem was, of course, that at midnight in the tiny hamlet formerly and charmingly known as Ober's Corners, I was lacking in the mascarpone department. However, I had an abundance of cream cheese leftover from holiday baking projects. I wondered if a similar dish could be made swapping out regular cream cheese for the mascarpone? Well, I am happy to report that you can! Don't get me wrong, I am sure that it is much better with mascarpone, but it was darn good with cream cheese, too. I also swapped out pappardelle for fettucine because that's what I had on hand. And, of course, I had gorgeous fresh eggs from my hens that I knew would be lusciously profiled in this dish. I love this recipe because it's so quick and easy (takes as much time as making a box of mac and cheese!), it's obviously flexible, and it includes a great trick. While you are boiling the pasta, you make the simple egg-based sauce in a metal bowl over the pasta pot, creating a de facto water bath to melt the cheeses and keep the eggs from curdling (as seen below). Isn't that clever?


Fettucine (or Pappardelle) with Mascarpone (or Cream Cheese) and Egg
(Sources: www.marthastewartliving.com and also www.foodandwine.com
)
Serves 2


2 large eggs
3 tablespoons mascarpone cheese (or cream cheese in a pinch)
1/2 cup freshly grated Parmigiano-Reggiano cheese, plus more for serving if desired
kosher salt
freshly ground pepper , to taste
1/2 pound dried fettuccine (or pappardelle)

Fill a stockpot with 6 quarts of water, cover, and bring to a boil. In a medium stainless steel bowl, beat the eggs with the mascarpone or cream cheese, 1/2 cup Parmigiano, 1/2 teaspoon salt, and 1/4 teaspoon pepper. Set aside.

Add 3 1/2 tablespoons salt to the boiling water and add the fettuccine or pappardelle. Cover partially just until the water returns to a boil, then uncover, stir the pasta, and cook until al dente.

While the fettuccine is cooking, carefully hold the metal bowl just slightly over the boiling water to warm the egg and cheese mixture, stirring occasionally. When the fettuccine is cooked, drain and add it to the bowl; toss well. Serve immediately, passing the extra Parmigiano at the table.