Saturday, November 17, 2012

Midwestern Memories: Chicken and Noodles

I made the BEST pot of chicken and noodles for dinner tonight, which is really saying something, as I've been making some version of this dish for almost 20 years now! I was first introduced to chicken and noodles in 1993 by my sweet friend, Karen, who made it for me and our other roommates when we were living together in a big house in Kankakee, Illinois. And I'm sad to say that, after I moved away to Utah and then to New York, that there was a long stretch where I couldn't replicate the exact recipe, because I couldn't find Reame's frozen noodles anywhere outside the Midwest. But thankfully, Walmart has started carrying them for the past couple of years. Of course, you can use a different kind of noodle or make your own (which I had to do for years, in the absence of Reame's), but it's really not the same.

Now, there are several ways to do this, of course, including doing it all on the stove top or all in the crock pot. But I have devised a hybrid methodology that works well for me. I also like to split the prep over two days, doing some of it a day ahead. But you needn't. Here's my favorite way of making this hearty, comforting dish...


Gina's Chicken and Noodles

1 whole chicken
4 quarts chicken broth, divided
1 tablespoon chicken soup base (or to taste)
1 onion, peeled and cut in eighths
2 large carrots, scrubbed and cut into large chunks
2 celery stalks, cut into large chunks
2 bay leaves
1/2 teaspoon whole peppercorns
1 family-size can cream of chicken soup
1 24 oz. package Reame's frozen egg noodles
2 cups cream or half-and-half
1/2 cup fresh parsley, chopped

(I do this the night before I want to have chicken and noodles.) Place the chicken along with two quarts of broth, the soup base, the veggies, and the bay leaves and peppercorns in the crock pot. Cook for about four hours on high (or all day/overnight on low). When the chicken is tender, remove it from the crock pot and refrigerate. Strain the stock through a sieve, then refrigerate that, too.

The next day, de-fat the cooked and chilled stock, then combine it with the other two quarts of broth, and bring all the liquid to a boil in a large stock pot. Whisk in the cream of chicken soup until mostly smooth and return to a boil. Add in the frozen noodles and bring back to a boil, stirring to separate. Reduce to a simmer and cook for about 30 minutes, or until the noodles are sufficiently tender.

Meanwhile, remove the skin and bones from the chicken and break the meat into large chunks. When the noodles are tender, stir in the chicken, the cream, and the fresh parsley, and cook on low until heated through (don't boil). Correct the seasonings if necessary, then serve piping hot in large bowls.

*If you want the authentic Midwestern carbo-loading experience, serve over homemade mashed potatoes.

Wednesday, November 14, 2012

The Monster Cookies Before Christmas

My friend June has been so busy at school this semester, that she asked me to be the co-advisor of the student gay-straight alliance club. This week, the GSA hosted a fundraising bake sale with a dark and semi-creepy "Nightmare Before Christmas" theme. Of course, I wanted to contribute something for the sale, but this was also the week of the intramural public speaking competition that I coordinate each semester, so I wasn't up for anything too involved. Plus, I find that fussy things don't always go over well at bake sales. Simpler is usually better.

I remembered that on a recent episode of "The Pioneer Woman," she made some yummy-looking (and theme-appropriate) "monster" cookies that also looked very quick and easy. The recipe calls for everything but the kitchen sink, but it's also very adaptable, so you can use whatever goodies you have on hand or prefer.


PW's Monster Cookies
(Source: adapted from The Pioneer Woman)

2 sticks (salted) butter, softened
1 cup white sugar
1 cup brown sugar, packed
2 whole large eggs
2 teaspoons vanilla extract
1 1/2 cups all-purpose flour
1/2 teaspoon baking soda
1 teaspoon baking powder
1 1/2 teaspoons kosher salt
1 1/2 cups old-fashioned oats
1/2 cup M-n-M's (I swapped out macadamia pieces)
1/2 cup pecans, chopped
3/4 cup chocolate chips (I used bittersweet chunks)
1/2 cups peanut butter chips (I swapped out toffee bits)
2 1/4 cups Rice Krispies

Preheat oven to 375 degrees. Cream butter with sugars until fluffy. Add eggs one at a time, beating well after each addition. Add vanilla and beat.

Combine flour, baking soda, baking powder, and kosher salt. Add to mixing bowl and mix till combined. After that, add in remaining ingredients in whatever quantity you prefer. Add more nuts if you’d like, or more M & M’s, more peanut butter chips or chocolate chips. Add Rice Crispies at the very end, mixing until just combined. Do not overmix!

Use a cookie scoop to scoop balls of dough onto a cookie sheet. (I used a half-sheet pan line with a Silpat, and used a muffin scoop to make six monster-sized cookies per pan.) Bake until golden brown, then allow to cool on a rack. (The large cookies took about 15 minutes to bake, and I got 20 cookies out of one batch of dough.)

Saturday, November 10, 2012

Like that Bible miracle...but with ham.

I have been playing my Aldi "Chopped" game again, where I wander around the store, grabbing random things, then I come home and figure out how to combine them. This round, I sliced up half a large onion and put it in the bottom of the crock pot, then put in a small ham (3-4 lbs.). I sprinkled it with pepper, garlic, and ground celery seed, and slathered it with grainy honey mustard and a handful of brown sugar. Then I added the mystery ingredient--a jar of red cabbage and apples--and finally, a good splash of apple cider vinegar. I cooked it in the crock pot on low all day (6-8 hours) then served it with homemade mashed potatoes. This is my basic methodology for cooking pork roast, but I wasn't sure what it would be like with ham. As it turns out, it's DELICIOUS! My roommate was heard to exclaim, "I never want to eat anything else but THIS!" Ha ha.

We had this ham dinner for two nights, and there was still plenty left. Monday night after choir rehearsal, I stopped by Panera to buy a loaf of bread to make some sandwiches for an Election Night party (FOUR MORE YEARS! FOUR MORE YEARS!), but they were closed. Boo hiss. So I popped into Walmart and I was surprised to find that they had Cubano bread in their bakery. So I made two (whole loaf) Cubano sandwiches for the get-together.

A Cubano is normally ham and pork roast, but I used ham and honey roasted turkey, Swiss cheese, yellow mustard, and homemade pickles, and crisped up the bread and melted the cheese in a 400 degree oven for a few minutes before serving. My fellow Democrats gobbled them up, despite the fact that Cuban sandwiches made no sense thematically for the occasion. Tee hee. (Pictured left is the AWESOME serving platter than my darling friend, Kurt, sent me for my birthday. It reads: "Democrat: a person who believes in the political and social equality of all. A member of the Democratic Party of the United States." How perfect is that??)

And can you believe that there was STILL ham left after all of this? So for lunch today, I chopped the remaining ham (a couple of cups?) and whizzed it up in the food processor with half of an onion and three medium dill pickles, a good dash of black pepper, and about a half cup of mayo. Then I toasted up some bread, slathered on the ham salad, topped each open-faced sandwich with a slice of sharp cheddar (one had to have pepper jack when I ran out of cheddar), and some tomato slices for my roommate's sammies. YUM! And all this from one little seven-dollar Aldi ham! I AM THE BUDGET MASTER! FEAR ME!
Saturday, November 03, 2012

Doro...WHAT??

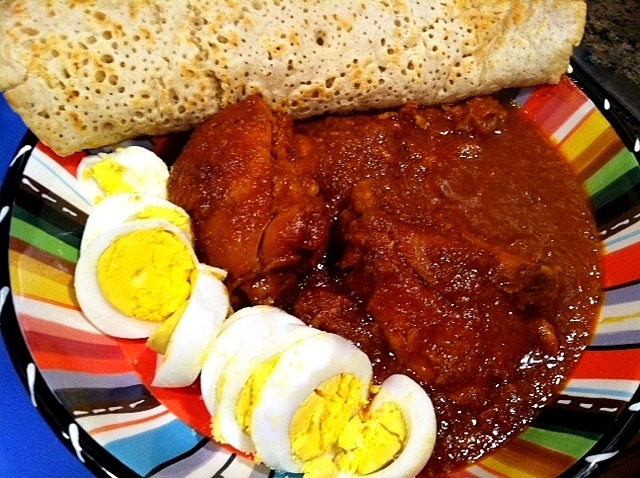
This silly anecdote will come as a surprise to know one who knows me, but here it is. I was watching the Halloween episode of Minday Kaling's new sitcom, and she made the following joke: "This Ethiopian lady in my building is handing out doro wat. It's like this chicken stew with eggs in it. Kids love it." So naturally, I had to Google doro wat....and then make some for myself, along with a reasonable fascimile of injera, the Ethiopian flatbread that one uses to mop up the spicy, saucy goodness.

The main problem with making Ethiopian cuisine at home is not having access to authentic ingredients--namely, the berbere spice mixture for the doro wat and the grain, teff, for the injera. So I had to fashion a faux berbere using nearly every spice in the cupboard, and then I converted the recipe to made in the crock pot, as is my way. Also, the injera batter is described as fermented and slightly sour-tasting, so I used some whole-wheat flour and a half cup of sourdough starter. That worked fairly well, and the resulting dinner was pretty awesome, if I do say so myself! Thanks for the inspiration, Mindy Kaling!


Crock Pot Doro Wat (Ethiopian Chicken and Pepper Paste Stew)
2 tablespoons olive oil
4 lbs. skin-on, bone-in chicken thighs
2 tablespoons butter
2 large onions
2-inch piece fresh ginger, peeled
6 cloves garlic, peeled
6 oz. can tomato paste
2 tablespoons chili powder
1 tablespoon sweet paprika
1 tablespoon smoked paprika
2 teaspoons cardamom
1 teaspoon coriander
1 teaspoon fenugreek (I swapped out cumin)
1 teaspoon turmeric
1 teaspoon cayenne pepper
1/2 teaspoon cinnamon
1/2 teaspoon nutmeg
2 cups chicken stock
1 cup red wine

1/4 cup lemon juice
1 teaspoon salt
1/2 teaspoon black pepper

8 hard-cooked eggs, peeled

In a large skillet, heat the olive oil over medium heat, and then brown the chicken on both sides. When browned, take the chicken out of the skillet, remove the skin, and place the pieces in the crock pot. Then, in the bowl of a food processor, add the onions, ginger, and garlic, and process to almost a paste. Drain most of the oil from the skillet, leaving about two tablespoons. Melt the butter in the pan, add the onion-ginger-garlic mixture, and cook for a few minutes until translucent and tender. Stir in the tomato paste and ALL of the spices, except the salt and pepper. Cook for a few minutes, stirring frequently, until the tomato mixture just starts to color. Whisk in the chicken stock, red wine, lemon juice. When thoroughly combined, pour this sauce over the chicken in the crock pot, cover, and cook on high for 3-4 hours or low for 6-8, until the meat is almost falling off the bone. Serve with one hard-cooked egg in each helping, and injera (flatbread) or rice on the side.

GREAT TIP FOR LEFTOVERS: When the doro wat has cooled, remove the bones and gristle and any bits of skin from the chicken and discard. Shred the chicken back into the sauce and refrigerate. The next day, peel and dice one large sweet potato and add to the crock pot with a quart of vegetable (or chicken) stock, along with a teaspoon of dried thyme. Cook for about two hours on high or four hours on low until the sweet potato pieces are tender. Stir in the leftover doro wat, plus one or two cans of drained chickpeas. Cook another hour or two until heated through. This makes a TERRIFIC soup, maybe even better than the doro wat in its original form!

Faux Injera (Ethiopian Flatbread)
(Source: adapted from Whats4Eats)
1 cup all-purpose flour
1/2 cup whole wheat flour
1 tablespoon baking powder
1/2 teaspoon salt
12 cup sourdough starter
2 to 2 1/2 cups club soda (or water) 

1. Preheat a large cast-iron skillet over a medium flame. Mix the flour, whole wheat flour, baking powder and salt together in a large bowl. Stir in the club soda and mix to a smooth batter. It should have the thin consistency of a pancake batter.
2. Wipe the skillet with a little oil using a paper towel. Ladle about 1/2 cup of the batter into the skillet and spread it with a spatula to make a large crepe. Let bake in the skillet until all the bubbles on top burst and begin to dry out, about 2-3 minutes.
3. Carefully turn the injera over and cook on second side another minute or two. Try not to brown it too much.
4. Remove the injera to a warm platter and repeat with the rest of the batter, wiping the skillet clean with an oiled paper towel each time.
5. Serve immediately or hold covered in a warm oven.

Monday, October 29, 2012

HAPPY BIRTH-O-WEEN!

So...my birthday was Friday. I am now as close to 50 as I am to 40. GACK! As a birthday/Halloween combo treat, Cyd and I planned a special weekend road trip. We headed down to Sleepy Hollow on Friday night, had the world's most EXPENSIVE birthday dinner at Ruth's Chris Steak House at the Tarrytown Marriott (YIKES!), and then took in the Horseman's Hollow that we loved so much last year. (Sadly, it was not as good this time--it seemed like there just wasn't as much to it. Boo hiss.) But Saturday night, we were able to attend our friends Jaymie and Audrey's big Halloween bash in New Jersey, which was faaaaaaaaabulous!

The one assignment that I was given for the party was to make a crock pot of Paleo chili. Absolutely, I said! Now...what is Paleo chili, I wondered? So a cursory perusal of the interwebs taught me that the Paleo or primitive diet restricts grains, that is, crops which the paleolithic hunter-gather would not yet have cultivated. Legumes are also verboten because they need to be soaked and cooked in order to be edible--too much prep for the caveman, I guess.

Root crops seem to be somewhat controversial in the Paleo community, but I found a recipe for bison and sweet potato chili on a web site called "Paleo Girl," so I thought it would be acceptable. It was also VERY tasty--basically just chili with diced sweet potatoes swapped out for the typical kidney beans. The bison was good, but given how expensive it is, and how strong the spice levels are in chili, I would not hesitate to swap out ground beef in this recipe. Also, as an FYI, I doubled the recipe below, and it filled a large (six quart?) crock pot. The one big change I made was to nearly TRIPLE the prescribed amount of tomato product, as the texture wasn't soupy enough to suit me, and then I had to up the spice level as well. Still, it turned out great, and I would make it again for both cavepeople and those with more modern, carb-inclined palates.

"Paleo" Bison and Sweet Potato Chili
(Source: adapted from Paleo Girl)

1 pound ground buffalo (or ground meat of choice)
1 tablespoon olive oil
1 large sweet potato, peeled and cubed into 1/2 inch pieces
1 medium red onion, diced
4 garlic cloves, minced
1 jalapeno, seeded and diced
1 4 oz. can diced green chiles
1 28 oz. can tomato sauce
2 14.5 oz. cans fire-roasted diced tomatoes
2 tablespoons cumin
2 tablespoons chili powder
1 teaspoon smoked paprika
1 teaspoon white pepper
1/2 teaspoon cayenne, or to taste (optional)
1/2 teaspoon salt
1/2 cup fresh cilantro chopped

1. Brown your ground meat in a stock pot. Once browned remove it with a slotted spoon leaving any drippings in the pot.
2. Add the olive oil and cook the sweet potatoes for about five minutes, stirring often. Add the onion and continue cooking until sweet potatoes are fork tender.
3. Add the garlic, jalapeno, and green chiles and cook for another two minutes.
4. Next add remaining ingredients except for cilantro.
5. Let simmer for about ten minutes so that the flavors can meld together. (I cooked it in the crock pot on low for a couple of hours.)
6. Stir in the cilantro right before serving. (Feel free to go wild and add your favorite "non-Paleo" toppings such as cheese, sour cream, and corn chips.)

Besides the fine chili that I provided (tee hee), Audrey and Jaymie had a ton of delicious food at their party. It seems that they ran all over town getting speciality items from their favorite restaurants, including some from a place called The Prickly Pear. It has never been my pleasure to dine there, but you can be sure I'll be checking them out during my next visit now that I have tasted their excellent catered dishes.

My very favorite thing on the appetizer buffet was their scrumptious salsa verde (I am currently working on wheedling the recipe out of the chef), but my favorite entree was pork tenderloin medallions with a gorgonzola cream sauce served with farro. OH MY! SO GOOD! I somehow managed to miss it on my first trip around the pool table (where the main dishes were set up), but my friend, Larry, brought me a taster plate and said I HAD to try it. And boy, was he right! Such a delicious combination! In fact, my first thought--as usual--was how I might replicate it at home. And I think I did pretty well, if I do say so myself. ;-)

Because it was a weeknight, I cheated a little and used one of those pre-marinated pork tenderloins (garlic and Italian herb flavor) with extra pepper and Italian herbs sprinkled on top before baking (pull at 145 degrees, tent with foil, and let rest for at least ten minutes before slicing). And then here's what I did for the sauce:

Gorgonzola Cream Sauce

1 tablespoon butter
1 large shallot, minced
2 tablespoons white wine
1 cup heavy cream
1/4 cup grated Romano or Parmesan cheese
1/2 cup (4 oz.) gorgonzola cheese, crumbled
1 teaspoon granulated garlic
1/2 teaspoon white pepper

Melt the butter in a sauce pan. Saute the shallot a few minutes until tender. Deglaze the pan with the white wine. When the wine has absorbed, add the cream and reduce by half over medium-low heat (do NOT boil!). When the cream has reduced, whisk in the cheeses until melted and smooth. Add the garlic powder and pepper, whisk again, and then serve over pork tenderloin medallions (or roasted meat of your choice).

Finally, the piece de resistance, the farro--which is rapidly becoming my favorite grain! I think The Prickly Pear steamed theirs, which was very good, but I wondered if one might make farro risotto-style? As it turns out, you can, and it's DELISH--so deeply flavorful and and a little chewy (in a good way). This is a side dish that I am going to make again and again...believe that!

Farro Risotto

6 cups (low salt) vegetable or beef stock, more or less
2 tablespoons olive oil
2 tablespoons butter
1 medium onion, small dice
2 cloves garlic, minced
1 cup pearled farro
1/3 cup white wine
1 teaspoon chopped fresh rosemary
1/2 teaspoon black pepper
salt, to taste

Heat the stock in a saucepan, bring to a boil, then turn down the heat and keep it on low until needed.
In a large skillet, heat the olive oil and melt the butter together. Saute the onion for a few minutes until tender. Add the garlic and farro and cook for another two or three minutes to toast the farro. Deglaze the pan with the white wine. Then start to add the hot stock a half cup at a time, stirring occasionally, and letting the liquid absorb before adding the next half cup of stock. When the farro is completely tender (about a half hour of stirring and tending to it), stir in the rosemary and pepper and check to see if it needs salt before serving.

UPDATE 11/23/12: Yippee! I heard back from the very kind owner of the Prickly Pear, Linda Andes, and she was gracious enough to share their fabulous salsa verde recipe with me. Here it is:

Prickly Pear's Salsa Verde

2 roasted jalapenos
1/2 white onion
1 tablespoon garlic
2 lemons
1/2 cup white balsamic vinegar
1/2 cup olive oil

Roast jalapenos in the oven for 10-15 minutes at 350 degrees. In a blender, add all ingredients except olive oil. Blend well and then slowly add olive oil to emulsify.

Will last 1-2 weeks in fridge.

Monday, October 22, 2012

Processing the late-harvest bounty...

So...I went to the Harvest Bounty Food Swap last weekend, and I still had all the produce that I had traded canned goods for hanging around. It was high time I figured something to do with all that bounty!

I began with the beautiful green and tomatillos. I tried not to be greedy and only took thirty of them at first, but no one else took any, so at the end of the swap, they gave them all to me. SCORE! So I had enough to make four pints of this scrumptious, oven-roasted salsa verde that I found on a blog called The Yummy Life. As written, the recipe will probably yield two pints--I doubled it.


Roasted Tomatillo Salsa Verde
(Source: The Yummy Life)

2 lbs. tomatillos, husks and stems removed (approx. 25-30 medium size)
4 garlic cloves
1 medium onion
1/2 lb. Anaheim green chile peppers; may substitute other large green chiles such as New Mexico or poblano or use 2 4-oz cans chopped green chiles from the Mexican aisle of the grocery store (I used a poblano)
2 small or 1 large jalapeno (I used a serrano)
1/2 cup cilantro, loosely packed
1 teaspoon cumin
1 teaspoon black pepper
1 teaspoon white pepper
1 teaspoon dried oregano (preferably Mexican)
1 teaspoon kosher salt
1/2 cup cider vinegar (may reduce to 2 tablespoons if not canning salsa)
1/4 cup bottled lime juice (okay to use fresh if not canning salsa)

ROAST THE VEGGIES: Roast tomatillos, chile peppers, onions and garlic using one of two methods:
--OVEN ROASTING: Preheat oven to 500 degrees. Place veggies in single layer on foil-lined baking sheet. Bake 15-20 minutes until tomatillos and peppers are charred, softened, and oozing juices.
--STOVE-TOP GRILLING. Heat stove-top grill/griddle on medium high heat. Arrange veggies in single layer, rotating with tongs until charred bits are present on all sides, and tomatillos are soft and oozing juices; move to bowl to collect juices.

PEEL, STEM AND SEED the green chiles. Stem and seed the jalepenos (skin can be left on); or leave seeds if hotter salsa is desired. Leave skin on tomatillos.

BLEND INGREDIENTS: Add roasted veggies (including juices that collected after roasting) and remaining ingredients to a blender or food processor; blend until desired consistency--anywhere from slightly chunky to pureed.

To eat salsa without canning, wait at least 4 hours to eat to allow the flavors to blend and vinegar to mellow. Best if eaten the next day. Store in refrigerator for up to 2 weeks.

TO FREEZE, transfer salsa to freezer-safe containers and freeze for up to 6 months. Allow at least 1/2" headspace for expansion when frozen.

TO CAN: add blended salsa mixture to pot on stove top, bring to a boil, reduce heat, cover and simmer 15 minutes. Pour salsa into hot, sterilized pint or half pint jars, leaving 1/4 inch headspace. Process for 15 minutes in boiling water canner. Turn off heat and remove cover; leaving jars in hot water for 5 minutes. Remove jars carefully and rest on towel undisturbed for 12-24 hours. If any jars don't seal, store in fridge to use within 2 weeks; or freeze. Canned salsa tastes better if it's stored unopened for at least one month to allow flavors to blend and vinegar to mellow. Recipe may be doubled or tripled.


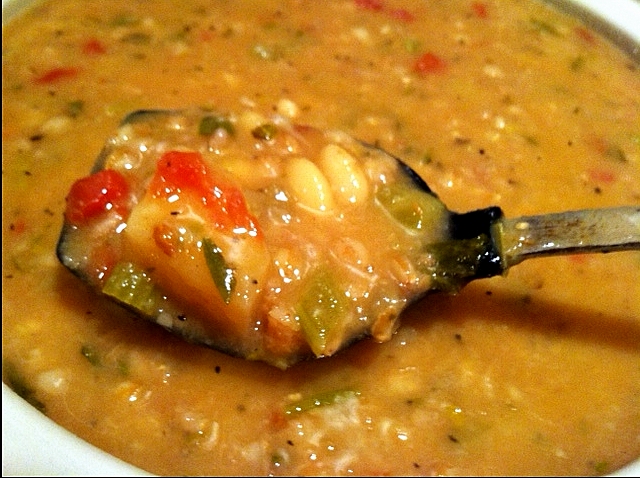
When I completed my afternoon canning project, I begin putting together a crock pot of soup for the next night's dinner. I used a recipe that I had made before for Zarco bean, fennel, and chicken sausage soup, and swapped out Bolito beans (also from Rancho Gordo) that are bit like pintos, but smaller and meatier, and instead of using celery in the soup, I chopped up the stems from a small bunch of Swiss chard, and then added the slivered leaves at the end. And in a stroke of near genius, instead of plain water, I used whey left over from a recent cheesemaking endeavor as the cooking liquid. It gave the soup a slight creaminess and a bit of tang, not unlike buttermilk. In fact, you can use whey wherever buttermilk is called for, especially for baking.

Bolito Bean and Chicken Sausage Soup with Fennel and Swiss Chard

1 lb. bolito (or pinto) beans
1/4 cup olive oil
1 large onion, diced
1 large bulb fennel, diced (fronds, too)
6 or 8 large leaves Swiss chard (stalks, too)

4 large carrots, peeled and diced
1 whole head of garlic, peeled and chopped
8 cups water (or better yet, whey left over from cheesemaking)
1 15 oz. can diced Italian-style tomatoes (the juice, too)
2 bay leaves
2 teaspoons cumin
1 teaspoon ground celery
1 teaspoon black pepper
3 tablespoons chicken or vegetable soup base (I like Better Than Bouillon)
1 lb. chicken sausage, thickly-sliced (or remove the casing and form little meatballs)

Pick over the beans and remove any debris. Rinse thoroughly, then cover the beans with several inches of water. Let soak for 6-8 hours or overnight. Drain.

In a large skillet or Dutch oven, heat the oil and saute the onions, fennel, the stalks of the chard (diced), carrots, and garlic until softened. Add to the crock pot. Pour in the drained beans, plus the water or whey, and the can of tomatoes with juice.. Add the bay leaves, cumin, ground celery, pepper, and soup base, and stir. Cook on high for four hours or low for eight (or until the beans are tender).

In the last hour of cooking, add the leaves of the Swiss chard (very thinly sliced=chiffonade) and the pieces of chicken sausage. When the chicken is cooked through, remove the bay leaves, taste to correct seasonings, and serve.

Saturday, October 13, 2012

Harvest Bounty Food Swap 2012

Today was my friend Melissa's second annual Harvest Bounty Food Swap at the local co-op. I'm happy to report that attendance doubled from last year, and there were lots of yummy things to trade for, including a lot of raw produce from community gardens. Along with home-canned goods, I came home with cabbage, Swiss chard, winter squashes, Daikon radishes, and a whole bunch of green and purple tomatillos.


We also had another great potluck. I took my favorite banana nut bread baked in a bundt pan to look fancy, but there were some fabulous dishes that others brought to share. One lady named Carmen brought a delicious shrimp and butternut squash risotto that I simply have to make at home. She even sent me home with an extra bowlful to have for lunch the next day! Wasn't that nice of her? 

The hostess with the most-ess, Melissa, brought an awesome pumpkin pie made from a real pumpkin (not from a can), and the crust was made with lard that she rendered herself. I liked the texture of the pie, and the balance of spice was spot on, not overbearing. Here is her recipe:

Melissa's Pumpkin Pie

About 2 cups pureed pumpkin
1 1/2 teaspoons ground cinnamon
1/2 teaspoon ground ginger
1/4 teaspoon freshly-grated nutmeg
1/2 cup sugar
2 eggs, slightly beaten
3/4 cup half-n-half (Melissa used heavy cream)

First combine the pumpkin and spices, then beat in eggs and gradually add cream. Stir just to combine and pour into blind-baked* crust. Bake at 350 degrees for about an hour, or until the tip of a knife inserted in the center of the pie comes out clean.
*To blind bake the crust, bake covered with parchment and pie weights at 350 for 15 minutes, then uncover and bake for another 10-15 minutes until golden. Cool completely.

But the best dish at the potluck, in my humble opinion, was this amazing Asian kale salad that a woman named Marsha brought. I have recently come around to including this superfood in my diet, but usually only thrown into soups or once in awhile as crispy, oven-baked chips. But I never thought I would enjoy it raw. Boy, was I wrong! This salad is SO GOOD! Y'all have to try it!

Asian Kale Salad

1 bunch kale, ribs removed and sliced thinly or chopped – approximately 1/2 pound chopped (OK to use the pre-cut bagged kale from store, but remove any really fat stem pieces)
1 carrot, peeled and julienned (I used two)
1/2 cup dried cranberries (craisins)
1 red pepper, diced (I used a large spicy red chile)
2 scallions, chopped (I used a thinly-sliced shallot)

Dressing:
1 clove garlic, crushed (I used four cloves!)
1 teaspoon fresh ginger root, grated (about 1 to 2 inch length of ginger root)
1 1/2 tablespoons toasted sesame oil
2 tablespoons olive oil
2 tablespoons tamari (or soy sauce or teriyaki)
1 1/2 tablespoons rice vinegar
1 tablespoon honey squirt of sriracha, optional


Garnishes:
1/4 cup toasted pumpkin seeds/pepitas (I used 1/2 cup!)
1/8 cup toasted sesame seeds

1. Combine all veggies and craisins in a very large bowl.
2. Prepare dressing by mixing all dressing ingredients together in a small bowl. Stir well and mix in all the items.
3. Pour dressing over veggies in bowl. Toss well. Let marinate at least 15 minutes.

Follow-Up (10/15/12): If you have leftover kale salad, it will wilt after being in the fridge for a day. It's still good like that (just with a softer texture), but another idea is to use it to make a delicious fried rice!

Kale Fried Rice

1/4 cup vegetable oil
1 cup sugar snap (or snow) peas
2 cups Asian kale salad
2 eggs
salt  and pepper
4 cups cooked rice
2 tablespoons soy sauce
1 tablespoon Hoisin sauce
1 teaspoon toasted sesame oil
1/2 teaspoon granulated garlic
squirt of sriracha

In a large skillet, heat the oil and stir-fry the sugar snap or snow peas for a few minutes Add the kale salad to another section of the pan just to warm it up, and crack in two eggs, cooking them until just barely set. Add four cups of cooked rice, and the soy sauce, Hoisin sauce, sesame oil, granulated garlic, and sriracha. Toss everything together and continue to cook until everything is heated through.


Thursday, October 11, 2012

A new dish for the crock pot rotation...

I found yet another excellent, easy slow cooker recipe to share from Pinterest (of course): Crock Pot Beef and Broccoli. This is quick to throw together, and turns out so tender and flavorful! All you have to do when you get home from work is cook a small pot of rice. Done and done. This one is definitely going into the regular work week rotation.

P.S. I added mushrooms to the original recipe because I always ask for them to be added them to beef and broccoli at Chinese restaurants or to my pad siew at the local Thai restaurant. 


Crock Pot Beef and Broccoli
(Source: Pinterest via BSRecipes)
1 pound boneless beef chuck roast
8 oz. sliced mushrooms, optional
1 cup beef stock or broth

1/2 cup soy sauce (next time, I might try low sodium for this)
1/3 cup brown sugar
1 tablespoon sesame oil
1 tablespoon Korean pepper paste (or a squirt of sriracha), optional
4 garlic cloves, minced
2 tablespoons cornstarch
2 tablespoons sauce from the crock pot after being cooked
fresh broccoli florets (as many as desired)

In a large skillet, brown the chuck on both/all sides. Then remove from pan and slice into thick strips or cut into chunks. Place beef in the crock pot, along with the mushrooms. Pour in the beef stock, soy sauce, brown sugar, oil, pepper paste or sriracha (if using), and garlic. Pour over beef and mushrooms. Stir to combine, and cook on low for six hours.
In a small bowl, stir cornstarch and some sauce from the crock pot together until smooth. Add back to the crock pot. Stir well to combine. Also, add the broccoli to the crock pot, and stir gently to combine. Cover and cook an additional 30 minutes on high (the sauce has to boil for it to thicken).

Serve over hot cooked (preferably Basmati) rice.

Tuesday, October 09, 2012

Extra days off are delicious!

I was cussing folks that had Labor Day off when I was laboring, but it sure didn't suck to have an extra day off today! Of course, I didn't accomplish all of the stuff on my to-do list, but I did manage to squeeze in a couple of culinary projects into my lazy afternoon. One was a soup that I saw on Pinterest (of course). I actually combined two very similar recipes, added my own twists, and then converted it to be made in the crock pot, as is my way. This is the DELICIOUS, hearty, flavorful, comforting soup that I ended up with:

Crock Pot Hungarian Mushroom Soup
(Source: Pinterest)


4 tablespoons butter
2 carrots, peeled and chopped
1 large onion, chopped
1 pound fresh mushrooms, washed and sliced
2 teaspoons dried dill weed
1 tablespoon paprika (I used one teaspoon smoked + two teaspoons sweet)
2 tablespoons soy sauce
2 cups chicken (or vegetable) broth
1 teaspoon vegetable soup base, optional
1 cup milk
3 tablespoons flour
up to one teaspoon salt, to taste
black pepper, to taste
1 tablespoon lemon juice
few shakes of hot sauce, to taste
1/4 cup chopped fresh parsley
1/2 cup sour cream

Melt the butter in a skillet over medium heat. Saute the carrots and onions in the butter for five minutes. Add the mushrooms and saute for five more minutes. Stir in the dill, paprika, and soy sauce. Add veggies to the crock pot then pour in broth and stir in the soup base. Cook on high for an hour and a half or low for three hours.

In a small bowl, whisk the milk and flour together. Pour this into the soup and stir well to blend. Cover and cook on low for another hour and a half on high or three hours on low.

Finally, stir in the salt, black pepper, lemon juice, hot sauce, chopped parsley and sour cream. Mix everything together and allow to heat through, 15-30 minutes on low--do NOT boil. Serve immediately.

The other thing I experimented with in the kitchen today was making crumpets. I LOVE crumpets--so tender and slightly chewy with all those little holes for soaking up butter! The problem is, there is only one store in my small town where you can find them, and they are four dollars for a four-pack! So it was my goal to learn to make them at home. (YES, you can make them at home--they don't just pop out of hedgerows fully-formed and only in England.) This was a decent first attempt...

English Crumpets
(Source: adapted from Epicurious)

3 cups all-purpose flour
2 teaspoons dry active yeast
1 3/4 cups warm water
1 cup warm milk
1 1/2 teaspoons salt
1 teaspoon of sugar or honey
1 teaspoon baking soda
2 tablespoons warm water

Combine yeast, sugar and one cup of warm water into a mixing bowl. Cover with plastic wrap and stand in a warm place for about ten minutes. During this time the liquid should develop a foamy head, showing that the yeast is active. (You can skip this step if you use instant yeast like I did, and just mix everything together all at once--except the baking soda and last bit of water.) Sift flour and salt into another bowl, and mix well. Make a well in the center of the flour; add the yeasty water and the rest of the warm water and the milk. Using a wooden spoon, mix to a thick batter. Cover with plastic wrap, and stand in a warm place until well risen and bubbly. This will take about an hour. The batter doesn't rise dramatically, but it does expand somewhat, and the mixture takes on gases, which are necessary in the cooking process.

Combine the baking soda and the extra water, and add this mix to the dough. MIX WELL. Then leave this mixture to stand, covered, in a warm place for another15 minutes. Preheat a heavy based fry pan to a low heat such that oils will not burn or smoke. Spray oils also allow you to coat the crumpet rings as you are ready to cook. (I sprayed the skillet with regular cooking spray and the rings with flour-added cooking spray. Worked great!) Place enough mixture into the center of each ring to come almost to the top of the ring. (The dough does rise during cooking, and this should be allowed for in the filling of the ring.) Cook for 4-8 minutes over medium heat, until bubbles appear over the entire surface, and the dough appears dry. (I cooked them on a lower heat for 12 minutes so that they didn't burn and so they got done all the way through.)  Remove the ring, turn the crumpet over and cook an additional 30 to 60 seconds to brown the top. Remove from the pan and cool on a cake rack. If you find that the bottom is too dark, you are cooking too quickly. Slow it down, relax, and try again. The worst thing that can happen is that you have to make another batch.

*For some reason, I could only find two of my egg/English muffin rings, so I also used some wide-mouth canning jar lids. The crumpets didn't look quite as perfect, but the canning rings worked fine...and the crumpets tasted just as good, especially with some melty Plugra on top! Also, crumpets freeze beautifully, then you can just pop them in the toaster at breakfast or tea time. YAY!


Sunday, October 07, 2012

Fall Break Stay-cation

(Photo credit: Dorothy Douglas)

YAHOO...it's Fall Break (aka Colombus Day weekend to the culturally insensitive)! My roommate and I talked about a mini-tour of the White Mountains of New Hampshire, but ultimately opted to stay home. And I think it was a very good decision. We have taken in movies, shopped, eaten out, toured local farm stands and orchards, pampered ourselves with mani-pedi's, and slept...A LOT! Not only has it been very relaxing and rejuvenating, but it's been just beautiful, as the North Country is experiencing the best autumnal color since I moved here in 2000.

Today, we headed out to Redford/Black Brook in the Adirondack Park to my friend Vicky's annual bonfire. It was a GLORIOUS drive, and it was nice to see friends and colleagues in such a casual, outdoor setting.


It was also fun to have lots of kids and dogs join the party. I took my wee Dollop to give her a little more socialization, and she had lots of fun, greeting the kiddos and the other pooches, and especially playing with her best boyfriend, Beauregard the mini poodle.


Once the sun had gone down and the fire was going like gangbusters, Vicky cooked her famous Coney dogs on the grill (you can see her dog, Sadie, patiently waiting for hers, lower left), and everyone else contributed something yummy to the potluck as well.


As for my own offering, I decided to make a big batch of potato salad. It occurs to me that I somehow made it through the whole summer without making any potato salad--and that's just wrong! I was chatting with a dear friend recently, and she was explaining how the potato salad she makes doesn't use a lot of mayo, but leans more toward a German potato salad--with a tangy vinaigrette and also lots of mustard, but not served warm. So that was my culinary experiment, to make a German-American hybrid potato salad for Vicky's gathering.

I found a recipe online from a woman with a German mother who owned a deli and made this amazing Bavarian kartoffelsalat every day for their customers. I took inspiration from those flavor combinations, some of her methodology, threw in a couple of things I like, and came up with what I think was a pretty tasty--but creamier--result. As I made five pounds of potatoes and brought home an empty container, I think the partygoers liked it, too!


German-American Potato Salad

5 lbs. red potatoes (or Yukon Golds)

1/2 cup red wine vinegar (I might cut this back to 1/4 cup next time)
1/4 cup rice wine vinegar
2 teaspoons salt, divided
1 large onion, minced
3/4 cup Baconnaise (bacon-flavored mayo)
1 tablespoon Dijon mustard
2 tablespoons sugar
1 teaspoon granulated garlic
1 teaspoon dried dill
1 teaspoon ground celery
1/2 teaspoon pepper
2 tablespoons fresh parsley, roughly chopped

Peel the potatoes and cook in boiling water until easily pierced through to the middle with the tip of a knife. Cut into chunks (or thick slices, if you prefer), then toss with the vinegars and a teaspoon of the salt. Refrigerate until completely cool.

Mix together the onion, Baconnaise, mustard, sugar, the other teaspoon of salt, and the rest of the seasonings. Pour over the cooled potatoes and gently combine. Sprinkle the fresh parsley in and toss one more time. Serve immediately or chill until ready to serve.

Thursday, October 04, 2012

Coq au Riesling (You do, and you'll clean it up!)

Ok, I have a terrific recipe for you today that is cozy and comforting, but elegant enough to prepare for company. It's from a show on the Cooking Channel called French Food at Home, and it's a twist on Coq au Vin, which is traditionally made with red wine. But this is Coq au Riesling, made with the sweet white wine and creme fraiche which creates this luscious, tangy sauce with which to smother browned chicken and mushrooms. I served it on top of some of the carrot-squash penne that I had left over from making macaroni and cheese the other night, but I think it would be super-delicious with a wild rice pilaf or some such. It's so rich and flavorful, and this is such an EASY recipe, even for a weeknight! What's not to love?


Creamy Coq au Riesling
(Source: Laura Calder, The Cooking Channel)

6 chicken legs, split at the joint or a 3-pound whole chicken, cut into 8 pieces (I used 8 thighs)
salt and freshly ground pepper
1 tablespoon each butter and olive oil (or 2 tablespoons goose fat), plus more butter for frying
4 shallots, minced
1 clove garlic, minced
2 tablespoons Cognac
1 cup dry Riesling
1/2 cup chicken stock
8 ounces mushrooms, quartered (I used a whole pound)
1/2 cup creme fraiche or sour cream
chopped fresh parsley or tarragon, for garnish (definitely use tarragon, stirred right into the sauce)
Sprinkle the chicken with salt and pepper. Heat the fat in a saute pan and brown the chicken on all sides, working in batches. When all the chicken is browned, remove it to a plate and add the shallots and garlic to the pan for 1 minute. Pour in the Cognac to deglaze. Put the chicken back in the pan. Pour in the wine and stock, cover and cook until the chicken is tender, about 20 minutes, turning once.*

Meanwhile, melt a little butter in a frying pan and cook the mushrooms until golden. When the chicken is cooked, remove it to a serving platter and keep warm. Boil the cooking liquid down to sauce consistency. Stir in the creme fraiche, mushrooms, and tarragon. When hot, taste and correct the seasonings. Pour the sauce over the chicken and serve.
*Tip: When the chicken is very close to done, remove it from the pot, place it on a lined baking sheet, and pop it in the oven while you brown the mushrooms and make the sauce. This gives a chance for the chicken skin to crisp back up, because flabby chicken skin is not good eats!

Wednesday, October 03, 2012

A Cheesy Idea for Squash Season

My roommate bought some turkey thighs this past weekend, and I was searching for ideas for side dishes to go with them. Someone on Yahoo! Answers posted this wonderful-sounding Rachael Ray recipe for a macaroni and cheese that involves butternut squash. I didn't end up making it that same night, but I saved the recipe, and we had it tonight with some grilled smoked sausage and green peas. YUM! Since it is the winter squash season, after all, it would be best if you roasted a butternut squash yourself, as they are plentiful and so tasty. But in a pinch, you can use a box of frozen as RR dictates.

Also, I think this would be a great recipe for kids or anyone that resists eating their vegetables, as they would never recognize the "secret" ingredient! The only changes I made were to add a cup of grated cheddar to the sauce, and to add an extra cup of cheese on top. And I didn't broil it--I just baked it at 400 degrees for about 15 minutes until the cheese completely melted. Oh, and I forgot to add chopped fresh parsley to the top. That would have been pretty against the bright orange of the casserole and so very autumnal. Oh well...next time.

Harvest Moon Macaroni and Cheese
(Source: Rachael Ray, Food Network)

1 pound macaroni (I used a carrot and squash penne from Barilla)
2 tablespoons extra-virgin olive oil
1 medium onion, finely chopped
3 cloves garlic, finely chopped
2 tablespoons fresh thyme, finely chopped
3 tablespoons butter
3 tablespoons all-purpose flour
1 cup chicken stock
1 1/2 cups whole milk
salt and freshly ground black pepper
nutmeg, grated to taste
1 (10-ounce) box frozen butternut squash, defrosted
a few dashes of hot sauce
1 cup grated Parmigiano-Reggiano (I used Romano)
1 cup extra-sharp yellow cheddar (up to three cups, divided)
a handful fresh parsley leaves, finely chopped
1 teaspoon sweet paprika

Bring water to a boil, season with salt and cook macaroni to al dente. Preheat broiler and place rack in middle of the oven. Heat the extra-virgin olive oil in a sauce pot over medium heat, saute onions and garlic until soft, 6 to 7 minutes and stir in the thyme. Scoot onions off to side of pan and melt butter, whisk flour into butter and combine whisk 1 minute then whisk in stock and milk, season sauce with salt, pepper and nutmeg, and cook until thickened, about 3 to 4 minutes. Stir in butternut squash and a few dashes hot sauce. Reduce heat. When sauce comes to a bubble, stir in Parmigiano.

Combine the sauce and macaroni, transfer to a casserole dish and top with shredded yellow cheddar, chopped parsley and paprika. Brown the macaroni under broiler, 4 to 5 minutes until brown and bubbly.

Monday, October 01, 2012

International Smorgasbord!

Man, did we have a TERRIFIC dinner tonight! It was sort of an ethnic hodge-podge (Mexican, Italian, AND French!), but it was all so delicious, and so hearty and comforting. I threw the appetizer together before I went to work this morning, a zesty Mexican shrimp cocktail that I ran across on Pinterest. By making it early in the day, it had time for all the flavors to marry. SO GOOD, and so easy!

Mexican Shrimp Cocktail
(Source: adapted from Pinterest)

2 lbs. cooked, shelled shrimp (50-60 count)
2 large tomatoes, squeezed of seeds and gel, then chopped
1/2 small white onion or 2 green onions, chopped
1/2 cup cilantro, roughly chopped
1/2 jalapeno (I used two small jalapenos!), seeds removed and minced
2 avocados,diced
1 can tomato/vegetable juice (V8--I used spicy hot!)
2 garlic cloves, peeled and minced
juice of two limes
salt and pepper, to taste

Mix all in glass bowl and chill; serve with crackers or tortilla chips.

For our entree, it was Meatless Monday, so I wanted to make some sort of vegetable soup in the crock pot. When I was at our local co-op yesterday, I bought a pound of pearled farro, not knowing much about it or how to prepare it, or what I was going to use it for.  So I polled my people on Facebook, and one of my friends forwarded me a recipe for Tuscan Farro and White Bean Soup which I adapted for the crock pot, and it turned out FABULOUS! Honestly, this is one of my best soups I've ever tasted and/or made! And I love that it's so hearty and comforting, and the texture is creamy...with no added cream! All in all, this is a very healthy--and more importantly, flavorful--soup, that is perfect for crisp, fall weather.

Tuscan Farro and White Bean Soup
(Source: adapted from Vegetarian Times)

2 tablespoons olive oil
1 cup red onion, chopped
1 medium leek (white and pale green part), rinsed well and sliced
2 garlic cloves, minced (I used four!)
1 cup celery, chopped
1 cup potatoes, peeled and cut into chunks (I used red potatoes)
14 oz chopped tomatoes (I used Italian-style)
2 tablespoons fresh sage, chopped
2 tablespoons fresh rosemary, chopped (I only used one tablespoon--rosemary is powerful juju!)
2 tablespoons fresh marjoram, chopped (I used fresh oregano)
4 cups vegetable stock or broth
1 cup farro, rinsed and drained (I used pearled)
2 cups white beans, cooked or canned (rinsed if canned)
salt and pepper, to taste

In a large pot, heat oil over medium-high heat. Add onion, leek and garlic and cook, stirring often, until onion and leek are softened, about 10 minutes. Add celery, potatoes, tomatoes, sage, rosemary and marjoram or oregano and cook, stirring occasionally, ten minutes. Add stock and bring soup to a boil. Add farro and beans. Season with salt and pepper. Reduce heat to low, cover and simmer, stirring occasionally, until farro is tender, 35 to 40 minutes. (If soup becomes too thick, add a little hot water.) Serve warm with crusty Tuscan bread.

*To convert this to be made in the crock pot, I heated the oil in a large skillet, and I sauteed the onion, leek, garlic, and celery for about ten minutes until tender. I dumped this mixture into the crock pot and added everything else except the cannellini beans. I cooked the soup on high for four hours, though I'm sure eight hours on low would work, too. In either case, if you're around, stir it once in awhile, as the farro can glom together and stick to the bottom of the pot. At the end of the cook time, I added the drained beans, and turned it to low until it was time to eat (just until the beans are warmed through). Oh, and four cups of vegetable stock was not NEARLY enough! I probably ended up using TEN cups altogether, and it was still somewhere between a soup and a stew!

I didn't serve this with Tuscan bread, but I decided to try an easy French bread recipe--another gem that I found on Pinterest--and make my own. The bread turned out great, and very tangy, as I used the vinegar that the recipe called for, as well as leftover whey from cheesemaking instead of plain water. Served warm from the oven with a generous shmear of Plugra, and you'll think you died and went to heaven! And it's the perfect complement to the farro soup.

French Bread
(Source: Deals to Meals blog)
Yield: 3 small loaves or 2 large

2 1/2 cups warm water (or use whey, if you have it)
2 tablespoons yeast (I used instant and did not proof it)
3 tablespoons sugar (I used closer to four)
2 tablespoons white vinegar

Add the above ingredients together and let sit until bubbly (about 3-5 minutes). Then add:
1 tablespoon salt
1/3 cup oil (I used vegetable)
6-7 cups flour (or a little more if it's too soft), one cup at a time--add enough until the dough is soft, but firm enough to mold into dough loaves

Knead for 2-5 minutes and then put in the oven with a small pot of boiling water. The water will keep the dough moist. Watch the dough and punch it down when it gets to the top of the mixing bowl. Do this every time it gets to the top of the bowl, as long as you have time to babysit it (2-5 times). Put the dough on a greased countertop and divide into three sections. Spray a cookie sheet with cooking spray and sprinkle a thin layer of cornmeal on the bottom of the sheet. Roll the dough balls into rectangle/long French bread shapes. Slash tops of bread diagonally 3-5 times and cover with a beaten egg. Let rise 30 minutes (or until doubled) on the counter, or you can put them in your oven at 170 and wait until they are the size you want to cook them at. Once they are to the right size, turn up your stove to 375 (without opening the door!) and let them bake until done. Or, just raise on the counter and bake at 375 for 30 minutes. Serve warm out of the oven!

*Here's a tip: You can mix the dough together and then stash it in the fridge, knocking it down every eight hours or so whenever it reaches the top of the bowl. It will still rise, just verrrrrrrry slowly, and that way, you can hold it until you're ready to bake it off. And the flavor develops more, too, the longer it takes to rise.