Friday, August 27, 2010

Appearances can be deceiving...

Ok, so the cake I want to share with you today may not win any beauty prizes, but it should not be overlooked just because of its humble appearance. I ran across this recipe on Baking Bites a few months ago, and even though the picture didn't dazzle me, I had a feeling that this simple little cake would be right up my alley! This recipe is so great, because it's easy and quick, but yields a moist and tender little cake with terrific flavor--like a Creamsicle in cake form! As a matter of fact, I whipped this up on a weeknight, and it took no more time than making something (full of chemicals) from a boxed mix. While my dear roomie was throwing something together for dinner, I focused on dessert, and both were ready in under an hour! This one is a keeper to be revisited again and again...


Orange Sour Cream (or Yogurt!) Cake
(Source:
Baking Bites)
Serves 8 (um...or maybe 6! tee hee)

1 1/2 cups all-purpose flour
1 teaspoon baking powder
1/4 teaspoon salt
1/2 cup butter, room temperature
3/4 cup sugar
1 tablespoon orange zest
2 large eggs
1/2 cup orange juice, preferably fresh
1/2 cup sour cream (I swapped out some thick, homemade yogurt)
*I also added a teaspoon of vanilla for more of that Creamsicle quality!

Topping
1/2 cup sugar (granulated, not confectioners’)
3 1/2 tbsp orange juice, preferably fresh
*I added 1/2 teaspoon of vanilla to the glaze, too.

Preheat oven to 350F. Lightly grease an 8-inch square baking pan. In a medium bowl, whisk together flour, baking powder and salt.

In a large bowl, cream together butter, sugar and orange zest (and vanilla!) until light. Add in eggs one at a time, and beat mixture until smooth and well-combined. Mix in one third of the flour mixture, followed by the sour cream. Mix in another third of the flour mixture, followed by the orange juice. Stir in all remaining flour, mixing until no streaks of dry ingredients remain. Pour into prepared pan.

Bake for 35-40 minutes, until a toothpick inserted into the center comes out clean.

When the cake has finished baking, whisk together glaze ingredients in a small bowl. Use a spoon to drizzle the glaze evenly over the cake (I poked holes all over mine with a skewer first). Allow glaze to soak in while cake cools. Allow cake to cool completely before slicing. (I added a big dollop of whipped cream!)

Wednesday, August 25, 2010

So late, I'm right on time!

I am SO tardy blogging about what to do with June strawberries, that it's time for the fall crop! See how, as my beloved mother used to say, things have a way of working out? Tee hee.

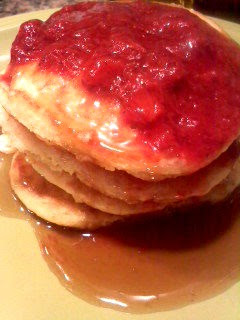
A few months ago, I was watching an episode of "Throwdown with Bobby Flay," and he was challenging NYC's Clinton Street Baking Company to a blueberry pancake throwdown. Now I have never made a superlative pancake at home, but after watching this show, I was inspired to try, try again. Even though it's a pain, I think the secret to ethereally light pancakes is to separate the eggs and whip the whites, as you do for waffles, and as is the Clinton Street Baking Company's method. Moreover, they top all of their pancakes with this decadent maple butter that is butter and real maple syrup melted and sort of whipped together to form a lusciously sweet emulsion. Man oh man, were these pancakes DIVINE! And as it was strawberry season and too early for fresh blueberries, I converted the copycat recipe that I found on a lovely British blog called Let Her Bake Cake to include a deliciously tangy strawberry-lemon compote. This is a MUST for your next brunch!

Buttermilk Pancakes with Strawberry-Lemon Compote and Maple Butter
(Source:
Let Her Bake Cake, inspired by Clinton Street Baking Company)
Serves 3-4

Buttermilk Pancakes

2 eggs
1 scant cup buttermilk
5 tablespoons unsalted butter, melted and slightly cooled
1 1/3 cups all-purpose flour
1/2 teaspoon salt
1 tablespoon sugar
2 teaspoons baking powder
1/2 teaspoon baking soda

Separate the eggs so that the yolks go into a large bowl and the whites go into the bowl of a stand mixer or a bowl large enough to fit a hand held electric mixer.

Add the buttermilk and melted butter to the yolks in the bowl and beat together. In another bowl mix together the flour, sugar, salt, baking powder and baking soda.

With a stand mixer or electric mixer, whip the egg whites to hold soft peaks.

Now pour the liquid mixture into the dry ingredients and stir lightly until just combined. Some lumps are OK. Fold in the egg whites until just combined. It's okay if some of the whites aren't fully incorporated.

Rub a nonstick frying pan with a bit of butter and heat over medium-high heat. Add batter to pan to make whatever size pancake you want (I made four smallish ones at a time in my 10-inch skillet). Pancakes are ready to flip once a few bubbles appear on the surface and and the tops are starting to look dull. Flip and cook another minute or two.

If you wish, you can keep the pancakes warm in a very low oven while you cook the remaining batter.

Strawberry-Lemon Compote

1 1/2 cups strawberries, hulled and halved or quartered
2 tablespoons sugar
strips of peel from one lemon (no pith!)
juice of one lemon
1 split vanilla bean (or 1 teaspoon vanilla extract*)
1/4 cup water

Combine all ingredients in a small saucepan and bring to the boil. Turn down heat and simmer until mixture is thickened, about 10-12 minutes. Stir occasionally during cooking time. Fish out the lemon peels and vanilla bean, and spoon compote over pancakes while still warm.

*If you are using vanilla extract, wait until the compote is done cooking, then add the vanilla at the very end.

Maple Butter

1/2 cup unsalted butter
1/3 cup maple syrup

In a small saucepan, warm the maple syrup over low heat, then add the butter, one tablespoon at a time, whisking in thoroughly before adding the next pat. Serve immediately over pancakes.

Tuesday, August 24, 2010

Day late and a berry short?

Jeez! I've been so out of touch with everything lately--including this blog--that I have quite a backlog of recipes that I still want to share. The problem is, some of them are from so long ago, that the foodstuffs on which the dishes are based are out of season! Oh well...still, I will forge ahead and try to get caught up on my summer (that wasn't) recipes.

Let me start with an excellent raspberry-rhubarb pie that I made earlier this summer. Maybe you stashed some fresh raspberries in the freezer to make a pie or jam in the off-season? This pie might be worth busting them out for! Or you could always use frozen raspberries instead. As for the rhubarb, it was such a mild summer, that it is still thriving around these parts, so you might be in luck there. The best thing about this recipe, though, is the crust. Ever since I made that coconut cream pie awhile back, this has been my new go-to standard. It's buttery and incredibly flaky and just DELICIOUS! Homemade pies are not the quickest or easiest things to throw together, but this is definitely a culinary project worth undertaking! Raspberry and rhubarb is an excellent flavor combination; if you like strawberry-rhubarb, you'll like this. However, you could also substitute blueberries or blackberries--it's all good!

Raspberry-Rhubarb Pie
(Source: the crust is from Bon Appétit, the filling was my own concoction)

Double Crust:
3 cups all-purpose flour
1 tablespoon sugar
1 teaspoon salt
12 tablespoons chilled unsalted butter, cut into small pieces
6 tablespoons chilled solid vegetable shortening, cut into small pieces
1/2 cup (or more) ice water

Filling:
2 cups fresh (or frozen) raspberries
4 cups rhubarb, sliced
1 1/4 cups sugar
2 tablespoons lemon juice
1 teaspoon vanilla
1/4 cup thickener (any combo of flour, corn starch or tapioca)
1 tablespoon butter, in small pieces

Egg Wash:
1 egg
1 tablespoon cream or milk

Preheat oven to 425 degrees. Fit pie plate with bottom crust rolled out from half of the (chilled!) dough. Gently mix together the raspberries, rhubarb, sugar, lemon juice, vanilla, and thickener(s). Pour into bottom crust and dot the filling with butter. Top with the other crust, cut vent holes or form a lattice. Brush with egg wash.

Bake at 425 for 15 minutes. Reduce oven temperature to 350 degrees and bake for another hour, or until the middle of the pie bubbles. (Cover the top of the pie with tin foil if the crust starts to get too brown.) Cool for at least two hours to let the juices thicken before cutting and serving.

Sunday, August 22, 2010

Sweet comfort...

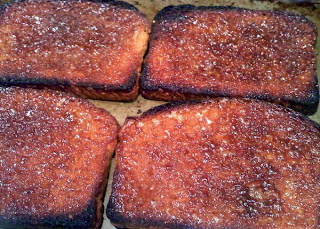
I can't believe that I haven't blogged about this before, but it seems a little...mundane. Then again, I have gone through at least three extended, obsessive love affairs with this ordinary breakfast food since The Pioneer Woman posted about it back in April. I'm sure it dovetailed with the stresses of finals and the end of the year at school, and most recently, with my health drama. And it is so simple and comforting, it's certainly worth a mention on this here blog. Ladies and gentlemen,I give you: CINNAMON TOAST! Not just that cinnamon toast that everybody has made since childhood where you sprinkle cinnamon and sugar on buttered toast, but an ingenius new methodology from a desperate mother of four...BROILED cinnamon toast! When you mix the butter and cinnamon and sugar together and add a splash of vanilla then pop it under the broiler for a couple of minutes, you get a bubbly, caramelized, brûléed toast treat!

As is my way, I took a few liberties with PW's recipe. First of all, I only make half of her recipe at a time--one stick of butter is enough for eight large pieces of toast (or four breakfasts, which usually tides me over until my next attack!). Also, I prefer to toast my bread first for crispiness all the way through. Thirdly, I find 1/2 cup of sugar to one stick of butter a bit too sweet, so I take it down to 1/3 cup. And I also like to swap out half or even all of the white sugar for brown sugar, which gives you caramel cinnamon toast! NOM NOM NOM! You must try this, my people.

Pioneer Woman's Cinnamon Toast "The Right Way"
(Source:
The Pioneer Woman Cooks!)

16 slices bread (whole wheat is great!)
2 sticks salted butter, softened
1 cup sugar (I prefer 2/3 cup, and I prefer brown sugar)
3 teaspoons ground cinnamon (use GOOD cinnamon, PLEASE! I like Vietnamese from King Arthur)
2 teaspoons vanilla extract (again, life is too short to use cheap, crappy vanilla!)
1/8 teaspoon ground nutmeg (optional--I don't prefer this flavor here)

Preheat oven to 350 degrees. (I turn mine on broil, and while it's preheating, I toast my bread in the toaster.)

Smush softened butter with a fork. Dump in sugar, cinnamon, vanilla and nutmeg, if using. Stir to completely combine. Spread on slices of bread, completely covering the surface all the way to the edges.

Place toast on a cookie sheet. Place cookies sheet into the oven and bake for 10 minutes (I skip this step, as I toast mine first). Turn on the broiler and broil until golden brown and bubbling. Watch so it won’t burn! (Note: this only takes 2-3 minutes.)

Remove from oven and cut slices into halves diagonally. (I don't see the need to slice the toast myself, but you do as you see fit!)

Thursday, August 05, 2010

Rumors of my death have been greatly exaggerated...

...but once you hear my story, you could see how people might have been misled. This hardly seems the right forum for my tale, but as most of my posts are inflected with every little thing that's going on in my life, I don't see how to avoid the subject. So here goes...

Sorry to overshare, but I had been having some "female trouble" for some time, and I finally went to see a gynecologist about it. She found that I had a very thickened uterine lining, so she scheduled me for a D&C. I truly expected that she would then put me on some hormones after that, and send me on my way. But the test results of the tissue that she removed were very, very bad. :-(

Apparently, at the age of only 42, I had uterine cancer--an unusual and aggressive type at that. I saw an excellent oncologist right away, and he took very swift and radical measures to treat me. Just a week after I saw him for the first time, I was admitted to Fletcher Allen Hospital across the lake in Burlington, VT for three days to have a total abdominal hysterectomy (uterus, ovaries, tubes--all of it). I had a lot of friends praying for me and/or sending good thoughts out into the universe on my behalf, and I know that I am very blessed. Despite the aggressiveness of the type of cancer, it was only stage one, and had not yet spread to the lymph nodes or any surrounding tissues or organs! HALLELUJAH!! Nevertheless, it is the kind of pernicious cell that likes to return to the scene of the crime, so the doctor has prescribed six treatments of chemotherapy, mainly as a precautionary measure. I had my first session yesterday, and despite a bit of queasiness (nothing that a root beer Frosty float and an anti-nausea pill couldn't fix!), it pretty much went off without a hitch. Of course, they have me so pumped full of steroids, I don't think I'm capable of feeling much of anything right now! They say if you're going to have the fun side effects, they usually kick in 2-3 days after treatment. So I guess we'll have to wait and see.

In the meantime, I am healing well, and I have a lot of support locally and across the miles. My beloved roommate used her two-week vacation to care for me right out of the hospital, I have had a small army of cooks bringing me casseroles and such for weeks, and my long-distance friends are sending cards and emails and Facebook messages and lovely gifts. So things are as good as to be expected, andI hope to be rarin' to go by the time school starts again at the end of the month.

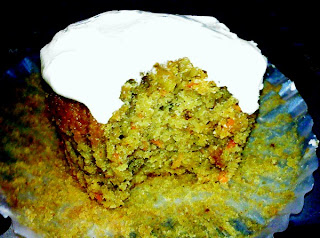
By this point, you're probably thinking, hey, I just came here for a recipe, not all this medical drama! And I actually have one for you. Truth to tell, I have quite a few posts in the hopper (the ones I should have completed in July when all the, erm, crap went down), but I think I'll work in reverse chronological order today, just because it fits my theme. Now I don't know what the etiquette is when you're the new girl on the chemo block, but I figured bringing cupcakes wouldn't hurt to ingratiate myself with the other ladies and the staff! But I wanted to bring something somewhat healthful, and one of my friends had recently brought me some zucchini from her garden, so I made zucchini cupcakes from a recipe in Everyday Food. They turned out pretty well--anything with cream cheese frosting has to be good--but I made a few changes, as is my way, and you might want to make a few more if you try them yourself. Other than the frosting, these are actually fairly low-fat and quite healthy, especially if you use some whole grain flour and add in some extra veg, as I did. Recipe follows...sorry for the crappy cell phone pics, but they give you the idea.

Sweet Zucchini Cupcakes with Cream Cheese Frosting
(Source:
Everyday Food, May 2007)

1 1/2 cups all-purpose flour, spooned and leveled (I used half whole wheat pastry flour)
1 cup packed dark-brown sugar
2 teaspoons baking powder
1/2 teaspoon ground cinnamon (I doubled this, and it still needed more spice, IMHO)
1/2 teaspoon salt
1/2 cup coarsely chopped pecans or walnuts (I increased this to 3/4 cups)
1 zucchini (10 ounces), coarsely grated, 1 1/2 cups (I added another 1/2 cup grated carrots for color, making 2 total cups of veggies)
1/3 cup vegetable oil
2 large eggs, lightly beaten
1/2 teaspoon pure vanilla extract (I doubled this)

Preheat oven to 350 degrees. Line cups of a standard (12-cup) muffin tin with paper or foil liners. Set aside.

In a medium bowl, mix together flour, brown sugar, baking powder, cinnamon, and salt. Mix in nuts. In another bowl, combine zucchini, oil, eggs, and vanilla; add to flour mixture, and mix just until combined (do not overmix).
Divide batter evenly among cups. Bake until a toothpick inserted in the center of a cupcake comes out clean, 40 to 45 minutes. Cool in tin on a wire rack for 10 minutes; turn cupcakes out, right side up, and cool completely.

Meanwhile, make frosting. Using an offset spatula or butter knife, spread frosting on cupcakes. The frosted cupcakes are best eaten within one day.

Cream Cheese Frosting
(Makes more than enough for 12 cupcakes)

4 tablespoons room-temperature unsalted butter (I used salted)
4 ounces room-temperature bar cream cheese (I swapped out neufchatel, worked perfectly)
2 cups confectioners' sugar
1/2 teaspoon pure vanilla extract

In a medium bowl, with an electric mixer, beat butter and cream cheese until smooth. Add confectioners' sugar and vanilla extract; beat until light and fluffy. Refrigerate until ready to use, up to one day.