Thursday, December 30, 2010

As Ke$ha might say, "Get your drunk on!" (Drunken BEANS, that is!)

This year, I decided to give many of my dear friends the gift of BEANS for Christmas! As I have blogged before, I am completely smitten with Rancho Gordo's heirloom beans, and I just wanted to share the love and get others hooked...like a culinary crack dealer. Tee hee. Plus, with New Year's right around the corner, I figured my friends might want to cook up some beans for good luck in 2011. (You're not limited to just black-eyed peas, ya know! The luck applies to anything you eat a great number of, symbolizing the amount of wealth--or pieces of gold--you'll acquire in the New Year, or some such nonsense.)

As I was placing my gift orders (that included Christmas limas and snowcaps, naturally!), I got to wondering if I had any Rancho Gordo beans left in my own supply. So I dug around in the pantry and unearthed one solitary package of Ojo de Cabra (goat's eye) beans.  But what to do with them? The description said that they were sort of like pintos, and a quick Google search took me to a recipe from Relish Magazine (provided by Rancho Gordo themselves) called "Drunken Beans." Yet another reason to make such a dish for New Year's when there is often much imbibing of spirits, and surely an open beer bottle to be found lying about! ;-)

So I got my beans properly drunk, served them over some rice, and garnished them with some of the corn relish that I just made. I must tell you, if you like things like red beans and rice, this will be TOTALLY up your alley! 

HAPPY NEW YEAR, everyone! (It's gotta be better than 2010...just sayin'.)


Rancho Gordo Drunken Beans
(Source: Relish Magazine)
"Not sweet or tomato-y like canned baked beans, these are great over rice or served with fresh corn tortillas. Use a dark, sweet beer such as Killian’s or Michelob Amber Bock."

1 tablespoon vegetable oil
1 cup chopped onion, divided
2 garlic cloves, minced, divided (I used at least four!)
2 cups dried beans Ojo de Cabra (Goat’s Eye) or pinto beans
3/4 cup dark, sweet beer (I used a lighter lager--the whole bottle)
1 thick slice bacon (um, or eight slices, as I did?!)
3 serrano peppers, seeded and minced
1/2 pound button mushrooms, sliced
1/2 teaspoon salt
Coarsely ground black pepper
Limes wedges
teaspoon salt
Coarsely ground black pepper
Limes wedges

1. Heat oil in a heavy saucepan; add 1/4 cup chopped onion and 1 minced garlic clove. Sauté about 5 minutes. Add beans and enough cold water to cover by 3 inches. Bring to a boil, reduce heat to medium-low and simmer, uncovered, 2 hours or until beans are tender, adding water as necessary to keep beans covered.
2. Add beer and simmer about 15 minutes.
3. Cook bacon large skillet until crisp. Remove bacon and all but 1 tablespoon of fat from pan, reserving bacon. Add peppers and remaining onion and garlic to pan; sauté until tender. Add mushrooms; cook until tender. Chop reserved bacon and add to pan.
4. Combine bacon mixture with bean mixture. Cook 10 to 15 minutes. Season with salt and black pepper. Serve with lime wedges. Serves 6.

Recipe courtesy of Rancho Gordo, Napa, Calif.
"Relish a New American Farmer," Feb. 2007

Thursday, December 23, 2010

Pie is the Best Present of All

I have a friend who is a nightmare to buy presents for, but he loves homemade baked goods. So in lieu of purchasing a Christmas present for him this year, I decided to make him something special. I conferred with his wife, and she informed me that he loves mincemeat pie, but she herself does not, so she never makes it for him. Done, and DONE, I say!

About two weeks before Christmas, I cooked up a batch of mincemeat using just dried fruits and no actual meat or suet. I had to admit, it looked and smelled divine, even before macerating in liquor for a good long while. Here is the recipe I (mostly) followed:

Homemade Mincemeat
Makes about 6 cups (enough for two pies)
(Source: adapted from Rick Rodgers' Christmas 101 via Joy of Baking)

2 large Golden Delicious apples, peeled and grated (I used MacIntosh)
1 12 ounce (1 1/2 cups) can frozen apple juice concentrate, thawed
1 cup dried apples, chopped
3/4 cup dark raisins
3/4 cup golden raisins
3/4 cup dried currants
3/4 cup dried cranberries
2/3 cup mixed candied peel
1/3 cup candied lemon peel
1/2 cup dark brown sugar
1/2 cup dark rum
1/2 cup brandy or cognac (I used maple whiskey)
4 tablespoons unsalted butter
1/2 teaspoon ground cinnamon (I used 1 full teaspoon)
1/2 teaspoon ground allspice
1/2 teaspoon freshly ground nutmeg
1/2 teaspoon ground cloves (I only used 1/4 teaspoon)
1/4 teaspoon salt
*I also added one cup of orange juice to the mix

Place all the ingredients in a large Dutch oven, and bring to a boil over medium heat, stirring often. Then, reduce the heat to medium-low and simmer the mincemeat, stirring often, for about 25-30 minutes, or until the liquid is almost evaporated. Transfer the mincemeat to a large bowl and let it cool completely. Cover with plastic wrap and place in the refrigerator, at least overnight, or up to a month. Note: If storing longer than a week, stir in a little rum or brandy (about 1/4 cup) every week.

Ok, so I had mincemeat, but how now to make it into a pie? Truthfully, I consulted lots and lots of recipes, but then just kind of used The Force and winged it. I started with my favorite recipe for a two-crust pie and chilled the dough thoroughly. Then I rolled out both crusts, filled the bottom one with three cups of the mincemeat to which I added a cup of roughly chopped walnuts, dotted the filling with two tablespoons of butter, covered the filling with the top crust, perforated it and added a traditional star design for flourish. Then I egg-washed the top with a whole egg mixed with a tablespoon of cream. I started baking the pie at 425 degrees for about fifteen minutes, then turned it down to 350 and baked it until golden, probably about an hour total (and I covered the edges of the pie when they threatened to get too brown).

When I presented the pie to the lucky recipient at a local pub where we exchanged gifts a few days before Christmas, my friend Tom took a fork out and dove right into the middle of it! He said it was good, but his affect displays are hard to read (=understatement). Still, I believe he was pleased. This was confirmed the next day when his wife sent me a picture of Tom enjoying his pie...for breakfast! Tee hee.

Sunday, December 19, 2010

Holiday Party Potluck Ideas

I don't know how you good people are managing your social dance cards this holiday season, but mine are a bit full. Of course, this is both a blessing--to have lots of friends--and a curse--to have to prepare many potluck dishes to bring to many events during this terribly busy time, right at the end of the semester.  So let me offer a few quick-and-easy people pleasers.

First on the docket was my office potluck which I had very little advance notice about and just one evening to prepare for (after teaching a night class, I might add). It was to take place on the last day of the term after two, three-hour finals and shortly before our winter graduation ceremony. When I was bouncing ideas off of my roommate the night before, I blurted out that I really needed something that I could throw in a crock pot when I got to school in the morning, and it would take care of itself all day and be ready to serve in the late afternoon. We considered soup, but I knew of two people that were already bringing some, so we started discussing hot dips. We briefly toyed with the idea of that Rotel cheese dip that everyone is crazy about, but I HATE processed cheese sauce, and I knew I would never live it down if I served something Velveeta-based to my colleagues.

When I contemplated my favorite hot dip that I'd ever sampled at a potluck gathering, my mind went immediately to an artichoke dip that I first had at a Christmas party a few years ago. It was baked, but I thought it might work in a slow cooker. I made a few adaptations--mainly, the inclusion of crabmeat--and I took home a clean crockpot from my office party!  MISSION ACCOMPLISHED!

Crockpot Crab and Artichoke Dip

2 cans artichoke hearts, drained
1 (8 oz.) brick cream cheese, softened
3/4 cup mayonnaise
1 (8 oz.) bag shredded Italian cheese blend (mozzarella, parmesan, provolone, asiago, fontina, romano)
1 can crabmeat, drained
2 teaspoons dill weed
2 to 4 cloves garlic (to taste), peeled and minced
1/4 teaspoon black pepper
several shakes of hot sauce, to taste
juice of half a lemon

Blitz the artichoke hearts in a food processor, then blend in the cream cheese and mayo. Scrape this out into your crock pot, and add the cheese, crab, and the rest of the seasonings. Stir everything together and turn the crock pot on high for an hour or so, until it's hot all the way through, then lower the heat to keep the dip warm throughout your party. Serve with sliced rounds of a crusty baguette that you have toasted in the oven just before serving.

Right on the heels of our gathering at work was my officemate's Christmas annual Christmas party. And I was so wiped out from the crashing halt of the semester that I wasn't feeling like coming up with anything too intricate. Luckily, my divine friend, Phillip, and his lovely hubby, Rob sent me an early and very tasty Christmas present this year: Medjool dates and date crystals from Shields Date Farm near Indio, CA. So for the party, I made a special hors d'oeuvre--those ginormous, sweet, almost creamy Medjool dates filled with tangy goat cheese and wrapped in bacon. I didn't follow any recipe--you don't really need to. But here's the jist of what I did:

I sliced each date on one side, filled the cavity with goat cheese, wrapped it in a half piece of extra-thick, very smoky bacon, and secured it with a toothpick. I placed them all on Silpay-lined trays and baked them at 400 degrees until the bacon was crispy (15-20 minutes?), turning them halfway through to promote even browning. They were very yummy, although I think I might try filling them with a blue cheese next time just for kicks!

I have one last idea if you're REALLY in a time crunch and can't even cook anything for an event. I have a couple of friends--who shall remain nameless--who often bring the following salad to potluck gatherings (because they can't be bothered to actually cook?!). It's an elegant, delicious, usually lighter offering to offset so many heavy dishes, and is something that the vegetarians can enjoy, too. And the best part of all, to prepare the salad, mostly what you need to do is open bags and assemble! I'm sure many of you already have a version of this salad in your repertoire, but just in case, consider this the master formula with infinite variations.

You start with mixed baby greens, any blend you prefer. Alternately, baby spinach on its own is lovely. Secondly, you add crumbled cheese, feta (plain or flavored) or a bleu. Third, you add nuts--pecans, walnuts, sliced almonds or even sunflower seeds. Some onion is optional, scallions or slivers of red onion. Lastly, you add fruit: strawberries in the summer, apples in the fall, or dried cranberries all year round (have you tried the pomegranate juice-infused Ocean Spray craisins?). Then you dress it all with--and this is KEY--Newman's Own Raspberry Walnut Light Vinaigrette (though your favorite balsamic dressing is yummy, too).  So easy, so sophisticated, so YUMMY, that you're guaranteed to take home an empty bowl from your party or potluck! Better yet, you should make a version of this salad weekly at your own house--it's just that good!

HAPPY HOLIDAYS, everyone! Enjoy them, and don't let them stress you out! :-)

Tuesday, December 14, 2010

What I Should NOT Be Doing During Finals Week

I'm not sure if having the first day of finals week off was serendipitous, or more likely, I'll be cursing my misfortune in a few days, as all of my exams are bunched up at the end of the week. But one thing I do know for sure is that I should have spent my day off grading papers. But instead, I spent it canning. I sometimes make little holiday gifts of jam or chutney at this time of year for friends and colleagues, but this time, I was canning for someone I didn't even know!

You see, upon learning of this humble little cooking blog, one of my students asked me if I had homemade canned goods and preserves for sale, as she wanted to put a gift basket together for her aunt who loves such things. Of course, I was happy to oblige, and so we discussed what sorts of items would her aunt would prefer. I had many things on hand that I believed would fill the bill...all except one. My student told me that her aunt's favorite thing in the world was corn relish, and of course, that was one thing I did not have. I tried to talk her into some zucchini relish, but it had to be corn. So how could I not try and make her some? After all, it was for Christmas!

The thing I was most worried about was the unseasonable lack of fresh corn on the cob, but some knowledgeable folks on my favorite canning resource, GardenWeb's Harvest Forum, assured me that corn relish, since it's pickled, can be successfully made with frozen cut kernel corn. And guess what? It can, and it's TERRIFIC! This is such an easy and delicious recipe (from our trusty old friend, the Ball Blue Book), and I am thrilled to now know that it can be made year-round!

Oh, for those of you who may be asking, what do you do with corn relish, you can use it wherever a pickle relish might be called for, like on hot dogs, hamburgers or sandwiches. It's also good mixed into a pasta salad, or you can blend it with sour cream, mayo or cream cheese to make a delicious dip. Some people eat it as a side dish on its own. As for me, I like it on nachos with some black beans. YUM!

Home-Style Corn Relish
(Source: BBB's Fresh Preserving)

2 cups white vinegar
2/3 cup sugar
1 tablespoon salt (that's plain canning salt)
4 cups cooked corn kernels, about 8 ears (I used frozen, thawed but not cooked)
2 cups diced mixed red and green bell peppers, about 2 large (I used one sweet red pepper, 4 long hot peppers and 2 jalapenos, as I like a little kick to my relishes!)
3/4 cup diced celery (about 2 stalks)
1/2 cup finely chopped onion (about 1 small)
1 tablespoon dry mustard (didn't realize I was out, so I swapped out 1 teaspoon yellow mustard seeds)
1 teaspoon celery seeds
1 teaspoon ground turmeric
*I added 1/2 teaspoon black pepper and 1 teaspoon of coriander

6 (8 oz) half pint glass preserving jars with lids and bands (I used pints and got exactly 3 jars)

1. PREPARE boiling water canner. Heat jars and lids in simmering water until ready for use. Do not boil. Set bands aside.
2. COMBINE vinegar, sugar and salt in a large saucepan. Bring to a boil, stirring to dissolve sugar. Add corn, red and green peppers, celery, onion, mustard, celery seeds and turmeric. Reduce heat and simmer 15 minutes, stirring frequently.
3. LADLE hot relish into hot jars leaving 1/2 inch headspace. Remove air bubbles. Wipe rim. Center hot lid on jar. Apply band and adjust until fit is fingertip tight.
4. PROCESS filled jars in a boiling water canner for 15 minutes, adjusting for altitude. Remove jars and cool. Check lids for seal after 24 hours. Lid should not flex up and down when center is pressed.

Wednesday, December 08, 2010

Birthday Presents Worth Food-Blogging About!

Way back in October--a time frought with personal misfortunes--my age advanced by another year, adding insult to injury (tee hee). My lovely colleagues at work took me out to the Japanese steakhouse in town for dinner and showered me with many excellent gifts, including a beautiful handmade Wizard of Oz lap quilt (you can see from the picture of my desk that it was a theme of the day--along with better luck!)

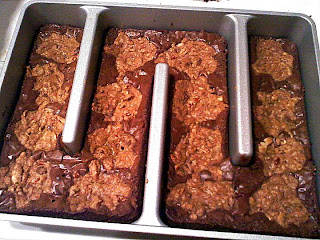
Another one of my favorite presents was from my very kind and generous roomie--a cooking implement that I had wanted for years, but was too cheap to pony up the 35 bucks for, the Baker's Edge brownie pan. And even after receiving the pan, it took me a long time to give it a test drive. WHY OH WHY did I wait that long? What a waste of time and awesome brownies that could have been enjoyed!

I am now convinced that this is the greatest creation in human history, especially for us edge lovers. You see, the pan has these metal dividers or channels that cause every brownie or bar to have at least two chewy edges, if not THREE! And before you inside brownie lovers start to protest (sickos that you all are), this pan bakes so beautifully and evenly, that the middles of the brownies are tender and ethereally light and just DEE-licious!

I can't wait to try other cookie bars and coffee cakes and pound cakes and cornbread and such in this magical pan! If you have been considering buying one, DO NOT hesitate. The pan is heavy and well-made, and if you take care of it and hand wash only, you will have it forever. And you will need it to make a weekly batch of brownies...which may be a problem. ;-) Oh, and before you even ask, pictured above is a mix that I highly recommend called Betty Crocker Supreme Cookie Brownie Bars. All I changed to the given instructions was to add an extra handful of mini chocolate chips to the cookie dough, along with a half cup of chopped pecans. SO GOOD!

The other commercial product/birthday present that I must recommend to you is the gift that I got for my roommate for her birthday, the Keurig Special Edition coffee maker. Now, I tried to get this for her last year, but she wasn't convinced that she would like it, coffee snob that she is. But now that she has one, she is OBSESSED with the thing! She loves how fast it makes coffee, how it makes one cup at a time so the rest of the pot is never wasted, and most of all, she loves that it make coffee dark enough for her tastes. I also got her the little adapter to make your own k-cups, so she can use any of her favorite dark roast blends, or you can buy k-cups labelled "extra bold," which means they have extra coffee grounds in them for a bolder brew.

My main concern about the device, cheapskate that I am, was the cost per cup. But if you buy the k-cups in bulk via Amazon (highly recommend Coffee People's offerings--Black Tiger is a favorite), you can often get them for less than $0.50 a cup, and even if you use two to fill a commuter mug, that's still a fraction of the price of a daily Starbucks' run! Also, make Sam's Club (or Costco) your friend. They have a Keurig bundle for $120 that includes the special edition machine, 60 k-cups, AND the little adapter to make your own k-cups. That's a heckuva deal! Also, they have a separate box of 80 k-cups of Paul Newman's Organic Extra Bold for $33 (about $0.41 a cup), another excellent bargain. You're welcome. ;-)

Thursday, December 02, 2010

In which my life threatens to become a bad country song...


"Yeah, I watched that sweet old life become a bag of bones..."
--Indigo Girls, "Ozilline"

Rest in peace, old girl. You were dearly loved and will be sorely missed.

ROSIE LINDSEY
(June 6, 1996 - December 2, 2010)