Monday, December 31, 2012

Time for a little more junk food before you begin that P90X workout resolution!

SHEESH! How did it get to be New Year's Eve already? It kind of snuck up on me. So late in the afternoon, I dashed to the grocery store in my pajamas (covered mostly by my coat), snow boots, and a festive tuke, along with the rest of the inhabitants of the North Country, to pick up party provisions. Of course, our party involves me watching my beloved Kathy Griffin and Anderson Cooper on CNN while my roommate is already snoring over there on the loveseat! Tee hee.

But I did prepare a couple of  Tex-Mex recipes that I found on Pinterest for our snacking and dining pleasure this evening. Both were easy to make, though one was just okay and the other was quite good and worth making again.

For our snack, I made something they called "Cowboy Caviar." It's comprised of two cans of (drained) Mexicorn, one can of Ro-tel (regular or hot), two cups shredded cheddar, six sliced green onions, and one cup each of mayonnaise and sour cream. After I combined these things, I tasted it, and it was kind of bland, so I added a teaspoon of both granulated garlic and ground cumin, quite a few shakes of hot sauce, a tablespoon of lime juice, and a can of ranch-style beans. That made it much tastier, though still not anywhere near the best version of this kind of thing. Plus, I didn't like how the shredded cheese gets kind of slimy in the dip. I would not make this again. I would make this or this instead.

Then for our dinner, I made some easy buffalo chicken taquitos that were pretty yummy. The only changes I made were to use the whole package of cream cheese, buttermilk instead of regular milk, and BBQ rub instead of Mrs. Dash and Cajun seasoning. I got a dozen the size of burritos, which were great for a meal, but for an appetizer or party snack, I would use less filling in each tortilla and roll them into skinnier taquitos.


Buffalo Chicken Taquitos
(Source: Real Women of Philadelphia via Pinterest)

2 tablespoons butter
1 teaspoon Mrs. Dash
1 teaspoon garlic powder
1/4 teaspoon Cajun seasoning (I used 1 1/4 teaspoons BBQ rub instead of Mrs. Dash and Cajun seasoning)
4 ounces cream cheese (I used one 8 oz. package)
1/3 cup Frank's hot sauce
1/3 cup milk (I used buttermilk)
4 cups chicken, cooked and shredded (I used a deboned deli chicken)
12 soft taco flour tortillas
2 cups mozzarella cheese, grated
2 tablespoons vegetable oil
Preheat oven to 425 degrees. In a small sauce pot over medium low heat, melt butter. Add Mrs. Dash, garlic powder and Cajun seasoning. Stir to combine and cook for one minute. Add cream cheese and stir until melted and completely combined with butter and spices. Whisk in hot sauce and milk and simmer for 5 – 8 minutes. Add salt to taste. Combine chicken and sauce.
Lay out a tortilla; fill with about 1/4 to 1/3 cup chicken and two tablespoons of mozzarella cheese. Tightly roll up taquito and place on a greased baking sheet; repeat until chicken is gone. Brush taquitos with vegetable oil on all sides. Bake for 15 – 18 minutes; rotate them every five minutes, until golden brown. Serve with blue cheese dressing and celery sticks (optional).

Saturday, December 29, 2012

Snowpocalypse 2012 Calls for More Soup!

Since I was still pretty much snowbound yesterday until our plow guy came and dug out the driveway in the very late afternoon, I spent the day at home, shovelling paths for the dogs to get out to potty and for us to get to our cars, tending the fire, cleaning the kitchen, and doing some neglected piles of laundry. I also unearthed a chicken from the back freezer, thawed it out, and proceeded to cobble together a very cozy and satisfying cauldron of homemade chicken noodle soup.

There was no recipe per se, but it was pretty traditional, with the exception of one special secret ingredient: fresh lemon juice! I loved that lemony turkey soup after Thanksgiving so much, that I thought to try it with chicken soup. The lemon does something wonderful to cut through the richness of the chicken fat and freshen up all the flavors. We ate steaming bowls of this soup with some awesome open-faced roast beef melts on the side: grainy bread grilled in a pan with a little butter, melted Swiss cheese, a sprinkle of granulated garlic and black pepper, a schmear of my homemade cranberry mustard, and thin slices of our Christmas roast beast crisped up in the same pan. YUM!!

Lemony Chicken Noodle Soup
Chicken and stock:
1 whole chicken, water to cover
2 large carrots, scrubbed and cut into large chunks
2 stalks celery, rinsed and cut into large chunks
1 whole onion, ends removed and cut into large chunks (peels and all)
4 cloves garlic, whacked with a knife
bundle of fresh herbs--thyme, oregano, and rosemary, tied with string
12-15 whole peppercorns
2 bay leaves
2 or 3 tablespoons chicken soup base
Soup:
1 large onion, peeled and diced
2 stalks celery, rinsed and diced
2 large carrots, peeled and diced
1 poblano pepper, seeded and finely diced
2-3 tablespoons chicken soup base, to taste
2 teaspoons granulated garlic
1 teaspoon ground celery
1/2 teaspoon black pepper
1 tablespoon dried parsley (or half a bunch of chopped fresh would be better!)
half a "family-sized" bag of wide egg noodles (or one regular-sized bag)
salt, to taste
juice of two lemons
2 cups half and half, optional

To make the chicken and stock, in a large stock pot (eight quarts, I think--I like to use my pasta pot with strainer insert), place the chicken and cover with water. Add the other stock ingredients, bring to a boil, reduce heat and simmer for at least an hour, or until the legs start to pull away from the body of the bird. Remove the chicken and set aside to cool, then strain the rest of the veggies and bits from the broth.


To make the soup, add the onion, celery, carrots, poblano pepper, and spices and bring to a boil. Reduce the heat and simmer until the veggies are sufficiently tender, about ten minutes. Bring the soup back to a rapid boil and add the noodles. Cook according to package directions. While the noodles are cooking, remove the skin from the cooled chicken and debone it, then break the meat into large chunks. Sprinkle with about a half teaspoon of salt, and squeeze in the lemon juice. Mix it all together gently with your hands, checking for any bits of bone or gristle you may have missed. When the noodles are tender, turn off the heat and stir in the chicken and the half and half, if using. Taste to correct seasonings and serve piping hot with another garnish of fresh parsley if you have some on hand.

Thursday, December 27, 2012

The Book of Ruth (Chapter One: Her Special Dressing)

My dear friend Ruth spent her Christmas vacation in Grayton Beach, Florida with her lovely new hubby (lucky gal!).  And being the resourceful sort--and my hero--she travelled there with a crock pot in tow. For their Christmas Eve Dinner in said crock pot, she made a roast, new potatoes, carrots, and baby onions.  On the side, she also prepared "Ruth's homemade dressing," what a Southerner like herself calls "English peas," and a pumpkin pie for dessert.

It was the dressing that intrigued me most, though. Ruth says it's a big favorite with her family and friends at Thanksgiving, and her new hubs reportedly had three helpings for his Christmas breakfast! Tee hee. So I asked her for the recipe, and she explained her basic methodology which I have translated into a more precise recipe below--my take on it, anyway. This dressing is yummy, and easy enough to prepare on a weeknight alongside a roast chicken; who says we have to wait until the holidays roll around again? However, I made this for our lunch today to celebrate Cyd's early (snow day) release from work. YAY!


Ruth's Cranberry-Pecan Dressing

1/2 cup (one stick) butter
1 large onion, chopped
2 stalks celery, chopped
1/2 cup chopped pecans (or more, to taste)
1/2 bag of Pepperidge Farm stuffing (not the cornbread, the herbal)
2 teaspoons rubbed or ground sage or ground sage
1 teaspoon garlic powder
1 teaspoon coarse black pepper
2 teaspoons Italian herbs
1/2 cup dried cranberries (or more, to taste)
one can (or more) low-sodium chicken broth (I used one can, and I should have used a little more--it was a smidge dry for my tastes)
1 or 2 tablespoons olive oil, "to the moisture consistency that one desires," as Ruth says

In a large ovenproof skillet, melt the butter and sauté the onion and celery until tender. Stir in the chopped pecans and cook for a few minutes until the nuts are fragrant and just starting to brown.

In a large bowl, mix the stuffing, seasonings, and craisins. Add the sautéed veggies and pecans, then moisten everything with chicken broth. Add a drizzle of olive oil, and then add the dressing back to the skillet. Even it out, but don't compact it.

Bake uncovered at 350 degrees until a little crispy on top, 30 minutes or so.

Wednesday, December 26, 2012

An Italian Christmas...postponed.

I had a long day yesterday, preparing and delivering cannoli, attending a friend's holiday dinner, delivering gifts to two other households, and finally, attending midnight mass which for Episcopalians, starts more sensibly at 11pm. Not only did I not have time to prepare a full-on Christmas feast, my roommate was rockin' a pretty nasty chest cold (I had it last week, so I might be to blame...sorry, Cyd), and she didn't have much of an appetite.

So we decided to postpone our special dinner until tonight. I did make one dish ahead yesterday afternoon, and the roast beast had an extra day to marinate, so it worked out great. I just sort of made up the meat marinade as I went along, starting with my usual--olive oil, balsamic, cracked black pepper, salt, and a ton of freshly-minced garlic. But then I added the juice of a lemon and a handful of rosemary twigs. It smelled very fragrant and distinctly Italian, which ultimately provided inspiration for the rest of the meal.


Last week, I was listening to my favorite Sirius radio program, "Cocktails with Patrick," and the host called his mom to chat with her on the air about her Christmas plans. At some point, Patrick's mother made an off-hand remark about this green bean dish that she makes with Boursin cheese that was really good, and that's all I needed to hear!

The problem was, I forgot to buy Boursin cheese, and I remembered that detail on Christmas Eve, after all the stores had already closed. So in desperation, I made a home version from Paula Deen that was actually a pretty close clone and very tasty and worked perfectly in my green bean recipe!

Homemade Boursin Cheese
(Source: adapted from Paula Deen via food.com)

8 oz. cream cheese, softened
4 tablespoons butter, at room temperature
2 cloves garlic, peeled and roughly chopped
1 teaspoon dried oregano
1/2 teaspoon dried basil
1/2 teaspoon dried dill
1/2 teaspoon dried marjoram
1/2 teaspoon dried thyme
1/4 teaspoon black pepper

1. Put the cream cheese and butter into the bowl of a food processor. (You could use a mixer or blender if you don't have a food processor.)
2. Add the seasonings and process until completely blended and smooth.
3. Cover and refrigerate for at least a few hours before serving.

I found another food.com recipe that I loosely followed for what is sort of a more upscale version of green bean casserole, though almost as easy to prepare, and without the mushy canned green beans and cream o'crap soup. This recipe is a keeper and could very well become a holiday staple around here.

Green Bean Mushroom Bake
(Source: adapted from food.com)

2 lbs. green beans
4 tablespoons butter, divided
2 large shallots, thinly sliced 
8 ounces baby portabella mushrooms, sliced
1/4 cup white wine
1 (5 1/4 ounce) package boursin garlic and herb spreadable cheese (or half of the homemade)
1/2 cup dry Italian seasoned bread crumbs (I used lemon and garlic panko)
2 tablespoons grated parmesan cheese
1. Over high heat, bring pot of salted water to boil. Add beans. Cover and cook 4-5 minutes. Coat 2-quart baking dish with cooking spray. Drain beans; reserve. Preheat oven to 375 degrees.  2. In large skillet, melt two tablespoons butter over medium heat. Add shallots and cook, stirring, three to four minutes. Add mushrooms; cook, stirring, until softened, one to two minutes. Add wine; cook two minutes. Stir in Boursin cheese; cook until melted. Toss with beans; transfer to baking dish.  3. Melt remaining two tablespoons butter. Stir in bread crumbs and Parmesan; sprinkle over green beans. Cover lightly with foil*. Bake 20 minutes. Uncover; bake until golden, 10 minutes.
*At this point, you can refrigerate and bake the dish the next day. It might just take a little longer to heat through from cold.

It is usually my way to go an English route with the roast beast and make a Yorkshire pudding. But with the Italian-flavored meat marinade and the parmesan green beans and mushrooms (not to mention, cannoli for dessert!), it would seem the universe wanted me to round out the Italian theme with some risotto. However, after I had started to prepare the dish, I realized that I was out of arborio rice! Ugh. But I ran across something called "volcano rice" in my pantry (an Asian blend of white, brown, and red rices). Could I use it to make risotto, I wondered? As it turns out, you can!

The only downside is that it takes twice as long to cook, so you have to hang out by the stove for about an hour, stirring. But I used half vegetable stock and half beef au jus, and with the somewhat nutty rice, the risotto ended up tasting like a really delicious mushroom, beef, and barley soup, but the consistency was that of rice with a rich gravy that perfectly complemented the roast!

Beefy Volcano Risotto
1 quart vegetable stock plus 1 quart beef stock (low-sodium)
1 bay leaf
3 tablespoons extra-virgin olive oil
1 medium onion, very finely chopped
2 large cloves garlic, peeled and minced
1 cup volcano rice
1/2 cup dry white wine
freshly ground pepper

In a medium saucepan, bring the vegetable and beef stocks to a boil with the bay leaf. Keep the stock warm over very low heat.

In a large skillet or braiser, heat the olive oil. Add the onion and cook over moderately high heat, stirring, until softened, about two minutes. Add the garlic and cook another minute. Add the rice and cook, stirring until opaque, about three minutes. Add the white wine and cook, stirring, until completely absorbed, about one minute. Avoiding the bay leaf, add one cup of the warm stock and cook over moderate heat, stirring, until nearly absorbed. Continue adding the stock one cup at a time and stirring until it is absorbed between additions.


The rice is done when it's al dente and creamy, about 55 minutes total. Season with black pepper (and salt, if necessary).

Monday, December 24, 2012

And Lo, I Bring You Tidings of Great Potlucks which Shall Be to All People: A Christmas Epistle

I have had no fewer than FOUR holiday gatherings within a week's time, and I had to prepare something to take along to each of them! So for the first two events, I simply bought double the ingredients to make two batches of crock pot Hawaiian (pineapple) meatballs, that are always a big hit at parties.

Hawaiian/Pineapple Meatballs

4 pounds frozen (1/2 or 5/8 oz.) meatballs
2 tablespoons vegetable oil 4 cloves garlic, peeled and minced
1 teaspoon freshly-grated ginger (I use the kind in a tube)
6 tablespoons cornstarch
6 tablespoons soy sauce (I love the new Ponzu/citrus-flavored variety
6 tablespoons white vinegar (I like to use rice wine vinegar, too)
3/4 cup water
1/2 cup brown sugar
1/2 teaspoon black pepper
squeeze of sriracha
1 large (20 oz.) can crushed pineapple
2 sweet peppers, cut into thin strips (optional, but pretty--use red and green for Christmas!)

Add meatballs to the crock pot when ready to make the sauce. Heat the oil on medium high and saute for the garlic and ginger for a few minutes in a saucepan. While that is cooking, in a bowl, whisk together the corn starch, soy sauce, vinegar, water, sugar, black pepper and sriracha. Add the slurry to the saucepan and whisk constantly (so that the sauce does not get lumpy) until it thickens. When it is thick, remove from the heat and stir in the pineapple and peppers. Pour this mixture over the meatballs in the crock pot. Mix up the meatballs and sauce. Cover and heat on low for at least two hours. It will sufficiently stay 4-5 hours on low heat with an occasional stir.

Then, of course, there was the fabulous annual Padula Cookie Exchange to attend. The theme this year was a Colonial Christmas.


As for my contribution to this lovely spread of cookies, I decided to make something easy but impressive-looking.  Since two of the guests are partial to Parisian pastries (ooh, dig that groovy alliteration!), I turned to the Barefoot Contessa and her simple method for making palmiers or elephant ears. Now, if you made your own puff pastry from scratch, these cookies would be extremely complicated and time-consuming (and even tastier, no doubt).  But if you start with Pepperidge Farm, you'll be done in a jiffy! You can make them just with sugar, or add cinnamon, or I decided to add a hint of cardamom and ginger to make a tasty chai-spiced pastry.

Chai-Spiced Palmiers or "Elephant Ears"
(Source: adapted from The Barefoot Contessa, via Food Network)

1 cup sugar, divided
pinch kosher salt
1/4 teaspoon cinnamon
1/8 teaspoon cardamom
1/8 teaspoon ground ginger
1 sheet puff pastry, defrosted (recommended: Pepperidge Farm)
 
Preheat the oven to 450 degrees.

Combine 1/2 cup of the sugar and kosher salt and pour it over a flat surface such as a wooden board or marble slab. Unfold the sheet of puff pastry onto the sugar mixture.

Combine 1/2 cup of the sugar and the spices and spread the mixture evenly on the puff pastry. This is not about sprinkling; it's about an even covering of sugar. With a rolling pin, lightly roll the dough until it's a 13-inch square and the sugar is pressed into the puff pastry on top and bottom. Fold the sides of the square toward the center so they go halfway to the middle. Fold them again so the two folds meet exactly at the middle of the dough. Then fold one half over the other half as though closing a book. You will have 6 layers. Slice the dough into 38-inch slices and place the slices, cut side up, on baking sheets lined with parchment paper.

Bake the cookies for 6 minutes, or until caramelized and brown on the bottom, then turn with a spatula and bake for another 3 to 5 minutes, until caramelized on the other side. Transfer to a baking rack to cool.

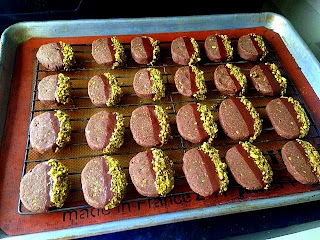
The last event of this festive week was a winter solstice party at Woven Meadows Farm. The evite instructed us to bring along our favorite winter cookies to share. I recalled these particularly excellent chocolate pistachio shortbread trees from a previous cookie exchange (recipe here), and though I was none too keen on rolling out dough and cutting out a bunch of cookies, I wondered if I could make them as slice and bakes? As it turns out, you can! I just divided the dough in half, rolled each part up in plastic wrap, chilled it, then sliced and baked the cookies. Once they cooled, I dipped the cookies halfway in chocolate and rolled the edges in ground pistachios. Pretty and pretty yummy!

Just when you thought this eternal post was over, I have one more holiday item to share. It was not for a party, at least not one that I attended. You see, back in September, my choir held a benefit concert and silent auction. The items that I contributed to the auction were two gift certificates for two desserts of the winner's choice. One of the gals who won one of the certificates decided to cash in on Christmas Eve. And she wanted cannoli, which I have never made before. I did not feel confident enough to make the shells, plus, I couldn't find the molds which are in a box somewhere.

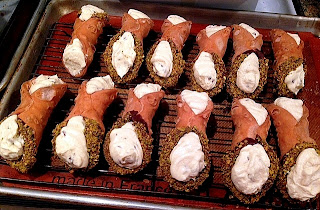
So yesterday afternoon, my roommate and I drove down to Albany to check out the new Trader Joe's and do a little last-minute Christmas shopping, and we also hit up an authentic Italian bakery called Bella Napoli. They sold me two dozen cannoli shells for $0.69/apiece, and they were perfect! All I did was dip them in chocolate and pistachios (a culinary motif this year, it would seem), and then prepared a delicious fresh ricotta filling. I may have purchased the shells, but the ricotta was homemade with milk from my farm share, and that made all the difference. lease note: If you prepare these for an event, make the filling advance, but don't stuff the shells until right before your party. If they sit around longer than two or three hours, the shells will become soggy. You have been warned.

Cannoli Filling

whole milk ricotta made from a half gallon of milk (a generous two cups)
1/2 cup powdered sugar (or sweeten to taste)
pinch of salt
1/2 teaspoon vanilla
1/4 teaspoon cinnamon
zest of one small orange or large tangerine (very fine)
1 tablespoon ground pistachios
3 tablespoons mini chocolate chips

In the bowl of a food processor, blend the ricotta until very smooth. Add the powdered sugar, salt, vanilla, cinnamon, and orange or tangerine zest and blend again. Stir in the pistachios and chocolate chips and chill the mixture until ready to fill the cannoli.


Sunday, December 09, 2012

70's Flashback: Skillet Lasagna

Dear readers of a certain age (40 or above), do you remember Hunt's Skillet Lasagna? My mom was a single, working mother, so she often turned to such packaged convenience foods during the work week to get a quick dinner on the table.And the skillet lasagna, with its little packet of a ricotta cheese like substance that I alway got to squeeze on top, was my favorite. Sadly, they don't make it anymore (and even if they did, it probably wouldn't hold the same appeal as it did for my childhood palate), but I have a recipe that produces something much better--all the flavors of lasagna without all the fuss, and easy enough to throw together on a weeknight! (You're welcome.)


Skillet Lasagna
(adapted from America's Test Kitchen's Pasta Revolution and from the blog, Pink Parsley)
Serves 4 to 6

3 (15 oz.) cans petit diced tomatoes, with juices
1 tablespoon olive oil
1 medium onion, diced
1/2 teaspoon salt
freshly ground black pepper
3-4 cloves garlic, minced
pinch of red pepper flakes (I omitted this because I used hot Italian sausage)
3/4 teaspoon dried Italian seasoning
1 lb. Italian sausage, crumbled (or ground beef, if you prefer)
10 curly-edged lasagna noodles, broken into 2-inch lengths (or better yet, 10 oz. pantacce pasta)
3/4 cup shredded mozzarella cheese
1/2 cup grated Parmesan cheese
3/4 cup ricotta cheese
3 tablespoons minced fresh basil (optional)

Heat the oil in a 12-inch nonstick skillet over medium heat. Add the onion and 1/2 teaspoon of salt and cook, stirring often, until softened, 5 to 7 minutes. Stir in the garlic, pepper flakes, and Italian seasoning and cook until fragrant, about 30 seconds.

Add the sausage or ground beef to the skillet. Cook, stirring often and using a wooden spoon to break up the meat, about 3 to 5 minutes, or until it's no longer pink.

Scatter the pasta in the skillet, then pour the tomatoes and their juice over the top. Stir and cover. Cook at a vigorous simmer, stirring often, until the pasta is tender, 20-24 minutes (if you don't stir it, the pasta will clump together and stick to the bottom and sides of the skillet).

Meanwhile, preheat the broiler (I had mine on 450 degreees).

Remove the skillet from heat, and stir in half the mozzarella and parmesan, and 1/4 cup of the ricotta. Dot the remaining ricotta over the noodles in tablespoons, then sprinkle with the remaining mozzarella and parmesan. Transfer to the oven and broil until the cheese melts and is starting to brown, 3-5 minutes. Remove from oven, sprinkle with fresh basil (if using), and serve.


Friday, December 07, 2012

'Tis the season...for SOUPS!

When I was in the middle of my Christmas Canning Fest, I was texting with my dear friend, Carl--the fellow who inspired me to try my hand at mustard-making. I sent him a photo of the lovely cranberry mustard I had simmering on the stove, and he countered with a photo of his yummy-looking dinner: his grandmother's tomato soup with a side of quesadillas for dunking. He sent me the recipe, and I gave it a whirl a few days later. Easy and delish, and perfectly cozy for this time of year.

Grandma Schweitzer's Tomato Soup

1 small onion, diced
1 large can tomato juice (48 oz.--but I substituted two regular cans of spicy V-8 and a small can of tomato paste with four cans of water)
1/3 cup water
1/2 teaspoon salt
1/2 teaspoon sugar
2-3 celery stalks, cut in halves or thirds
fresh ground pepper, to taste
2/3 cup tiny egg noodles
1/2 cup heavy cream

Saute one small onion in olive oil in soup pot. Add tomato juice, water, sugar, salt, pepper, and celery. Bring to boil. Simmer for 90 mins. Add heavy cream and noodles and cook for 15 more minutes.  Remove celery and serve.

Soup #2 is going into my post-Thanksgiving repertoire in perpetuity. It was suggested to me by my friend, June, who raved about it after making it last year. Now I will always love my favorite turkey and wild rice soup best, but it's laden with heavy cream and definitely decadent. But this turkey soup is light and fresh and quite healthy--a refreshing change of pace from most of the guilty pleasures of the holiday season. You really must try this one, and not just with leftover turkey; it would be just as good with the ubiquitous deli chicken year-round. And I might try replacing the spinach with kale next time, too.

Lemon Turkey Soup with Fresh Spinach and Farfalle
(Source: Bon Appétit, January 2005)
Yield: 4-6 servings

2 tablespoons olive oil
1 large onion, chopped
2 large garlic cloves, finely chopped
3 celery stalks, chopped
2 carrots, diced
1 large red bell pepper, chopped
8 cups (or more) canned low-salt chicken or turkey broth
2 cups dried farfalle/bow-tie pasta (I used mini-farfalle)
2 cups diced cooked turkey
2 tablespoons fresh lemon juice
2 teaspoons grated lemon peel
1/2 10-ounce package ready-to-use spinach leaves (about 6 cups)
grated Parmesan cheese

Heat oil in heavy large pot over medium heat. Add onion and garlic and stir 1 minute. Add celery, carrots and red bell pepper and sauté until vegetables are tender, about 8 minutes. Add 8 cups broth and bring soup to a boil. Reduce heat to medium-low; simmer to blend flavors, about 20 minutes. Add pasta and simmer until pasta is tender, stirring occasionally, about 10 minutes.

Mix turkey, lemon juice and lemon peel into soup. Add spinach. Simmer until spinach wilts but is still bright green, stirring occasionally, about 3 minutes. Thin soup with additional chicken broth, if desired. Season soup to taste with salt and pepper.

Ladle soup into bowls. Serve, passing cheese separately.

The last soup I have to offer in this post is the last soup of the semester that I took to share at school. We had a little potluck for our last department meeting, and I wanted to take a hearty, spicy, vegetarian soup. I rifled around in the pantry and found some Rancho Gordo Black Midnight Beans, and I also had sweet potatoes on hand, so I decided that a sweet and zesty chili would be in order. It turned out great, if I do say so myself, and my colleagues really seemed to enjoy it! I recommend this recipe even for carnivores. You truly will not miss the meat with all the other tasty things going on.

Crock Pot Black Bean and Sweet Potato Chili

1 lb. dry black beans (or substitute 4 cans black beans, drained)
2 tablespoons olive oil
2 onions, chopped
2 Cubanelle peppers, seeded and chopped (you could also use Italian frying peppers or even poblanos)
6 cloves garlic, peeled and minced
2 medium sweet potatoes, peeled and cubed (I like 3/4-inch pieces)
2 - 15 oz. cans diced tomatoes (preferably, fire-roasted)
1 tablespoon paprika
1 tablespoon dark chili powder
1 tablespoon ground cumin
1 tablespoon cocoa powder
1 tablespoon brown sugar
1 1/2 teaspoons salt, or to taste
1 teaspoon ground celery
1 teaspoon cinnamon
1/2 teaspoon black pepper

juice of one (or two!) limes, to taste

I prefer to use dry beans, especially from my favorite company, Rancho Gordo, that I order from online once or twice a year. I used their Black Valentine beans this time. Rinse and pick them over, then put them in a large sauce pan covered with two inches of water, bring them to a boil on the stovetop, and boil hard for five minutes. Then put the beans and the liquid into a crock pot and cook them on low overnight (eight hours, or high for four hours). Of course, you can opt to use four cans of (drained) black beans instead if you prefer. But then you'll probably want to add at least two cups of vegetable stock in lieu of the cooked bean liquor.

The next morning, place a skillet over medium heat, add the olive oil, and saute the onions and peppers until the onions are translucent, about ten minutes. When the veggies are almost tender, throw in the minced garlic, and cook for another minute or two. Add this sauteed veggie mix to the crock pot with the beans, along with the sweet potato chunks, the diced tomatoes (and their juice), and the paprika, chili powder, cumin, cocoa, brown sugar, salt, ground celery, cinnamon, and black pepper. Stir to combine and cook on low for 6-8 hours (or high for 3-4) until both the beans (if they started as dry) and the sweet potatoes are tender. Thin with vegetable stock if necessary to reach a desired consistency.

When the chili has finished cooking, taste to correct the seasonings, and add more salt and pepper if desired. Squeeze in the juice of one or two limes and stir to combine just before serving. Garnish with any or all of the following: a dollop of sour cream or plain Greek yogurt, some chopped fresh cilantro leaves, shredded cheese, and/or avocado chunks or slices.

Saturday, December 01, 2012

Time for the kitchen elves to get to work!

Over Thanksgiving break, I took the opportunity to bust out my canner and start working on some holiday treats for friends and colleagues. First up was a lovely apple butter that I made in my crock pot. Usually, I make an apple butter that is highly spiced, but I ran across a recipe for a maple vanilla apple butter that sounded heavenly, and it skips the traditional spices that would surely mask the subtler flavors of the maple and vanilla. In fact, the taste reminds one of a caramel apple. Yum! And making it in the crock pot is so easy, and saves you from being burned by the spattering! I highly recommend this apple butter for a holiday gift-giving idea.

Maple Vanilla Apple Butter
(Source: adapted from Good Cheap Eats)
Yield: 3 pints

12 Granny Smith apples, about 3 pounds, peeled, cored, and sliced (I used Macs and Cortlands)
1 cup apple cider (or juice)
1 cup brown sugar
1/2 cup maple syrup
1 teaspoon vanilla extract  

Place the apples and cider or juice in a five quart slow cooker. Set on high and cook for three hours. Puree apple mixture until smooth using an immersion blender or in a food processor.

Stir in brown sugar, maple syrup, and vanilla extract. Continue to cook on high for another three hours. The sauce should thicken and darken and mound up on a spoon. (It won’t spread out across the spoon when you scoop some up.)

Pour apple butter into hot, sterilized jars. Fit with metal lids and bands. Place in hot water bath and process for 10 minutes. Remove jars from water bath and allow to cool undisturbed overnight on a towel on the counter, spacing them at least an inch apart. Once cool, remove bands and check lids for seal. Store in a cool, dark place.

My second holiday gift idea was inspired by a company that I just love that I discovered on our vacation to Maine last summer, Raye's Mustard, I had originally thought to order some of their sampler packs for Christmas presents for some of my colleagues, but then I became inspired by my friend, Carl, who reportedly makes a mean Oktoberfest beer mustard. I decided to make two varieties: a double batch of a sweet, fruity cranberry mustard, and then the German mustard that packs a real punch. I canned them in those cute little four-ounce jelly jars, and I ended up with two dozen gifts for folks at work that haven't been naughty. ;-)

Cranberry Mustard
(Source: Ball Canning)
Yield: at least 7 (4 oz.) jars

1 cup red wine vinegar
2/3 cup yellow mustard seeds
1 cup water
1 tablespoon Worcestershire sauce
2-3/4 cups fresh or frozen cranberries (about 2 12-oz bag)
3/4 cup sugar
1/4 cup dry mustard
2-1/2 teaspoons ground allspice

1.) BRING vinegar to a boil in a medium saucepan. Remove from heat and add mustard seeds. Cover and let stand at room temperature until seeds have absorbed most of the moisture, about 1-1/2 hours
2.) PREPARE boiling water canner. Heat jars and lids in simmering water until ready for use. Do not boil. Set bands aside.
3.) COMBINE mustard seeds and liquid, water and Worcestershire sauce in a food processor or blender. Process until slightly grainy. Add cranberries and blend until chopped.
4.) BRING cranberry mixture to a boil in a medium saucepan, stirring constantly. Reduce heat and simmer for five minutes, stirring frequently. Whisk in sugar, dry mustard and allspice. Continue to simmer, stirring frequently, until volume is reduced by a third, about 15 minutes.
5.) LADLE hot mustard into hot jars leaving 1/4 inch headspace. Remove air bubbles. Wipe rim. Center hot lid on jar. Apply band and adjust until fit is fingertip tight.
6.) PROCESS in a boiling water canner for 10 minutes, adjusting for altitude. Remove jars and cool. Check lids for seal after 24 hours. Lid should not flex up and down when center is pressed.

Oktoberfest Beer Mustard
(Source: adapted from Ball Canning)
Yield: at least 5 (4 oz.) jars

1-1/2 cups beer (Carl uses Guiness; I used a pumpkin ale)
1 cup brown mustard seeds (I used half brown and half yellow seeds)
1 cup water
1/2 cup malt vinegar
1/2 cup lightly packed brown sugar (I used a whole cup)
1/4 cup dry mustard
1 tablespoon onion powder

1.) COMBINE beer and mustard seeds in a medium saucepan. Bring to a boil. Remove from heat, cover and let stand at room temperature until seeds have absorbed most of the moisture, about two hours.
2.) PREPARE boiling water canner. Heat jars and lids in simmering water until ready for use. Do not boil. Set bands aside.
3.) PLACE mustard seeds and remaining liquid in a food processor or blender. Process until chopped and slightly grainy.
4.) TRANSFER mixture to a large saucepan. Whisk in water, vinegar, brown sugar, dry mustard and onion powder. Bring to a boil. Reduce heat and simmer, stirring frequently, until volume is reduced by a third, about 15 minutes.
5.) LADLE hot mustard into hot jars leaving 1/4 inch headspace. Remove air bubbles. Wipe rim. Center hot lid on jar. Apply band and adjust until fit is fingertip tight.
6.) PROCESS in a boiling water canner for 10 minutes, adjusting for altitude. Remove jars and cool. Check lids for seal after 24 hours. Lid should not flex up and down when center is pressed.