Sunday, December 29, 2013

A Cheesecake Epiphany

I trust that you all had a MERRY CHRISTMAS? Ours was nice and quiet, and I prepared a somewhat Italian-themed feast which consisted of an aged prime rib roast that we acquired at this great little Italian market that we discovered in Albany called Cardona's. I marinated the roast beast in a ton of garlic, cracked black pepper, fresh rosemary, olive oil, and balsamic--and cooked it in my fabulous new All-Clad roasting pan that my roomie got me for Christmas! SQUEE!

For our side dishes, we had pumpkin ravioli (acquired at Trader Joe's in Albany) in browned butter with crispy sage leaves, grated Grana Padano, and pine nuts; steamed green peas in a lemony vinaigrette; and homemade chocolate cream pie for dessert. Then after dinner, I cleaned out the back fridge (full of old, frozen leftovers) to make room for the new leftovers (ha!), and even managed to haul the trash out over the ice floes AND gather the mail from across the treacherous turnpike without falling on my ample posterior. It was truly a Christmas MIRACLE!

The next day, I spent an hour trying to dig Cyd's car out of the ice and snow, but no dice. Then yesterday, it took us an additional 45 minutes and the strategic application of ice melt, kitty litter, and pots and pots of hot water, but we FINALLY managed to get her freed from the ice floe that is our driveway and parking spots! YAY! Another Christmas miracle! So the poor thing was able to go see her beloved Patriots play in Foxboro, MA at Gillette Stadium, which was my birthday and Christmas gift to her. I got a text from her this afternoon after the game had started. It said, "It's awesome. In freezing rain but awesome." LOL! The poor thing. Living the dream. The wet, cold dream.


Of course, with my roomie gone, that left me rattling around the house alone, which rarely ever happens. It was fine, because I had an article for the local food magazine overdue, and I got that done at long last. Then my dear friends Janice and Domenica took pity on me being on my own and invited me over to dinner tonight. Somehow I made it there alive despite sliding all over the icy roads, and we had a lovely meal and lively conversation.>

But the highlight of the evening was THIS: Goat cheese cheesecake with a toasted walnut and graham cracker crust and this crazy (but crazy delicious) red grape, walnut, red wine, and rosemary compote on top. It may sound a little weird, but it might be the best cheesecake I've ever had...and I've had a LOT of great cheesecakes! I strongly encourage you to give it a try. I know I'm going to make one to share with Cyd when she gets home.


Goat Cheese Cheesecake with Red Grape Compote
(Source: Cuisine at Home Magazine)

For the Crust:
1 cup walnuts, toasted
1 cup graham cracker crumbs
2 tablespoons sugar
1/2 stick butter, melted

For the Filling:
1 pound goat cheese at room temperature
4 ounces cream cheese at room temperature
3/4 cup sugar
1/2 cup sour cream
3 eggs at room temperature
2 tablespoons heavy cream
1/2 teaspoon vanilla extract

Red Grape Compote
rosemary sprigs for garnish

Preheat oven to 350.Toast walnuts in a 350 oven until golden and aromatic, 10-15 minutes. Allow to cool. Process walnuts, cracker crumbs, and sugar in a food processor until fine, then transfer to a bowl and stir in butter. Press crumbs onto the bottom and 1" up the sides of a 9" springform pan. Patch any holes that could cause the filling to leak. Bake crust until golden, about ten minutes; cool while preparing the filling.

Reduce oven temperature to 250. Beat both cheeses, sugar, and sour cream together in a stand mixer fitted with a paddle attachment (or a hand mixer on low speed) until light and fluffy. Add eggs one at a time, beating well and scraping down the sides of the bowl after each addition. Beat in cream and vanilla. Pour filling into cooled crust, smooth the top, and bake at 250 for 1 to 1 1/4 hours. The center will not be fully set. Remove cake from oven and let stand at room temperature until completely cool; cover and chill overnight.

To serve, remove sides form the pan, then slice. Before making each cut, dip a thin-bladed knife into a glass of hot water and wipe dry with a towel. To remove a slice from the cake, turn the knife sideways and lift the piece out, or use a narrow-bladed spatula. A small offset spatula works well. Garnish with Red Grape Compote and a sprig of rosemary.

Red Grape Compote 

3/4 cup dry red wine 
1/3 cup sugar 
2 teaspoons cornstarch 
2 cups red grapes, halved 
1/2 cup walnuts, toasted and chopped 
1 teaspoon fresh rosemary, chopped 
1 teaspoon fresh lemon juice 
freshly ground pepper 

Simmer wine, sugar, cornstarch, and salt in a small saucepan over medium-high heat, whisking until thick, two to three minutes. Pour syrup over remaining ingredients, toss to coat. 

NOTES : Suggested wine is Cabernet Sauvignon. Don't overcook the wine syrup or else it will thicken too far and make the grape topping sticky and gloppy.


Tuesday, December 24, 2013

Party fare...thoughtfully made.

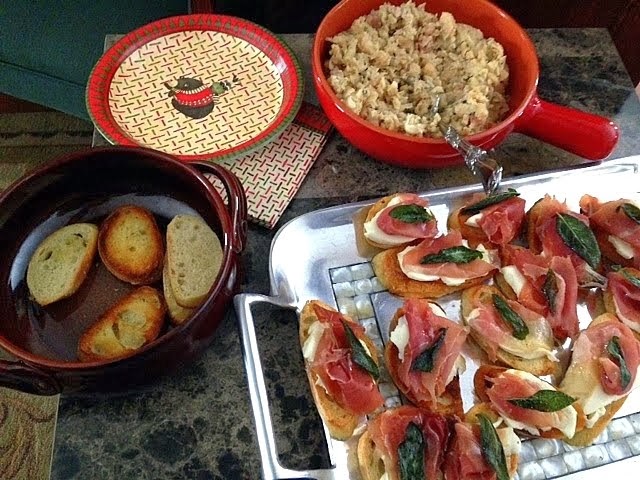
We are enjoying a delightful ice storm in the region at present, so I wasn't too keen on leaving the house and having to chip my car out and slide down the roads. But my dear friend was having a Christmas party Saturday night, and I was afraid that she might not have many guests. Since I decided to attend at the last minute, I didn't have much time to pull together anything fancy to take to the potluck party. So I threw together that simple Tuscan white bean dip and crostini that I had at the Christmas cookie exchange last week.

For once I was purposefully trying to be low-key and not to impress anyone with my gourmet wizardry. But when I got a plate of food from the fabulous buffet and sat down to socialize, a friend specifically asked if I had brought that white bean dip? I said yes, but how would she know that? Her response was that she knew by the crostini that were so "thoughtfully made." LOL! All I did was cut up a baguette, brush some olive oil on the slices, and broil them for a few minutes, and only on one side! Not very fancy. But I guess some folks would open up a box of crackers and call it good? (To avoid protests from the Boxed Cracker Defamation League, I'd like to say publicly that I am a strong supporter of boxed crackers, especially those red bean and sweet potato Triscuits.)

Anyway, I followed the recipe below, but I added the zest of the lemon that I juiced, about two tablespoons of shredded parmesan, and about the same amount of pine nuts. Oh, and a bunch of chopped fresh parsley. Good stuff! 

White Beans and Rosemary Crostini
(Source: adapted from Under the Tuscan Gun)

2 tablespoons olive oil, plus more for serving
1/4 pound pancetta, diced
2 cloves garlic, peeled and thickly sliced
3 sprigs rosemary, leaves removed
2 (15 ounce) cans cannelini beans, drained and rinsed
zest and juice of one lemon
2 tablespoons shredded parmesan, optional
2 tablespoons pine nuts, optional
1/4 cup chopped, fresh parsley, optional
Kosher salt and freshly ground black pepper
Baguette, sliced

1. Heat fireplace to a medium heat. Adjust grill racks over the flame and heat a heavy dutch oven over the rack. Alternatively, heat a medium saucepan over medium heat.

2. Once hot, add the oil to heat. Add pancetta and render some of its fat. Add rosemary and garlic and sauté until fragrant.

3. Stir in beans and lemon juice and zest. Mash the beans with the back of the wooden spoon. Don’t mash them all smooth- you want some texture. Stir in the parmesan, pine nuts, and parsley (if using), and season with salt and pepper.

4. Toast sliced baguette. Serve the beans on top of the toasted bread. Drizzle with olive oil, if desired.

Ooh, and here's a great idea if you have any of the spread left over. I made a double batch for the party, so I had some left. Today I took four smaller sweet potatoes, peeled and cubed them, and put them in the crock pot with about six cups of chicken (or vegetable) stock and cooked this for several hours on high until the the potatoes were very tender. Of course, you can just simmer this on the stove if you're in a hurry. Once the potatoes were soft, I used a stick blender to blend the potatoes and broth until smooth, then I stirred in about two cups of the leftover bean spread. At this point, you can add some cream or half-and-half, too, if you like. Garnish with some crabmeat, and TA-DAH, Sweet Potato and White Bean Bisque with Crab! (You could also swap out the sweet potatoes for any kind of winter squash.) DELISH!


Friday, December 20, 2013

In which I create blackberry beer jam...

Back in September at a meeting of my book club, I sampled some blackberry beer jam that a friend acquired at a microbrew festival in Quebec. When I mentioned the jam in passing online, my beer connoisseur and brewmaster friend, Mike, got all excited and wanted to try some. So I thought I might buy a couple of jars for him as a Christmas gift. But it's not available online, and even a trip to the Unibroue Brewery in Chambly, QC proved, err, fruitless. So I thought, fine then, I'll make my own dang blackberry beer jam! How hard could it be? Well...it was a bit of a challenge, mostly because I searched the entire internet for a recipe that I could use or at least follow somewhat closely and modify, but I couldn't find much. Was this a bad sign? Is the sweet pairing of berries and beer that uncommon and far-fetched?

As it turns out, I ended up morphing together a recipe for rhubarb beer jam (yes, that's a thing) and a methodology for making seedless blackberry jam without commercial pectin, and I was shocked that my Franken-jam actually turned out GREAT! It was delicous, and it set up perfectly using natural pectin from green apples. I ended up with 14 half-pint jars of the stuff, and I mailed quite a few of those all over the country for friends at Christmas who were enticed by just the idea of blackberry beer jam, and by some of the pictures that  posted on Facebook, no doubt. I used frozen fruit at this time of year, of course, but I can't wait to try this again next summer when the local berries are ripe, and maybe make a raspberry beer jam, too!

I recommend making this jam over two days to split up the work and spare the cook, and also to enhance the flavors. I completed Phases I and II of Operation Blackberry Beer Jam in one evening session. Last night, I crushed four pounds of blackberries with a potato masher and cooked them with five cups of chopped Granny Smith apples (cores, seeds, peels and all) in three pints (four cans) of Long Trail Blackberry Wheat Beer for about 25 minutes until soft and pulpy. I pressed all of this through a fine mesh sieve, removing most of the seeds and skins. To the resulting ten cups of puree, I added an equal amount of sugar (I might cut this down to 75% next time), two split vanilla beans, and the zest and juice of three lemons.

At that point, I put the whole pot in the fridge and let it macerate overnight. Then today, I cooked it down until it reached 220 degrees (and passed the frozen plate test*), and then I jarred it up, processed it in a boiling water bath for ten minutes, and prayed that it would set without commercial pectin. And it did! YAY! I swear, I may have to go into business selling this stuff--it's a hot commodity!

*When you start cooking your jam, put a small glass plate in the freezer. Once the jam hits 220 degrees on a candy thermometer, place a teaspoonful on the frozen plate, let it cool for a minute, and then press it a bit gently with your fingertip. If it wrinkles, you're good to go. Alternately, run your fingertip through the middle of the jam, and if the furrow stays clear and the two halves of the jam don't run back together, you're good to go. If not, keep cooking the jam another five minutes and try the test(s) again.


LOOK at the gorgeous color of that purée!


I got 14 jars--PLENTY to share with friends as tasty little Christmas gifts!


Clinging to the spoon as it cooled--a PERFECT set!

Wednesday, December 18, 2013

Cookie Party 2013: Christmas in Tuscany

If classes are finally over and fall semester is complete, it must be time for the Annual Padula Christmas Cookie Exchange! This year's luncheon theme was Christmas in Tuscany, and as always, it was an epicurean throwdown! Let me share some pictures from the affair...


How AMAZING is this wreath made of rosemary branches topped with a olive medley and marinated sundried tomatoes? So clever!

Appetizers: White bean and pancetta spread on crostini and more crostini stopped with fresh mozzarella, prosciutto and fried sage. YUM!

The lovely luncheon tablescape.

The place settings--a tiny crock of homemade cinnamon honey butter made with Amish butter from Pennsylvania. Domenica said, "Like Texas Roadhouse, but BETTER!" Ha ha.


The main entrée was the world's BEST chicken and dumplings, or rather, homemade ricotta gnocchi that were light as a feather! I will have to make this delectable dish for myself at home. But in the meantime, here's the link to the recipe in Bon Appétit.


As if the cookies weren't enough, Domenica baked a showstopping dessert: An Italian cream cake filled with fresh orange curd and topped with toasted coconut and candied pecans. WOW!


THE COOKIES! (Thank you, Google, for the holiday "auto awesome" twinkle effect. Tee hee.)

As for my contribution to the festive exchange, I made Almond Roca Cookies. Apparently, Emeril had a cookie contest one year, and Lynn Scully of Rancho Sante Fe, CA was the winner. Well, I can tell you, these cookies are big winners! They look really fancy, but they are very simple, and I banged out six dozen of these bad boys in no time flat.

I only made one substantive change to the recipe. It calls for coarse ground almonds, so when I went to the store for ingredients, I bought almond meal or flour. Then when I looked at the pictures more carefully, I could see that they meant sliced almonds that you chop up further (I used a pastry cutter) in which to roll the dough. But I already had the almond meal, so I decided to use it, swapping out one cup of the AP flour. Then I doubled the baking soda to one teaspoon, as the nut flour is heavier than wheat flour. The cookies turned out nutty and crispy and absolutely delicious!

Oh, and I ran out of milk chocolate for drizzling at the end, so I did the last few with bittersweet, and though I am usually a fan of the darker chocolate, milk is the way to go to make these cookies taste similar to Almond Roca. However, my roommate and chief taster preferred the ones with bittersweet chocolate. So you do as your heart leads. ;-)

Almond Roca Cookies
(Source: adapted from The Cooking Channel)

2 1/2 cups all-purpose flour (I swapped out one cup of almond meal/flour)
1/2 teaspoon baking soda (increase this to one teaspoon if using almond meal/flour)
1/4 teaspoon salt
1 cup dark brown sugar
1/2 cup sugar
1 cup butter, room temperature
2 eggs, room temperature
2 teaspoons pure vanilla extract
1 package toffee bits (I used the English toffee bits with milk chocolate)
1 cup coarsely ground almonds (I used sliced almonds that I broke up more with a pastry cutter)
4 ounces milk chocolate
1/2 tablespoon vegetable oil

Preheat oven to 300 degrees F.

In a medium mixing bowl, whisk together flour(s), baking soda, and salt. Set aside. In the bowl of an electric mixer, blend sugars together on medium speed. Add butter and mix to form a grainy paste. Add eggs and vanilla and mix at medium speed until light and fluffy. At low speed, slowly add the flour mixture and then the toffee bits. Mix until just blended; do not over-mix.

Place ground nuts in a small bowl. Using hands, roll balls of dough into 1 to 1 1/2-inch balls, then roll in the ground nuts. Place on cookie sheets several inches apart. Bake approximately 22 minutes and then transfer cookies to a cooling rack.

Melt the chocolate with the vegetable oil in a double boiler or in a bowl set over a pan of simmering water. Drizzle melted chocolate over cooled cookies. Place cookies on a cookie sheet and place in freezer or refrigerator until chocolate is firmly set.


Sunday, December 15, 2013

Early Deep Freeze! Time for a Warm-Up.

GOOD NEWS--of the Christmas miracle variety--is that it "warmed up" to 18 degrees today, and the hot water's back on in the kitchen! I am running the dishwasher at present, and if it stays thawed until tomorrow, I might even sneak in a load of laundry before the next deep freeze. CLEAN UNDERPANTS FOR EVERYONE! MERRY CHRISTMAS! HO HO HO!

Since the winter blast has come early and viciously this year, it's definitely time to get some hearty soups and stews bubbling away in the old crock pot. And I just happened to see the perfect candidate on a recent episode of Bitchin' Kitchen, a marvelous-looking stew where the vegetables are roasted before adding them to the stew. It sounded deliciously intriguing, so for dinner tonight, I made my version of Nadia G's Beef and Roasted Vegetable Stew. My friend, Karen, teases me that I'm always making a "version" of someone else's recipe, implying that I can't leave well enough alone, I suppose. And I know she's right, and yet I can't help but tinker.

More specifically, Nadia G's recipe called for beets (I hate them) and parsnips (love them, but didn't have any on hand). So I swapped out both sweet and gold potatoes in the roasted veg mix. I also had half a can of tomato paste knocking about in the fridge, so I threw that in the braising liquid for good measure. Oh, and I didn't have red lentils, so I used brown, and as is my way, I stewed the beef in the crock pot instead of on the stove top. So I'm not sure when it stops being Nadia G's recipe and starts becoming mine, but I always try to give credit where it's due.


Beef and Roasted Vegetable Stew
(Source: adapted from Nadia G's Bitchin' Kitchen)

5 carrots (4 chopped, 1 halved lengthwise)
4 parsnips, chopped (I swapped a few Yukon Gold potatoes, peeled and cut into chunks)
2 red onions, chopped
4 beets, chopped (I swapped out a few sweet potatoes, peeled and cut into chunks)
1/4 cup plus 1 tablespoon extra-virgin olive oil
4 cloves garlic, crushed
1 pinch salt and freshly ground black pepper to taste
3 (1-inch thick) slices beef foreshank, with the meat cut into bite-size cubes, reserve bone (I believe I used a big flat-iron steak that I unearthed from the freezer)
1/4 cup flour, for tossing beef cubes into
1/2 cup red wine*
half a small can tomato paste, optional
6 cups beef stock
1 celery stalk, halved
1/4 cup fresh chopped parsley, plus more for garnish
2 bay leaves
2 sprigs fresh thyme
1 pinch black peppercorns
1/2 cup dry red lentils (I used brown lentils)
pinch of brown sugar
*Cook's Note: Only use wine quality you would drink

Preheat the oven to 375 degrees F.

Chop four carrots, four parsnips (or gold potatoes), two onions and four beets (or sweet potatoes) uniformly, so they roast evenly. Spread root vegetables in a single layer on a baking sheet, coat with 3 tablespoons extra-virgin olive oil, and add garlic, salt, and ground pepper. Mix. Roast in oven for 45 minutes. 

Heat three tablespoons olive oil in a large pan on medium-high. Lightly toss the beef cubes in flour and add to pan. Sear for a few minutes on all sides until meat has a crisp exterior. Deglaze the pan with red wine. Transfer the beef and juices into a big pot and add the halved carrot, organic beef stock, halved celery stalk, fresh parsley, bones (from the foreshank), bay leaves, thyme, and peppercorns. Cover and simmer for two hours (or in the crock pot on high for about six hours); check on stew occasionally, remove the scum from the surface of the stew. 

Remove and discard the soggy carrot halves, celery, bones, and herbs. Add the roasted vegetables, red lentils, and pinch of brown sugar and let simmer an additional 20 minutes. I added the brown lentils and brown sugar to the crock pot and cooked the lentils for about another hour until they were tender, THEN I added in the roasted veggies. (I would add the roasted veggies until after the lentils were cooked no matter what kind of lentils I was using and even if I was cooking the stew on the stovetop.)

Serve the stew in bowls topped with fresh, minced parsley. I serve mine over steamed rice, because that's how my momma did it. :-)


Saturday, December 14, 2013

Minty Christmas Cake for My Colleagues

HALLELUJAH! I have come to the end of a very rough, very long semester. There were definitely points where I wasn't sure I was going to make it. Oh, I still have some more data entry to do to finish up grades, but it's pretty much all over but the shouting. And tonight, the Faculty Association ate, drank, danced, and shouted! It has been a few years since we've had a full-on holiday party, but the lovely wife of our new union president insisted it be reinstated, as she said she missed the dancing! (I did, too.)

We met at the local Elks' Club for a buffet dinner, but we were asked to provide a variety of homemade desserts. I was willing to contribute, of course, but I was just too wrung out and exhausted from finals to make anything elaborate. So this recipe is a bit of a cheater, as it starts with a boxed cake mix. And as usual, I managed to produce the ugliest cake in Christendom, so I hid a multitude of sins with some mini M&Ms and filled the hole in the middle of the bundt cake with fresh vanilla bean whipped cream. The people at the party had it half-devoured before I could even finish my dinner and get across the room to snap a messy, blurry picture. So I guess they liked it, regardless of its lack of visual appeal. ;-)


Mint Chocolate Cake
(Source: The Hungry Housewife)

1 box Devil's Food Cake
1 3.4 oz box cook and serve chocolate pudding mix (not instant!)
1/2 cup vegetable oil
4 eggs
1/2 cup coffee
1 cup sour cream
1 teaspoon vanilla
1/4 teaspoon peppermint extract
1 1/2 cup Andes Creme de Menthe Baking Chips*

Preheat oven to 350. Spray a bundt pan with non-stick cooking spray.

In a large bowl, whisk together the cake mix and pudding mix. Add the eggs, oil coffee, sour cream, vanilla and peppermint extract. With and electric mixer, mix on medium speed for about 3 minutes. Stir in the Andes mints. 


Pour into the prepared bundt pan and bake for 40-50 minutes, or until a tooth pick comes out with a few moist crumbs on it.
Remove from oven and allow to cool for 10 minutes in the pan. Invert onto a cooling rack and allow to completely cool.

Mint Fudge Icing

1 14 oz. can sweetened condensed milk
1/2 cup Andes Creme De Menthe Baking Chips**
1/2 cup Semi-Sweet Chocolate Chips
1/2 teaspoon vanilla extract
1/2 teaspoon peppermint extract

Put the Andes mints and the chocolate chips in a medium bowl.
In a small sauce pan over medium low heat, add the sweetened condensed. Bring the mixture to just under a boil. Remove from heat and add extracts. Pour the hot sweetened condensed milk over the mint and chocolate chips. Allow to sit for just a few minutes. Stir until the chocolate chips are completely melted. Pour over the cake.

*Cake- If you can not find Andes Creme de Menthe Baking Chips, you can use 54 regular Andes Creme De Menthe mints. Just unwrap and chop. You would need TWO 6 oz packages. Use all 36 in the first package and 18 of the second package.

**Mint Fudge Icing- if you can not find Andes Creme de Menthe Baking Chips, use the remaining 18 mints. Unwrap and chop.


Thursday, December 05, 2013

A Luscious Vegan Meal...With a Side of Meat

I have a friend from college and a former roommate when I was in grad school in Seattle who is a vegetarian, and she introduced me to a great vegan web site with many terrific recipes that would tempt (or fool) the most hardcore carnivore. I usually let my pal Vicki test drive the recipes, and then she recommends which ones I should try. That's how I discovered Oh She Glows' Layered Raw Taco Salad that's just out of this world, and I SWEAR you'd never miss the meat or the dairy!

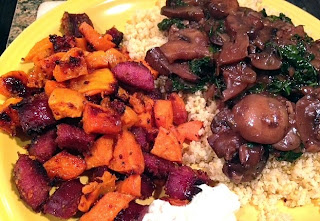
The next recipe I tried was perfect for winter--hearty and rib-sticking, savory and meaty, without the meat. It's called Cozy Millet Bowl with Mushroom Gravy and Kale. Not only is it delicious, but it has an amazing amount of protein (16g) from the grain, mushrooms, and nutritional yeast. Now millet was a new grain to me (except when it's baked into bread), and nutritional yeast sounds like something a bodybuilder throws into his smoothie to bulk up. But apparently, it's used for its flavor as well as its nutritional value, especially for vegan recipes calling for a cheese substitute, as it has a nutty, almost parmesan-like flavor. You can find it at your local co-op (along with the millet), and the vegetarians have a cute nickname for it: "nooch!" LOL! I will definitely make this dish again, but next time, I might try swapping out different grains, like quinoa or farro. The possibilities are endless.


So I made this lovely vegan meal tonight, then decided it needed a side of meat. HA! At my friend Joanna's party over Thanksgiving weekend, the best appetizer that she served was also the simplest. She roasted cubes of butternut squash and some slices of smoked sausage, and put one piece of each on a toothpick to be served with a garlicky dip. It was SO GOOD! I didn't have butternut squash on hand, but I used about four peeled and cubed sweet potatoes and half of a smoked sausage, sliced up, and then everything tossed with a couple of tablespoons of grainy mustard and a little brown sugar before roasting at 400 degrees until tender and browned. I can't even begin to fathom the nutrient density and superfood power of this delicious meal! So make the millet dish as a bowl unto itself or as a side dish, but make it! 

Cozy Millet Bowl with Mushroom Gravy and Kale
(Source: adapted from Oh She Glows)

1/2 cup uncooked millet (makes 2 cups cooked)
1/2 teaspoon extra virgin olive oil
2 cups chopped sweet onion (1 medium onion)
3 garlic cloves, minced
4 cups sliced crimini mushrooms (300 grams)
1 1/2 tablespoons minced fresh rosemary
2 tablespoons nutritional yeast
1 1/2 tablespoons low-sodium tamari (soy sauce)
1 1/2 teaspoons cornstarch
1  1/4 cups vegetable broth
1 cup fresh chopped kale, stems removed
freshly ground black pepper and kosher salt, to taste

1. Toast millet: In a pot or skillet with a lid, toast the millet over medium heat, stirring frequently, until it starts popping. Be careful you don’t burn it. The goal here is a light toast. Remove from heat. Cook millet: Bring a medium-sized pot of 1 cup water, a pinch of salt, and 1/2 cup uncooked millet to a low boil. Reduce heat to low and cover with lid. Simmer for 15 minutes or so. Remove from heat and let sit for 5 minutes covered. Remove lid and fluff with fork. Set aside.

2. Meanwhile, grab a large skillet and heat oil over medium heat. Add in chopped onions and garlic and sauté for about 5 minutes.

3. Add the sliced mushrooms and sauté for about 12 minutes longer, stirring as necessary. Now stir in the rosemary, nutritional yeast, and tamari. Cook for a few minutes.

4. In a small bowl, whisk together the broth and cornstarch until clumps are gone, and then stir into the mushroom mixture. Stir in kale. Cook for another 5-6 minutes or so, until slightly thickened. Portion millet into two bowls and serve the mushroom gravy on top.


Monday, December 02, 2013

Best. Party. EVER.

My friends, Joanna and Donnie Jackson of Woven Meadows Farm, threw a FABULOUS party over Thanksgiving weekend! The food was great (potluck) as was the fellowship, and we had LOTS of fun playing parlor games. One was a movie mashup game that was the brainchild of Professor Jackson.

She gave us two--or even three--movie descriptions where the ending of one title shared a word or letters with the adjacent movie title. An example would be if Kevin Spacey and John Cusack stared in a low-budget gore fest directed by Sam Raimi where antiques dealer, Jim Williams, encounters spirits inhabiting a cabin deep in the woods in Savannah, you would have Midnight in the Garden of Good and Evil Dead! Get it?

The rest of the night, we played a game that was like an extreme version of Celebrities called Salad Bowl. You fill a bowl with names of famous (or locally-known) people, then break into teams, and each player gives verbal clues to their teammates, trying to get them to guess as many answers as possible in one minute. Then the second round, you put the papers back in the bowl, and go again, but this time, you can only give one-word clues. For the third and final round, you do it one more time, but you can only act out the clues, like Charades. It was a RIOT! (Yes, we North Country folk have to work hard to make indoor fun when we have seven months of winter. Tee hee.)

Anyhoo, as I said, it was a potluck. And as I blogged before, I made some weirdly-addictive cracker candy thingies that both befuddled and delighted the guests. I also took a crock pot of my famous turkey wild rice soup, and it was very well-received (I had several recipes requests, as I always do). Though I was deeply offended when my (former?) friend, Tracy Guynup, declared it the "second best" soup he'd ever eaten, then started babbling about some Bookbinder Seafood Soup he'd had at a local deli (Broadview Deli) before it closed.

So I searched the interwebs and discovered that Red Snapper Bookbinder Soup is the signature dish of the Drake Hotel in Chicago, and the recipe has been widely circulated. I made some tonight for dinner. It was very good--but not even in competition with the beloved turkey wild rice, day-after-Thanksgiving soup! HMPH! (To be fair, my soup only had tilapia in it, and the one Tracy had was reportedly brimming over with different types of seafood. Maybe I'll try adding some shrimp and scallops next time.)


Red Snapper Bookbinder Soup
(Source: adapted from The Chicago Tribune)
Yield: 8 servings


Soup base:
2 tablespoons olive oil
2 each, chopped: carrots, celery ribs, garlic cloves
1 onion, chopped
1/2 each, chopped: red and green bell pepper
12 crushed white peppercorns (I used multicolored)
1 bay leaf
3 tablespoons tomato paste
2 teaspoons each, chopped: fresh thyme, rosemary, cilantro
8 cups vegetable broth
3 tablespoons butter
2 tablespoons all-purpose flour
1 tablespoon cornstarch
salt to taste

Red snapper:
2 small onions, finely chopped
3 ribs celery, finely chopped
1 to 2 fillets (10 ounces total) red snapper (I used tilapia)
1/4 cup sherry (I used cream sherry)

1. For soup base, heat oil in Dutch oven over medium heat. Add carrots, celery, garlic, onion and bell peppers; cook, stirring frequently, about 4 minutes. Stir in peppercorns, bay leaf, tomato paste, thyme, rosemary and cilantro. Cook 2 minutes. Add 7 cups of the broth: heat to boil.

2. Melt butter in small saucepan; add flour and cornstarch. Cook, stirring constantly, 4 to 5 minutes. Slowly whisk in remaining 1 cup broth until roux is smooth. Add roux to soup base; cover, simmer over medium-low heat 20 minutes. Adjust seasoning. Strain through fine mesh sieve or cheesecloth; discard solids. Return broth to pot.

3. For snapper, heat water to boil in medium saucepan over medium-high heat. Add onions and celery; blanch until soft, about 3 minutes. Remove with slotted spoon; add to broth. Boil fish in same water until cooked through. Remove fish from water; flake very finely with fork. Stir snapper and sherry into soup base; heat through.

Saturday, November 30, 2013

Crackies!

Recently I attended my first advisory meeting at the local food magazine where I am going to be a regular contributor. It was sort of a potluck luncheon, and the food was amazing! (Leave it to food writers to bring on the gourmet.) After we ate, all the staffers and editors and writers crammed around a big board room table and pitched ideas for issue themes and articles and discussed and debated what makes a food magazine sell, and I felt like Jennifer Garner in 13 Going on 30--a bit out of my element, but loving the collaborative creativity!

As I said, there were many fancy dishes for us to enjoy at the advisory luncheon, but my favorite thing served--and the thing that seem to make everyone "ooh" and "ahh" the most--was this ridiculously easy cracker-based candy that my friend, Justine, brought and affectionately refers to as "Crackies," due to their addictive quality. It's not unlike the awesome matzoh toffee that I have made before, but this doesn't have a chocolate topping. It's the vanilla version, if you will. (And I certainly will!)


Of course, I had to run right home and make some for myself and my roommate to share, and then I made a second batch to take to a fabulous game night party at my friend Joanna's tonight. I was amused when I kept hearing people say to one another, "You have to try this!" And the other person would respond, "What is it?" Then the first person would say, "I don't know, but it's great! Just try it!" And them I heard groans of pleasure. Tee hee.

I have two tips to make this simple treat even better. Although I don't usually like coconut, I like it in this, but only if it's toasted first, which makes it all the nuttier and yummier. Also, I highly recommend using reduced fat crackers for this, as the full-fat crackers yield a greasier result once you pour on all that butter. Having said that, here's the rest of the very complex methodology:

Lay out a half-sheet of (reduced fat) Club Crackers on a Silpat, then sprinkle on some slivered almonds and toasted coconut (most recipes just call for untoasted coconut, but screw that). Then make a light caramel of sorts by bringing a cup of butter and a half cup of sugar to a boil. Remove from the heat, and then add a teaspoon of vanilla. Pour this mess as evenly as you can over the cracker stuff and bake for ten minutes at 350. That's it, and the people will go wild and call your name wonderful and marvelous!

Thursday, November 28, 2013

THANKSGIVUKKAH 2013


HAPPY THANKSGIVUKKAH! For the first and only time in any of our lifetimes, the first day of Hanukkah falls on the same day as Thanksgiving, and this convergence will not happen again for 70,000 years! I suppose the right thing to do would be to create a Thanksgiving menu infused with kosher touches, and I did consider it. But it ended up being just me and my roomie celebrating at home this year, so I just went with traditional Thanksgiving dishes with a few new (non-kosher) twists. This year's menu included:

Apple Cider-Brined Turkey
Sausage and Sage Stuffing
Mashed Potatoes and Turkey Gravy
Cranberry Strumpet
Creamed Succotash
Spicy Vinaigrette Green Beans
Marbled Cream Cheese Pumpkin Pie
Maple Rye Pecan Pie


This year's turkey was definitely the best brined bird I've ever done! I loved the sweetness from the apple cider and orange juice. And between the brining and roasting it breast-side down, it was perfectly moist and juicy. WINNER!

Apple Cider Brined Turkey
(Source: adapted from The Pioneer Woman

3 cups fresh apple cider
1 cup orange juice
1 1/2 gallons (6 quarts) cold water
big handful of whatever's left in the herb garden--thyme, rosemary, tarragon, sage
6 cloves garlic, unpeeled but whacked with a knife
1 cup canning salt
2 cups brown sugar
2 tablespoons peppercorns
5 whole bay leaves
two lemons, washed and quartered
1 large onion, quartered

Combine all ingredients in a large pot. Stir until salt and sugar dissolve. Bring to a boil, then turn off heat and cover. Allow to cool completely, then pour into a large brining bag or pot. Place uncooked turkey in brine solution, then refrigerate for 12 to 24 hours. When ready to roast turkey, remove turkey from brine. Submerge turkey in a pot or sink of fresh, cold water. Allow to sit in clean water for 15 minutes to remove excess salt from the outside. Discard brine. Remove turkey from clean water, pat dry, and cook according to your normal roasting method. (I just slather the bird in a stick of butter and sprinkle it liberally with black pepper then roast it--breast-side down--at 325 until the thigh meat reaches 180F.)


I don't really have a recipe per se for the creamed succotash. I melted about a half stick of butter in a large skillet and sauteed a diced onion with mild chili pepper (Cubanelle), seeded and diced. Then I added a box of frozen bicolor corn and a box of frozen baby lima beans and cooked them risotto-style, adding turkey stock by the ladle-full until the veggies were tender and the last addition of liquid was absorbed. Then I finished the dish with salt, pepper, and maybe a half cup of cream. I might have added a teaspoon of dried thyme in there as well, as is often my way. Simple and delish!

The other vegetable I prepared was French-style green beans with almonds. As I was getting ready to cook the beans, I spied an easy, tasty-sounding recipe on the back of the package, and on a whim, gave it a try. It was yummy! The only thing I did was to add about a half cup of slivered almonds at the end. Oh, and I steamed the beans in the microwave instead of boiling them on the stove.

Spicy Vinaigrette Green Beans 
(Source: adapted from Pictsweet Recipes)

4 cups frozen French-cut green beans
1 1/2 tablespoons minced garlic
2 tablespoons red wine vinegar
2 teaspoons Dijon mustard
1/2 teaspoon salt
1/2 teaspoon pepper
2 tablespoons olive oil
1/2 cup slivered almonds, optional

Place frozen beans in a saucepan and cover with water. Place on a stove top and bring to a boil. Boil three minutes and drain. (Or microwave with a half cup of water added, covered, for five minutes.) In a small mixing bowl, combine garlic, vinegar, mustard, salt and pepper. Slowly whisk oil into garlic mixture. Pour mixture over cooked beans. Add about a half cup of slivered almonds to finish (optional).

I made two pies this year, a pumpkin pie swirled with a cheesecake filling that I've done before (but in a regular pie shell instead of a cookie crust), and then a new pecan pie recipe made with rye whiskey that I saw in The New York Times. My roommate has been on a rye kick lately, and we have a bottle, so I thought I'd give it a whirl. My twist was to swap out the molasses (too strong a flavor for my tastes) for local maple syrup. I also cut back on the rye to balance the flavors with the lighter-tasting sweetener, and it was still plenty boozy. Also, I only used whole pecans all mixed into the filling, which is how I prefer to do it. You can artfully arrange them on top if you like, but they always scorch that way, in my experience. Anyway, my version came out beautiful and scrumptious, if I do say so myself!


Maple Rye Pie
(Source: adapted from The New York Times)

5 eggs
1 1/4 cups light brown sugar 
6 tablespoons butter, melted 
1/3 cup Grade B maple syrup 
1/3 cup light corn syrup 
2 teaspoons vanilla extract 
1/4 teaspoon kosher salt 
2 tablespoons rye or bourbon, not more than 90 proof 
2 cups pecan halves 
whipped cream (better yet, ice cream!) for serving 

Heat oven to 400 degrees. Prick bottom of dough with a fork. Lay a piece of parchment or wax paper in pan, then a piece of aluminum foil. Fill foil lining with dried beans to top of pan. Bake 15 to 25 minutes, until the sides of the crust have set and turned a light golden brown. Remove from oven and lift out the beans, foil and parchment. Patch any holes with reserved dough, pressing firmly. Bake 10 to 15 minutes more, until golden brown. Let cool at least 30 minutes before filling.

Lower oven heat to 325 degrees. In a bowl, whisk together the eggs, brown sugar, melted butter.* maple syrup, corn syrup, vanilla, salt and rye or bourbon. Gently mix in the pecans.* Place baked pie shell, still in the pan, on a sheet pan. Gently pour in the filling. Bake 50 to 60 minutes, just until filling is firm and a wooden skewer comes out clean when inserted into center. (Tent with foil or a pie shield if the top starts to get too dark.) Let cool completely. Carefully remove outer ring of pan. Slice with a large, very sharp knife and serve with whipped cream or ice cream. 

Yield: About 12 servings. 

*A tip that takes pecan pie over the top: As you're melting the butter, add your pecans and toast them in the butter until it all starts to smell, well, nutty, and the butter starts to brown. Let this cool a bit before adding to the rest of the filling ingredients to avoid scrambling the eggs.

Saturday, November 16, 2013

Delicious Memories of the Crescent H Ranch

After my freshman and sophomore years of college during the summers, I worked at guest ranch called the Crescent H in Jackson Hole, Wyoming (and also its sister ranch, The Firehole, in West Yellowstone, Montana). I somehow cajoled many of my college friends to join me, and we had some great times. It's also where I got some professional cooking experience, first as a prep cook, and later doing breakfast and lunch on my own.

That's me, top left, at the tender age of 19, pictured with Bruno and Wayne, the two head chefs, and Kris, the pastry chef, on the right. Fun fact: Bruno and Kris fell in love while working together at the ranch and have been married for about 26 years now, I'd guess. They have two grown kids, and they still cook at the Firehole Ranch in Montana! And in the picture below, I am in the raspberry polka-dotted sweater, middle left, acting as Vanna White, highlighting a couple of celebrity interlopers in our group photo. Why Ackroyd and Hanks joined us, who knows?


The summer after my junior year of college, I decided to switch things up and work at a salmon cannery in Cordova, Alaska, which is a whole other Oprah show. But some of my college buddies, including my friend, Todd, stayed on at the ranch as a waiter, working with another chef called Ken.

Apparently, one of Ken's specialties was a mushroom-Brie soup that everyone loved, and somehow Todd managed to wheedle the recipe out of him, but only if he promised never to share it. All these years later, Todd has kept his promise, much to my frustration and annoyance. But I searched online until I found a similar recipe that looked ideal. I never had Chef Ken's signature dish so I can't compare, but I can attest that this version is delicious!

Then last night when I got home after choir practice, it was already 9:30pm. So I stopped for a carton of steamed rice at No.1 Chinese, and then reheated the leftover soup (which had thickened in the fridge overnight), added some fresh spinach for color and a little extra nutrition, and a small hunk of leftover pot roast that I diced up to form a stroganoff of sorts served over rice. Am I not culinarily creative and clever?! Who needs Chef Ken and his secrets? Good food is meant to be shared!

Wild Mushroom-Brie Soup
(Source: adapted from FoodSwoon)

1 1/2 pounds wild mushrooms, sliced (I used a mix of oyster, shitake, and Baby Bella)
1/4 cup plus 2 tablespoons butter
1/2 cup chopped celery
3/4 cup diced onions
1/4 cup chopped garlic
1/3 cup flour
1/2 teaspoon fresh thyme
1/2 cup sherry (I used cream sherry)
4 cups vegetable stock
2 cups half-and-half
1/2 cup heavy cream
1 cup Brie cheese, crumbled in pieces (white rind removed)
Pinch of cayenne (or more to taste)
Salt and pepper
Optional garnish: green onions or chopped fresh parsley


Add a tablespoon of butter to a skillet and cook the mushrooms until brown on each side, being careful not to crowd them. Remove mushrooms, set aside. Add another tablespoon of butter and cook in batches until the remaining mushrooms are browned.

Melt 1/4 cup of butter in a large soup pot over medium-low heat. Add the onions, celery and garlic and cook until soft, approximately five to seven minutes. Add the thyme, flour and pinch of cayenne. Stir constantly until a light roux forms, approximately three minutes. Add the sherry, increase the heat to medium-high and let the mixture come to a boil. Add the stock and half-and-half and bring to a low boil. Reduce the heat and let simmer for ten minutes.  


With an immersion blender, puree the soup until smooth. Or, let the soup cool and blend it in batches in a blender before returning to the pot. Add mushrooms and let soup come to a boil. Reduce heat and simmer for 20 minutes. Add the brie and whisk to incorporate. Add the cream and simmer for ten minutes. Taste. Season with salt and pepper. Garnish with green onions or fresh chopped parsley.

Sunday, November 10, 2013

Ender's Game Brunch

The most recent selection that my book club read was the sci-fi classic, Ender's Game. And we planned it so that we could finish reading it just in time for the major motion picture release. Before attending the movie matinee, we met at our host's house (my friend, Janice), for a wonderful book and space-themed brunch. Here are a few pics for your enjoyment...

This is the tablescape, complete with a space mobile dangling from the chandelier! (I was assigned to bring a quiche, pictured on the lower right, closest to the camera.)


There was a birthday cake for Ender (tee hee). And can you just see the packet of freeze-dried astronaut ice cream next to it? (It was gawd-awful, but amusing as table decor.)


And brunch was served on cafeteria-style trays, just like in battle school. Ha!

Pictured clockwise from the top left: Breakfast potatoes, strata with potatoes and red peppers, cornbread casserole with sausage, apples and maple syrup, the quiche I made with Cajun turkey, Swiss chard, onion, and three cheeses, and a ham and cheese croissant from some fancy bakery in Syracuse, I believe. There was also a lovely fruit salad for "dessert" (not pictured).


As for my contribution to the affair, I didn't make anything space-themed or even related to the book. It was brunch, and Janice wanted to serve quiche, but she was going to be out of town until the day of the party. So I volunteered to make one. I chose the following recipe from my favorite pie guru, Ken Haedrich, but I substituted some Cajun turkey from the deli, because that's what I had on hand. I will definitely try it with the sausage next time. Obviously, this is a dish that can--and should--be adapted in many ways.

Swiss Chard and Smoked Turkey Sausage Quiche
(Source: adapted from The Pie Academy)

Basic pie dough, refrigerated (I cheated and used a refrigerator roll-out crust)

Filling:
1/2 to 3/4 pound Swiss chard, stems removed
8 ounces smoked turkey sausage (or diced Cajun-spiced turkey from the deli)
3 tablespoons butter
1 medium onion, quartered and thinly sliced
2 cloves garlic, minced
4 large eggs, at room temperature
1 1/4 cups half-and-half or light cream
1 teaspoon Dijon mustard
1/2 teaspoon salt
1/4 teaspoon ground pepper
1/4 teaspoon hot sauce (such as Tabasco)
1/2 cup each of 2 or 3 cheeses, including Swiss, Fontina, or Feta plus Parmesan

On a sheet of lightly floured wax paper, roll the pastry into a 13" circle. Invert the pastry over a 9 1/2" - 10" quiche pan or tart pan, center, and peel off the paper. Gently tuck the pastry into the pan, without stretching it, then pinch the edge into an upstanding rim. Place in the freezer for 15 minutes while you preheat the oven to 400°. Tear off a 16" long sheet of aluminum foil and press it into the firmed shell so it fits like a glove. To prevent the pie shell from puffing as it bakes, fill the foil about 3/4 full with dried beans, banking them up the sides. Bake on the center oven rack for 15 minutes. Reduce the heat to 350°. Remove the shell from the oven, then carefully lift out the foil and beans. Using a fork, poke the bottom pastry 6 or 7 times; the holes will keep the pastry from puffing. Put the shell back in the oven and bake another 10 to 12 minutes. Cool on a rack. (Plug the holes with dabs of cream cheese, or put shavings of cheese over the holes and let it melt there, so the filling doesn't run out.)

Reset the oven to 375°. Rinse the chard, remove the ribs (and discard), then coarsely chop the leaves (you don't have to dry them) and set aside. Dice about a quarter of the sausage; set aside. Melt the butter in a large skillet or saute pan and stir in the onion. Saute over medium heat for five minutes, then stir in only the diced sausage and garlic. Saute another two minutes, stirring, then add the chard. Cover and saute/steam for five to eight minutes, stirring often, until the chard is soft and cooked down. Remove from the heat and leave uncovered. While that cools, slice the remaining turkey sauce into 1/4"-thick rounds. Set aside. Whisk the eggs in a medium-size bowl until evenly blended. Whisk in the half-and-half, mustard, salt, pepper, and hot sauce. Set aside.

To assemble the quiche, sprinkle one of the cheeses over the bottom of the tart shell (but save the Parmesan for the top.) Using a large fork - which will give you good control - place half of the chard here and there in the shell. Add half of the sausage. If you're using three cheeses, sprinkle on another one now; otherwise wait. Slowly ladle about half of the custard over the filling. Repeat with the remaining chard, sausage, and custard. Sprinkle the Parmesan cheese on top.

Bake the quiche on the center oven rack for about 40 minutes, until the top is light golden brown and the filling is somewhat puffy. Transfer to a rack and cool at least 30 minutes before serving. Makes ten or more servings.

Saturday, November 09, 2013

Cooking...without really cooking.

We are heading into the roughest part of the semester, and it seems like I have commitments almost every weekend lately, too. So today, I am thankful just to be at home and to have no plans. I need a break! But a gal's gotta eat, so I made a simple yet innovative lunch that I thought I'd share with you. Ladies and gentlemen, the Grilled Kimcheese Sandwich! I used both sharp and smoked cheddars, my homemade kimchi, and a fried egg. (Carnivores may wish to add ham, but I found it unnecessary.) SO DELICIOUS! This "recipe" is a keeper, for sure.

Since I was just enjoying my lazy Saturday, I had no intentions of baking anything. But one of my friends on Facebook posted something about making a "Watergate Cake" for her boyfriend, and I was intrigued. It's basically just a pistachio cake, but the moniker is an homage to President Nixon. According to crafsty.com, "After the Watergate scandal broke, there was a surge of interest in all things Richard Nixon. Turns out, pistachio was a favorite flavor of Nixon’s, and so all sorts of pistachio-flavored treats proliferated and were dubbed 'Watergate.' This cake is one of the more enduring examples, possibly because of its clever topping: 'cover up' icing." Ha ha! Not only is the name of this cake interesting, it's a cinch to make, because it's made with a boxed cake mix and instant pudding. The food purists may balk, but it was pretty tasty. I like it best once it chills in the fridge.

A couple of notes: Many recipes that you find online call for chopped pecans, but I think a pistachio cake should have, well, pistachios! Most recipes also call for powdered Dream Whip in the topping, but Cool Whip saves you a step and holds up longer in the fridge. Lastly, many recipes call for shredded coconut either in the cake or the topping or both, but I personally can't abide it. But you do as you like. In the words of Nadia G, "It doesn't affect me." (Tee hee.)

Watergate Cake with Cover-Up Icing
(Sources: cobbled together from a number of similar recipes on the interwebs)

Cake:

1 box white cake mix
3 eggs
1 cup lemon-lime seltzer
1 cup finely chopped roasted pistachios
1 cup vegetable oil
1 (3 1/2 ounce) package instant pistachio pudding mix

Cover-Up Icing:
1 1/2 cups cold milk
1 (3 1/2 ounce) packages instant pistachio pudding mix
1 regular tub (9 oz.) Cool Whip
1/2 cup chopped roasted pistachios

Cake: Mix all of the cake ingredients together. Pour into a greased and floured 13x9 inch pan. Bake at 350 degrees for 35-45 minutes or until a tester comes out with just moist crumbs clinging to it. Cool completely.
Icing: Beat the milk and the pudding mix together, then fold in the Cool Whip. Spread on top of cooled cake. Sprinkle with nuts. Refrigerate for 2-3 hours untl well-chilled. 

Store leftover cake covered in the refrigerator.


Friday, November 08, 2013

My first real writing gig!

So...I have some exciting news. I was featured in an issue of our local food magazine, Strictly Food for Thought, last January, which was very flattering. Since then, one of my wonderful former students has become the editor of that fine publication, and she has asked me to become a regular staff writer. Isn't that cool? Though I wasn't supposed to start until after the next advisory meeting on the 18th, she contacted me earlier this week to ask if I could throw something together at the last minute for their holiday issue, so I wrote an article about Christmas cookie swaps. I think it came out well. Let's hope so, as it will be my (semi-) professional writing debut! Next stop, the Food Network and a national cookbook tour! Ha ha.

Before I let the dreams of my future fame and glory go to my head, I'd like to share a simple, but simply delicious recipe from a friend of mine who also writes for SFFT. This is Anne Waling's Mushroom Saute, and it is quick, easy, hearty, savory, and perfect for a Meatless Monday, or in this case, a lovely Friday night meal that sure beats takeout!


Mushroom Saute
(Source: Anne Waling, Strictly Food for Thought)

2 tablespoons butter/olive oil (depending on your diet and the non-stick factor of pan)
1 tablespoon garlic or shallots, chopped (per cup of mushrooms)
1-2 cups mushrooms, slice (mix of baby brown, white, wild)
2 tablespoons balsamic vinegar
worcestershire sauce
red wine
thyme, fresh or dried
red pepper flakes
parsley, fresh, chopped
truffle oil, salt, pepper, shaved parmesan 

Œ1.) With pan on low heat, add oil. Add garlic and cook until fragrant and softening but not brown.
2.) Turn up heat and add butter, and when it is hot add sliced mushrooms. (This recipe is not meant for them to be crispy, so feel free to crowd the pan and let them release their juices.)
Ž3.) When the mushrooms are hot, add a couple of tablespoons of Balsamic vinegar and a dash of Worcestershire sauce; stir.
4.) Sprinkle in a little thyme (chop it if it is fresh, crush it in your hand if it is dried).
5.) Crush up a few red pepper flakes and throw those in too. I actually put a lot of these because I like the heat.
6.) Add a half cup of red wine, more or less, depending on quantity of mushrooms you have used. Simmer this to let the sauce reduce a bit, add the chopped parsley and finish with a good bit of truffle oil, salt and pepper.

*I served this over miniature three-cheese ravioli, but a crusty loaf of bread to soak up the delicious pan juices would also be a fine pairing.