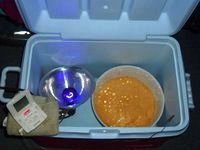
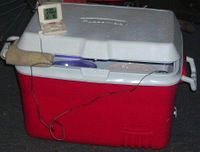
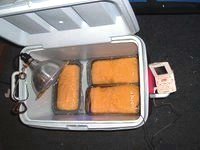
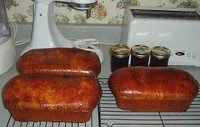
Good grief! I became so involved all my Super Bowl musings that I forgot to share some pics that I took over the weekend. As usual, I begin with an anecdote. You see, the house I live in out in the country is a drafty old farmhouse built in the 30’s. No one has electric heat out in these parts, as it is exorbitantly expensive. In this house, we have a combination of a fuel oil furnace in the back (love it—so toasty!), and a propane monitor in the front (hate the thing—a glorified space heater that may as well run on gold bullion!). We try to sit out in the living room running the propane heater, and an electric space heater, while trying to snuggle under sleeping bags for additional warmth. But when it becomes bitterly cold, or those jackals at the propane company won’t bring us any more until we pay $250 up front (OUCH!), we retreat to what we affectionately call “the winter room.” For a few months, the back/guest bedroom plays host to two people, four dogs, and whichever heat-seeking cats happen to wander in. This is how we stay alive until spring finally comes (sometimes not until May around here!). All this to say, for a gal that vowed to bake more bread this year, living in a veritable refrigerator makes that promise to oneself very difficult to keep. For example, when I made the brioche and sticky buns recently, it took THREE DAYS to complete the project! Granted, those long, slow, cold rises made for excellent flavor development, but who has the time for all that? So I was surfing around the net, hoping to find some kind of electric proofing box for home use, but all I could find was a huge commercial unit for about $1000! (This is a great idea, though. Someone could make millions with a countertop proofer, say, about the size of a humidifier? Someone hustle off to the patent office, pronto!) But in my web surfing, I found quite a lot of good advice about how to make a proofing box at home, using materials that you probably already have on hand, or perhaps with a few inexpensive additions. To start with, many bakers recommend using a Styrofoam chest as a proofer, but I worried about heating Styrofoam (the fumes and potential melting were concerns). So I used a regular plastic cooler. The heat source that most folks use is one of those electrical cords with a socket on the end, adding a light bulb, and dangling it over the edge and down into the cooler. But I used a metal clamp-on lamp that I happen to have and a purple reptile heat bulb (don't ask). Next, you’ll need a thermometer to monitor the heat, as the main danger of this Easy Bake Oven-type proofer is overheating your dough and killing the yeast. What you ideally want is a temperature of about 85 degrees. If you have one of those digital thermometers with an external probe, that works great to dangle down into the cooler, leaving the rest of the device outside so you can monitor the temperature without opening and closing the lid. Or, better yet, turn on the temperature alert, set it to 90 degrees, and it will let you know if it gets too hot. To regulate the temperature when it starts to get too warm, just use a tea towel to vent the lid (adjust the number of folds as need be). I can tell you, this worked like a charm! My sweet potato brioche doubled in two hours instead of two days! Whoo-hoo! So I just thought I’d share this idea with anyone else who may be struggling to get your breads to rise during the winter months. Hope it helps…
1 comment:
Nifty trick you figured out. I've spent the last year finding the right spots to proof bread in my place; at least it only involves finding draftless, sunny (or not) spots, not chasing out the winter winds.
You'll have to try some cold-proofed bread next. Take advantage of your natural environment.
Post a Comment