Thursday, April 20, 2006

Tarte au Sucre: An Ode to Quebec


When I first moved to this region almost six years ago, I had only two goals in mind: get as close to New England as possible and reside next to a large body of water (preferably, the ocean). Well, I am not in New England proper nor am I seaside, but I am just a stone's throw across Lake Champlain from Vermont. Not bad. And though I am not thrilled about living in the land of six to seven months of cold ("Always winter, never Christmas?"), I do love distinct seasons, particularly the riotous fall color, and also being no more than a half day's drive from many wonderful places such as the Big Apple, Beantown, and a good chunk of Maine. But the one thing I didn't anticipate in moving here was how much I ADORE living on the border of Quebec. We are a mere six miles from Hemmingford, QC, and about an hour from the wonderfully cosmopolitan city of Montreal. We often joke that our closest grocery store is in another country, except that (mini-marts not withstanding), it's no joke! It's true! So when life in the cowtown formerly known as Ober's Corners (home to 18 houses, one convenience store, and of course, one Catholic church) gets to be a bit mind-numbing, it is a pure JOY to have a bit of France in your back yard! And for the passionate cook and foodie, Quebec is a culinary wonderland! Why, just across the border begins the Circuit de Paysan (technically, the peasant's route, but we might say the scenic route!). If you follow it, you will encounter orchards, vineyards and cideries, old-fashioned butchers (the kind that smoke their own meats), cheesemakers, apiaries with local honey, Old World bakeries who make amazing breads, and in the summer, farmer's markets with fresh produce. Just incredible!

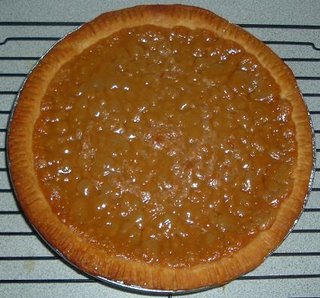
At the school where I teach, I am a member of the Cultural Affairs Committee and a former chair of our annual Diversity Celebration. So I am frequently involved with bringing different kinds of ethnic activities to campus. The favorite thing I like to do is to host a "Dinner and a Movie" night where we watch a movie from a particular culture and then discuss it over a meal featuring that country's cuisine. I already talked about our Indian night in a previous post, but this year, we are focusing on our neighbor to the north, Quebec. Tomorrow night, we are watching a film called The Seduction of Dr. Lewis which is set in Quebec, and then we will enjoy some regional desserts afterward. My contribution will be the traditional Quebecois sugar pie. I know people think first of maple in this area, but according to Julian Armstrong's A Taste of Quebec, maple syrup is not usually plentiful in the Laurentians. So a more common dessert than the maple pie is one made of brown sugar and cream. Indeed, I've never seen a grocery store up there without sugar pies in the bakery section! They're delicious and caramel-ly, sort of like a pecan pie without any nuts (though not as jiggly, as it is not an egg-based affair).

The tarte au sucre recipe that I have adapted is called Fleur-Ange's Sugar Pie (handed down from someone's grandmother named Fleur-Ange Vanier Rochon--let that roll off your tongue!). However, it calls for a double crust which I have never seen around here. So I make an open-faced pie. Also, I double the filling for a deep-dish confection. Other than that, the recipe is embarrassingly simple. Here it is:

Fleur-Ange's Sugar Pie

2 cups brown sugar
6 tablespoons all-purpose flour
2 cups whipping cream, light cream or half-and-half
2 teaspoons vanilla extract or a couple of pinches of freshly-ground nutmeg
pastry for a 9-inch (deep dish) pie

In a small saucepan, combine brown sugar, flour and cream. Place over medium heat and bring to a boil, stirring constantly, until thickened. Boil for two minutes, remove from heat, and stir in the vanilla or nutmeg. Let cool. Pour filling into prepared pie shell. Bake in a preheated 375 degree oven for 40-45 minutes or until top crust is golden.

Sunday, April 16, 2006

HAPPY EASTER (Bawk, bawk!)


Given that my hens are laying so well right now, I have eggs coming out of my ears, and I need to do something with them. The obvious choice is to hard-cook and dye some for Easter. But have you ever wondered what would happen if you dyed BROWN eggs? Well, here's the answer. Kinda pretty, huh? HAPPY EASTER, everyone! :-D

Saturday, April 15, 2006

Time to get down to (Easter) business!


As Easter Sunday quickly approaches, I decided it was time to stop futzing around and get to work on some holiday-appropriate treats. As has become my custom, I had been reading the Cook's Illustrated message boards, and a nice gal named Debby shared her recipe for babka (a brioche-like sweet bread/coffee cake of Polish origin). She worked with a Martha recipe for babka with a chocolate filling, but she swapped out a more traditional cheese and raisin filling for the chocolate. Both sounded yummy to me, so I gave babka a try...

Well, I had my three babka in the oven by 2am (yes, I am a nocturnal baker), but thank goodness that streusel hideth a multitude of sins! They looked nice, but Lord only knows what I'm going to end up with. What a nightmare! And it's all my own doing! First of all, I wanted to try both the chocolate version and the cheese one, so I made half batches of both fillings. But with three loaves, that doesn't work out right, does it? God help the math impaired! And there were other problems, too. First, there was the chocolate version. I chose, instead of the chopped chocolate that the recipe calls for that I'd just use chocolate chips (and not cut them up further). Bad idea! Trying to roll that tender dough over all those bumps just tore it all up. And forget about twisting it as the instructions demand! I just ended up mashing it into the pan in a bit of a rage. :-( Then there was the cheese cafuffle. I decided to use cream cheese instead of the farmer's cheese that Debby recommended. But then adding an egg yolk and sour cream made it pretty runny. I tried to get it to set up a bit in the fridge before spreading it on the dough, but it still gooshed out of the edges of the jelly roll. I probably have no filling left at all in that one! And for the last one, I had lost my will to care anymore, so I just threw the remainder of the chocolate bits on the dough and drizzled it with the remaining cheese filling and rolled the beast up! Now I never did get much of a twist going on, and for the last two, I ended up folding the barely-twisted logs in half and just tossing them into the pan like that. Heaven knows what will become of all this. I was anticipating a thousand dollars' worth of butter down the drain!

But there seems to have been an Easter miracle. So far, I have only sliced and sampled the strange chocolate-and-cheese hybrid, but it was lovely inside--sweet, tender, with a tight crumb, a dark, crusty exterior, and a delectably crumbly streusel topping. To say the very least, this is a very forgiving bread--hard to mess up, though I gave it my best try! ;-) Next time I make this (there will be a next time, and perhaps a new Easter tradition!), I will dutifully chop my chocolate, and I think I might just use the cream cheese filling from the King Cake that I made for Mardi Gras (just cream cheese sweetened with sugar) without the egg and sour cream that made this cheese filling so loose. In fact, truth to tell, this dough might also make a better King Cake (not as dry). Hmm...someone remind me that I need to try that next year! But I digress. What follows is the Chocolate Babka recipe, then the steusel topping, then Debby's cheese filling if you want to swap it out for the chocolate. You may also want to sprinkle on up to a cup of golden raisins over the cheese filling as Debby does, but I find all raisins to be wrinkled little abominations that ruin otherwise perfectly good food. But you do what you have to do. I won't judge you. ;-)

Chocolate Babka (a la Martha)

Makes 3 loaves
When shaping the babka, twist dough evenly throughout the length of the roll a full five to six turns. The babka can be prepared up to Step eight and frozen for up to a month before baking. When ready to bake, remove from freezer; let stand at room temperature for about five hours, and bake.

1 1/2 cups warm milk (110°)
2 packages (1/4 ounce each) active dry yeast
1 3/4 cups plus a pinch of sugar
3 whole large eggs, room temperature
2 large egg yolks, room temperature
6 cups all-purpose flour, plus more for work surface
1 teaspoon salt
1 3/4 cups (3 1/2 sticks) unsalted butter, cut into 1-inch pieces, room temperature, plus more for bowl and loaf pans
2 1/4 pounds semisweet chocolate, very finely chopped
2 1/2 tablespoons ground cinnamon
1 tablespoon heavy cream

1. Pour warm milk into a small bowl. Sprinkle yeast and pinch of sugar over milk; let stand until foamy, about 5 minutes.
2. In a bowl, whisk together 3/4 cup sugar, 2 eggs, and egg yolks. Add egg mixture to yeast mixture, and whisk to combine.
3. In the bowl of an electric mixer fitted with the paddle attachment, combine flour and salt. Add egg mixture, and beat on low speed until almost all the flour is incorporated, about 30 seconds. Change to the dough hook. Add 2 sticks butter, and beat until flour mixture and butter are completely incorporated, and a smooth, soft dough that’s slightly sticky when squeezed is formed, about 10 minutes.
4. Turn dough out onto a lightly floured surface, and knead a few turns until smooth. Butter a large bowl. Place dough in bowl, and turn to coat. Cover tightly with plastic wrap. Set aside in a warm place to rise until doubled in bulk, about 1 hour.
5. Place chocolate, remaining cup sugar, and cinnamon in a large bowl, and stir to combine. Using two knives or a pastry cutter, cut in remaining 1 1/2 sticks butter until well combined; set filling aside.
6. Generously butter three 9-by-5-by-2 3/4-inch loaf pans; line them with parchment paper. Beat remaining egg with 1 tablespoon cream; set egg wash aside. Punch back the dough, and transfer to a clean surface. Let rest 5 minutes. Cut into three equal pieces. Keep two pieces covered with plastic wrap while working with the remaining piece. On a generously floured surface, roll dough out into a 16-inch square; it should be 1/8 inch thick.
7. Brush edges with reserved egg wash. Crumble a third of the reserved chocolate filling evenly over dough, leaving a 1/4-inch border. Refresh egg wash if needed. Roll dough up tightly like a jelly roll. Pinch ends together to seal. Twist five or six turns. Brush top of roll with egg wash. Carefully crumble 2 tablespoons filling over the left half of the roll, being careful not to let mixture slide off. Fold right half of the roll over onto the coated left half. Fold ends under, and pinch to seal. Twist roll two turns, and fit into prepared pan. Repeat with the remaining two pieces of dough and remaining filling.
8. Heat oven to 350°. Brush the top of each loaf with egg wash. Crumble a third of streusel topping (recipe follows) over each loaf. Loosely cover each pan with plastic wrap, and let stand in a warm place 20 to 30 minutes.
9. Bake loaves, rotating halfway through, until golden, about 55 minutes. Lower oven temperature to 325°; bake until babkas are deep golden, 15 to 20 minutes more. Remove from oven, and transfer to wire racks until cool. Remove from pans; serve. Babkas freeze well for up to 1 month.

Streusel Topping

Makes 3 3/4 cups. (This topping is the crowning glory of babka!)

1 2/3 cups confectioners' sugar
1 1/3 cups all-purpose flour
12 tablespoons (1 1/2 sticks) unsalted butter, room temperature

In a large bowl, combine sugar, flour, and butter. Using a fork, stir until fully combined with clumps ranging in size from crumbs to 1 inch.


Debby's Cheese Filling

2 - 7.5 ounce packages farmer’s cheese
½ cup sugar
½ cup sour cream
pinch salt
1 egg yolk
zest of ½ lemon
3/4- 1 cup golden raisins (optional)

Put all ingredients (except raisins!) into a food processor and mix until smooth, about 1 minute. Debby recommends making a batch and a half, or even doubling it if your family REALLY likes a cheesy babka! The filling stores in the fridge up to a week and can also be used as a yummy crepe filling.

Friday, April 14, 2006

Banana bread is love...

I know it's Eastertime, and banana bread has no traditional place in the holiday (and would also be a no-no in Passover celebrations!), but when three aging bananas have been staring at you for a few days, what else can you do? Let them completely go to rot/waste? OF COURSE NOT!

The following banana recipe was given to me by a friend, actually the ex- of one of my very dearest friends, John. The recipe is entitled, Elva Williams' Banana Bread, and I believe Elva was our friend, Mark's grandmother (I am a teacher, and always like to give credit where credit is due!). Regardless of the origin of this recipe, you must believe me when I say that it is the MOST INCREDIBLE banana bread that you have ever or will ever eat! It is absolutely--dare I say it?--LUSCIOUS! Now my mother was known to make a very fine banana nut bread and gave away lots of mini-loaves of it as Christmas gifts, but this recipe is much, much better than hers. (Sorry, Mom!) In fact, I shouldn't even be giving this recipe away...I should be making my fortune with it! But as it was selflessly shared with me, so will I pass it on to all of you. And THAT is certainly in keeping with the spirit of this week's holidays! (I am trying hard to resist the temptation to claim that this is the banana bread that the Lord would come out of His tomb for..because that would be wrong--well, it would be right, but just a wee bit blasphemous. Tee hee.) So without further ado...

Elva Williams’ Banana Nut Bread

1. Sift together the following and then set aside:

2 cups sifted flour
1 teaspoon baking soda
½- ¾ teaspoon salt

2. Chop ¾ cups walnuts or pecans (I use at least a cup if not 1 ½ cups!) and sprinkle with a little of the flour mixture. (This helps the nuts to not sink to the bottom of the bread.)

3. Cream ¾ cup softened butter and add 1 ½ cups sugar and cream together. Add 1 beaten egg, and mix again. Then add 1 teaspoon of vanilla and mix again.

4. Mash 3 medium overripe bananas (I use a pastry cutter for this) which should yield about a cup. Add the banana mash to the wet ingredients and mix again.

5. Add the flour mixture and ½ cup buttermilk to the rest of the wet ingredients in thirds, alternating the flour and buttermilk. If you don’t have buttermilk, you could add 2 tablespoons of powdered buttermilk to the dry ingredients and then use ½ cup of water in this step. Or if you have neither wet nor dry buttermilk, then add 1 tablespoon of white vinegar to a half cup of milk and let it sit and clabber (get curdled-looking) before you begin this recipe.

6. Mix in the nuts.

7. Bake at 325 degrees for 1 hour-1 hour and 10 minutes for one large loaf, or 50-55 minutes for two small loaves or about 45 minutes for four gift-sized loaves. (I prefer the latter even if I’m not giving the loaves away because it makes more golden-brown-and-delicious crust!)


8. Try not to gobble the whole loaf down in one day's time (note that I said, TRY!).

Sunday, April 09, 2006

Easter comes early...


Happy Palm Sunday! I know that we're still a week away from Easter, and to look at the landscape here, you still see lots of brown, not green. The temps have still been in the 30's at night, so you'd think that the calendar is LYING about the advent of spring. But I have had some definite clues lately that the seasons are changing. First of all, at school, the students are already in shorts and flip-flops. Secondly, I attended what has become an annual tradition in my household--the all-you-can-eat pancake breakfast at Sanger's Sugar House in Ingraham, NY (The official count: pancakes=6, sausages=6, cartons of milk=2, nap=1 big one!). But the thing that has convinced me that spring is upon us at last is that my beloved hens have finally started laying like gangbusters (see top photo)! Yes, Easter eggs are plentiful around here, and I didn't even have to dye them. And as a special, unexpected bonus, when I was at the feed store last weekend buying scratch grains for my girls, I serendipitously ran into a nice man who was trying to share his ducks' eggs with the store owner. The owner was kind of scared, saying "I don't know what the wife will think if I bring these home!" So I saw an in, and I made my move, volunteering to take them off his hands (see bottom photo). ;-)

So what is a gal to do with all of these eggs? I'm glad you asked. Now duck eggs are not good fried, as they are very thick, and the yolk is almost pasty. But in addition to being great for baking, if you whip them up with some milk or cream, they make an EGG-cellent omelette or quiche. As luck would have it, I had a luncheon to cater on Friday, so quiche it was! I worked from a basic recipe for Quiche Lorraine from the cookbook without equal, The Joy of Cooking. But instead of bacon, I used hot capicola (a spicy Italian ham), and instead of sautéed onions, I used a large, sweet onion, sliced thinly and caramelized in a bit of butter and olive oil. Wait, that's not Quiche Lorraine! Onions make it Quiche Alsacienne, I believe. Well, anyway...instead of diced Swiss cheese, I used an aged (sharp) provolone, shredded, and doubled the amount called for (as is my way when anything calls for cheese!). The resulting quiche was spicy and delicious! I made two, and they disappeared at the luncheon! Here is the recipe if you'd like to try it:

Capicola, Caramelized Onion, and Aurrechio Quiche

9-inch pie crust

1 large onion (preferably, a sweet variety), sliced thinly
1 tablespoon olive oil
1 tablespoon butter
1 teaspoon brown sugar
4 oz. hot capicola, sliced into very thin strips (a chiffonade, as Martha would say!)
1 cup of Aurrechio (aged/sharp provolone), shredded
3 large (chicken) eggs or 2 duck eggs (or a combo!)
2 cups milk or cream (I like half-n-half)
1/2 teaspoon salt
1/4 teaspoon pepper
few dashes of hot sauce (to taste)
1 tablespoon chives
1 tablespoon parsley

Preheat the oven to 375 degrees. Press a pie crust into a fluted tart pan and chill. Slice the onion and caramelize it in a hot pan with olive oil and butter and a bit of brown sugar until the onion is a deep brown (20-30 minutes). Sprinkle the sliced capicola in the bottom of the pie crust, then sprinkle the caramelized onion on top of that. Then sprinkle on the cheese.

In a bowl, whisk the eggs with the milk or cream and add the salt, pepper, hot sauce, and herbs. Pour the custard mixture carefully over the other ingredients in the pie shell, and then bake for 35-40 minutes or until the top is golden brown and the center of the quiche is no longer jiggly. I prefer to serve this warm or at room temperature, but it's pretty good from piping hot to cold from the fridge!