But I would like to reflect, for a moment, on one of my food resolutions from 2006, that is, to bake more bread. I feel that I definitely made good on that promise. I made bread, oh yes, I made lots of bread. There were brioches and challah and ciabatte and whole wheat "Z bread" and sourdough and multi-grain. But I feel that I am going to bust last year's loaf record wide open before winter's even over this year thanks to the recipe that has been sweeping the globe since it was first published in the New York Times in early November. That's right, it's even more infectious than Amish Friendship Bread, and that is the minimalist no-knead bread from Jim Lahey of my favorite bakery in NYC, Sullivan Street Bakery, by way of Mark Bittman's NYT column(s). I know I'm a little late to the party on this one, but better late than never (which should be my Native American name, as my friends can attest!), especially when it comes to the bread recipe that has rocked the culinary world. I don't mean to make melodramatic overstatements, but this method of making homemade bread is right up there with the discovery of fire and the invention of the wheel! People, listen to me. NO. KNEAD. BREAD. No kneading. None. Nada. Zip. Zilch. Bupkiss. It's nearly effortless. Notice I did not say quick, though. The trade-off is the long, long, LONG rising time that does the work of kneading for you. You don't believe me, do you? How can you make (edible) bread without at least some kneading? Well, I did it, and so have countless others (just check out the lengthy threads on messages boards such as those at Cooks Illustrated and eGullet). And below are the pictures to prove it. Let me give you the recipe as originally printed in the New York Times, and then I'll walk you through my first attempt with a pictorial essay of sorts, ok? Ok!
No-Knead Bread
(Source: Adapted from Jim Lahey, Sullivan Street Bakery via Mark Bittman and the New York Times)
Time: About 1½ hours plus 14 to 20 hours’ rising
3 cups all-purpose or bread flour, more for dusting
¼ teaspoon instant yeast
1¼ teaspoons salt
Extra flour, cornmeal or wheat bran as needed
1. In a large bowl combine flour, yeast and salt. Add 1 5/8 cups water, and stir until blended; dough will be shaggy and sticky. Cover bowl with plastic wrap. Let dough rest at least 12 hours, preferably about 18, at warm room temperature, about 70 degrees.
2. Dough is ready when its surface is dotted with bubbles. Lightly flour a work surface and place dough on it; sprinkle it with a little more flour and fold it over on itself once or twice. Cover loosely with plastic wrap and let rest about 15 minutes.
3. Using just enough flour to keep dough from sticking to work surface or to your fingers, gently and quickly shape dough into a ball. Generously coat a cotton towel (not terry cloth) with flour, wheat bran or cornmeal; put dough seam side down on towel and dust with more flour, bran or cornmeal. Cover with another cotton towel and let rise for about 2 hours. When it is ready, dough will be more than double in size and will not readily spring back when poked with a finger.
4. At least a half-hour before dough is ready, heat oven to 450 degrees. Put a 6- to 8-quart heavy covered pot (cast iron, enamel, Pyrex or ceramic) in oven as it heats. When dough is ready, carefully remove pot from oven. Slide your hand under towel and turn dough over into pot, seam side up; it may look like a mess, but that is O.K. Shake pan once or twice if dough is unevenly distributed; it will straighten out as it bakes. Cover with lid and bake 30 minutes, then remove lid and bake another 15 to 30 minutes, until loaf is beautifully browned. Cool on a rack.
Yield: One 1½-pound loaf.
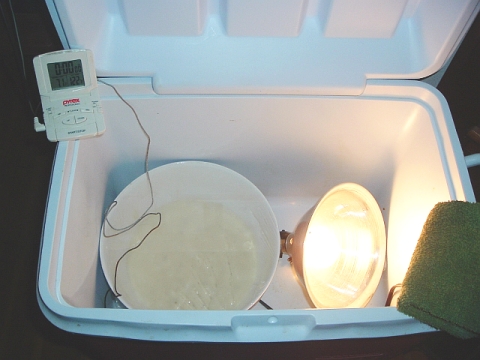
Let me start by explaining this contraption. Because my old house is very cold and drafty, I have trouble getting breads to rise in the winter. So I use a regular insulated cooler, a 40-watt lightbulb, a probe thermometer, and a dish towel to make my own homemade proof box. I put the light down in the cooler and turn it on. I place my bread bowl next to the light, and also dangle the thermometer down inside to keep tabs on the temperature in the box. And then I use the folded dish towel to vent the lid to maintain the desired temperature, from 70-90 degrees. This is kind of a crappy pic, but if you click on the image and look closely, you can see that the temperature inside the proof box is a perfect 71 degrees. It's a great trick for winter baking.
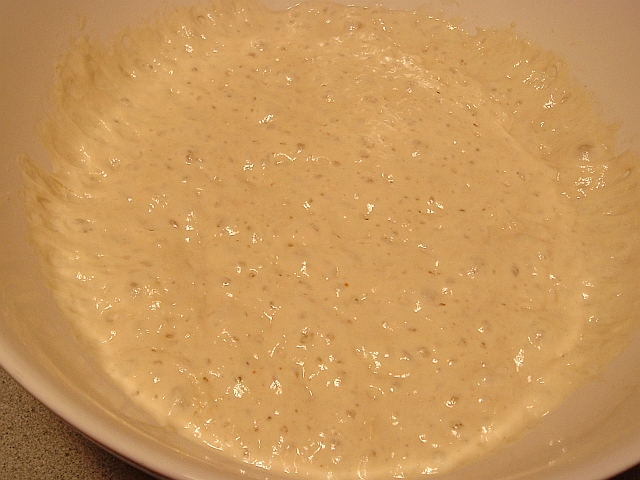
Ok, so I mixed the ingredients in my favorite bread bowl with nothing but a wooden spoon which literally took less than a minute. It's such a wet dough, really more like a thick batter. In fact, Mark Bittman, in a follow-up column responding to the no-knead phenomenon, suggests cutting the water back to a cup and a half, as does the demo video that Lahey himself made. Bittman also suggests upping the salt to almost a tablespoon, as a lot of bakers found the bread under-seasoned, so I did that. Then I just covered the bowl with plastic wrap, dropped it down into the proof box, and went to bed, leaving the bread to do its thing. 18 hours later, it looked like this, all fluffy and bubbly! Imagine that, from a mere pinch of yeast!
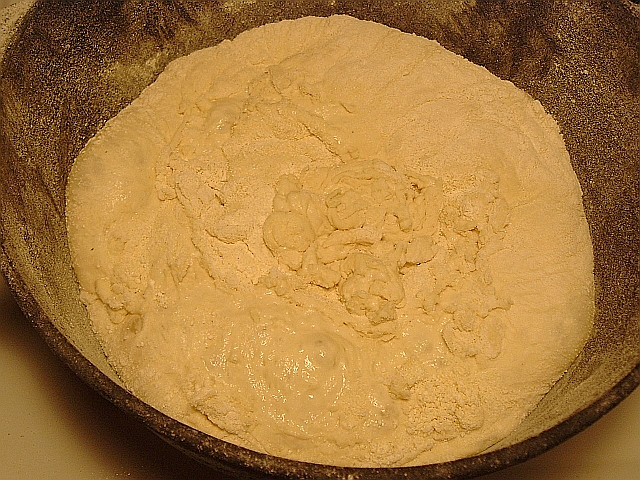
Next,I scraped the dough out onto a heavily-floured Silpat, worked in just enough flour so that I could handle it a little, folded it over at 3 and 9 o'clock, and also at 6 and 12, and plopped it back onto the Silpat to rest, covered lightly with plastic wrap, for 15 minutes.

While the dough was resting, I prepared a flour sack towel (or a couche, if you insist) by heavily dusting it with a mixture of both flour and cornmeal which I draped over a small (eight-inch) bowl. When 15 minutes was up, I placed the dough down in the bowl (though it had become looser and so sticky that I couldn't really make a proper ball or a seam on the bottom, even with lots more flour), sprinkled it with more flour and cornmeal, folded the ends of the towel over it, and put it back in the proof box for closer to three hours than just two (as Bittman reported) until it doubled and almost filled the bowl, comme ca.

Toward the end of the second rise, I preheated the oven to 450 degrees with my cast-iron dutch oven inside. When the dough was ready, the idea was to dump the dough right into the hot pan. The problem was, despite lots and lots of flour and cornmeal, the sucker was really stuck to the towel! So I ended up using the tip of a knife to free the dough from the towel into the dutch oven. Most of it ended up in the pot, but I had to scrape maybe another golf ball-sized amount of dough off of the towel with the knife, and I just tossed it in the pot, too, on top of the rest of the dough. It looked crazy, as Tyra would say and you can see, but I baked it anyway just to see what would happen.
Well, would you believe THIS happened? Look at it! It's just GORGEOUS!
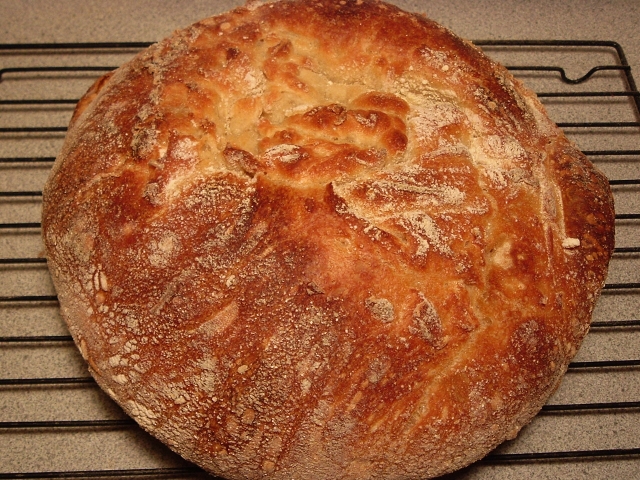
Because it's such a soft dough that spreads to conform to the shape of the pan that you bake it in, it wasn't as tall as I would have liked. My dutch oven is pretty big (8 quarts), and the resulting loaf was only a little over two inches high. But look at that lovely, open (holey) crumb! But it's all about the crust with this bread. When it's fresh from the oven, it's shatteringly crisp (you can actually hear "la musique du pain" or the crackling as it cools). Though it will become chewier the next day, you can always crisp it back up with a ten-minute stint in the oven. And most importantly, it tasted great. The long, slow fermentation makes for delicious flavor, though not as pronounced and tangy as, say, sourdough. Still, for such little effort, the result is more than impressive. Why would you want to bake bread any other way?

I am going to keep practicing and experimenting with the method, of course. First, I will try cutting back on the water. Second, I must figure out a new plan for the second rise so that it doesn't stick on me when it's time to turn it out into the pot. And speaking of pots, I might have to break down and buy a smaller dutch oven. Some other recipe testers have reported that something between 3 1/2 and 4 quarts might be perfect to get a loaf that is more like four inches high. Having said all that, this recipe is very forgiving and pretty much mistake-proof, so matter what you do to it, the bread will probably turn out. I urge you to give it a try, even if you've never baked a loaf of bread in your life. Make it your New Year's resolution!
*Follow-up: I tried a second loaf, and I used whole-wheat white flour that actually needed the entire 1 5/8 cups of water. To solve the sticking problem, I lined the bowl for the second rise with a piece of parchment with flour and cornmeal on it, and it turned right out when it was time (although I could have just baked it on the parchment itself if I needed to). And I broke down and bought a small cast iron pot (just under four quarts--25 bucks at T.J. Maxx!) to bake my no-knead breads in, and I produced a loaf that was about four inches! Yeah!
Now...what to serve with this lovely bread? I decided to make a simple soup from a fun recipe that I had encountered here and there around the internet. It's called Lasagna Soup, and true to its name, it really does taste just like lasagna, but with a fraction of the effort (see? this eternal post has a theme). It was very easy to make (especially if you use a food processor for the cutting and chopping parts), it tasted great, and it was perfect for sopping up with crusty slices of the no-knead bread. What more do you need?
Lasagna Soup
(Source: adapted from www.recipezaar.com)
1 pound bulk Italian sausage (I used half sweet and half hot)
2 cups onions, chopped
1 cups carrots, diced
2 cups mushrooms, sliced
2 tablespoons garlic, minced (5 or 6 cloves...or more!)
4 cups chicken broth
1 can Italian-style stewed tomatoes, chopped (14 1/2 oz--I used diced fire-roasted)
1 can tomato sauce (10 3/4 oz)
1 teaspoon dried oregano
1 teaspoon dried basil
*if you didn't use any hot sausage, you may want to add a pinch of hot pepper flakes (1/4 teaspoon)
salt and pepper
1 cup mafalda (mini-lasagna noodles) or campanelle pasta
2 cups fresh spinach, chopped (I used one box frozen cut leaf)
1 cups provolone cheese or fresh mozzarella, diced (or a little of both)
1/4 cup parmesan cheese, shredded
4 teaspoons thinly-sliced fresh basil
Brown sausage in a large saucepan over medium-high heat. Add onions and carrots; saute 3 min. Stir in mushrooms and garlic, and saute another 3 min.
Add broth, tomatoes and tomato sauce, herbs and red pepper flakes (if using), and salt and pepper to taste. Bring to a boil. Drop in pasta and simmer until cooked, about 10 minutes or acccording to package directions. Stir in spinach and cook until wilted. (I tasted the soup at this point, and it actually tasted a little flat to me, so I grabbed my handy-dandy tube of double-concentrated tomato paste and squeezed in about a tablespoon. Then I spied a opened bottle of Cabernet Sauvignon on the counter and poured in a good glug of that. And those two little adjustments did the trick!)
Place 1/ 4 cup mozzarella or provolone cheese into serving bowls and pour hot soup on top. Garnish with parmesan and basil. Serve with a green salad, and I like a scoop of cottage cheese on the side, and of course, some crusty (no-knead!) bread.
5 comments:
I made the lasagna soup too, but my recipe came from cusine at home. I havent tried the bread yet, but I want to. Have you seen the thread on egullet? Its 17 pages long with many different formulas. Some ppl made it with semolina, wheat, rye, spelt, etc.
Yes, I did read every word on eGullet and about the same amount of pages on the Cooks Illustrated message boards. People have gone crazy for this bread! Eventually, I will try some other grains, but right now, I'm still obsessed with the "plain" version!
What a lovely loaf, and grin, my odd version of a proofing box is my microwave oven :)
Welcome to the No Knead party!! I've been making this bread at least twice a week since the recipe was published. My personal modifications include cinnamon-raisin, parmesan pepper and sesame seed. If you want to try a version with "add-ins", I recommend folding them into the dough after you turn it out of the bowl (after the first loooong rise). That seemed to work best for me.
I'll never buy bread again...
I haven't tried this recipe yet but how about doing the second rise on top of a piece of parchment in the basket and then lifting the paper and moving it to the dutch oven on top of the paper? Maybe...?
Post a Comment