Well, gang, I'm in a bit of a food blogging depression. First of all, we are coming on TWO WEEKS without being able to post photos, which would be even more upsetting if I had anything great to post! And believe me, it's not for the lack of trying. As you may have noted, I have been in a bit of a buttermilk place lately. And Anna over at Cookie Madness posted a recipe for a Buttermilk Pecan Pie that sounded awesome. After it's baked, you should end up with a creamy buttermilk layer topped with a crunchy pecan layer...yum! But I got the brilliant idea to throw a half a cup of chocolate chips into the mix. Well, the chocolate bits melted and coagulated with the buttermilk custard so that it didn't separate into different layers. And though the resulting pie tasted good, the filling ended up, at best, an unappetizing grayish color, and at worst, not unlike bits of sewage floating about in a gelatinous, mucus-like goo. As AB would say, definitely NOT good eats! :-(
So I shifted gears and decided to pay heed to my bread-baking resolution and try another recipe that I found for an herb bread from the famous Cincinatti ice cream makers, Graeter's. I made a couple of amendments to the recipe--as you know by now is my way--by including some thyme (my favorite herb) and also some granulated garlic (garlic is always welcome to the party!). Those turned out to be very good decisions. The tragedy came when I accidentally overproofed my loaves. I guess I was still in winter mode where proofing takes twice as long as it should, and as it has been warm and humid lately, my dough basically imploded at the end of the final rise while I was trying to preheat the cantankerous oven. The resulting bread was delicious and still had a very nice texture and crumb. But the tops of the loaves were not gently domed as they should be, but sunken in, like a surfer's thigh that has been gouged by a shark bite or perhaps attacked by a flesh-eating disease of some sort. BOO HISS!
Ah well, cooking--like life--teaches us about both triumphs and disappointments. And we wouldn't appreciate the views from the mountaintops if we hadn't suffered through the valleys now, would we? Ok, ok, enough with the saccharine platitudes. It's back to the drawing board. I will report back. In the meantime, I hope you all are having more luck in the kitchen these days than I am. If so and you want to try these recipes and hopefully succeed where I have failed, here they are:
Buttermilk Pecan Pie
1 1/2 cup whole pecans
1/2 cup butter, room temperature
1 1/4 cups granulated sugar
1/4 cup brown sugar
2 teaspoons vanilla
3 eggs
3 tablespoons flour
1/8 teaspoon salt
1 cup buttermilk
1 uncooked pie crust, use a 9 inch deep dish
Preheat oven to 350 degrees F. Place pecans on a cookie sheet and toast for 8-10 minutes or until aromatic. Let cool, then chop coarsely.Reduce oven heat to 300 degrees F.
In a mixing bowl, beat together butter and both sugars. Beat in vanilla and eggs; Stir in flour and salt. Add buttermilk and stir until fully incorporated. Stir in pecans. Pour into pie shell.Place in oven (set on a cookie sheet to catch drips) and bake at 300 for 1 hour and 15 minutes. Cool completely, then chill.
Miriam's Herb Bread
yield: 1 loaf (I would double this recipe...eat one loaf and freeze the second for future use.)
1/2 cup warm water
1/2 cup warm milk
2 tablespoons sugar
1 tablepsoon dry yeast
2 tablespoons unsalted butter, softened (I used it, of course!)
1 teaspoon salt
1 tablespoon dried parsley
1/2 teaspoon dried tarragon
1/2 teaspoon dried dillweed
1 t dried minced onion
*I also added 1/2 teaspoon dried thyme and 1 teaspoon granulated garlic
1/3 cup chopped walnuts
2 1/2 cups bread flour (I used AP for a softer interior)
Combine warm milk and warm water with sugar in large bowl and add yeast, stirring well to dissolve. Let proof. Add butter, salt, herbs and onion. Add half of flour and mix well. Add nuts; mix. Add just enough flour to make dough easy to handle; turn out onto lightly floured work surface and knead until smooth and elastic, 8-10 minutes.Grease a clean large bowl and place dough in it, turning dough over to coat top. Cover and let rise in warm place until double in size (about 1 hour). Punch dough down. Roll into 18"x9" rectangle, then roll up, beginning with short side of dough. With heel of hand, press ends to seal. Fold ends under loaf. Place seam side down in greased 9"x5"x3" loaf pan. Cover and let rise till doubled in bulk (time will vary). Preheat oven to 375 degrees F. Place loaf in lower middle rach of oven. Bake 25-30 minutes or till top sounds hollow when tapped. Turn out of pan and brush top with butter or milk. Cool on wire rack.
Thursday, June 22, 2006
Monday, June 19, 2006
Baking takes a backseat this weekend...
I am sad to report that I have done no cooking nor baking of any note this weekend, as we finally had some good weather, and--better late than never--the garden HAD to go in! My back and legs may never be the same, and I am sunburned and bug-bitten to boot, but weather and the Good Lord providing, we will have lots of delicious veggies in a couple-to-few months' time. I am not done yet, as the relatively mild winter (and more to the point, lack of a protective snow cover) proved quite detrimental to my lovely perennial herb garden. So many plants need to be replaced there, but I did manage to get the lion's share of the planting in the vegetable gardens done, including 48 individual varieties of tomatoes (mostly interestingly-colored heirlooms, all grown from seed, as is my passion) and 17 types of both hot and sweet peppers. And I must tell you, that I really scaled back this year! I usually grow about 70 different varieties of tomatoes, but I'm getting old and starting to slack off. ;-) I was also pleasantly surprised to find lots of cucumber and squash volunteers this year that we will let grow and just see what we end up with. And other than some greens and other tidbits here and there, that might just have to do for this year's garden. Below are the tomatoes and peppers that I'm growing for anyone who is interested in such things. And I promise, I will be back to food blogging very soon--stay tuned!
TOMATOES:
Amish Gold
Aunt Ruby's German Green
Better Boy
Big Rainbow
Black from Tula
Black Plum
Black Prince
Cosmonaut Volkov
Craig's Magnus
Craig's Matchless
Dona
Earl of Edgecombe
Farmer's Market #1
Ferris Wheel
Flamme'
Galina
Gilbertie
Glasnost
Golden Roma
Grandpa's Cock's Plume
Green Zebra
Hillbilly
Isis Candy Cherry
Italian Beefsteak
Lemon Boy
Lucky Cross
Mortgage Lifter Bicolor
Mr. Stripey
New Zealand Pink Pear
Oltraolny
Paul Robeson
Polish
Porter's Dark Cherry
Old German
Old Yellow Candy Stripe
Quimbaya
Rio Grande
Rose de Berne
Sasha's Altai
Stupice
Sun Sugar
Super Marmande
Sweet Cluster
Sweet Olive
Tangella
Wolford's Wonder
Yellow Bell
Yellow Pear
PEPPERS:
Ancho
Antohi Romanian
Big Chile
Cascabella
Diamond
Golden Cayenne
Golden Greek
Habanero
Mild Jalapeno
Orange Sunsweet
Pepperocini
Placido
Purple Jalapeno
Red Beauty
Serrano
Sweet Chocolate
Tabasco
Friday, June 16, 2006
Et tu, Blogger?


I suppose it’s high time that I posted something. I know I have gone a few days without doing so, but I have been waiting for Blogger to get its act together. However, I might be waiting a LONG time, so I’m just going to trudge ahead. I know Blogger is free, and you get what you pay for, but COME ON! It’s been over a week now that people have been having problems posting photos. It can be done, but it is...involved. You see, you can post photos using Firefox, but not Internet Explorer. But the computer that has Firefox on it is so old (Windows won’t even support it in another month!) that I can’t download from my digital camera. So I must download to one computer, e-mail myself the pictures, download them to the other computer, post the images using Firefox, and did I ever mention that we live out in the boonies and still use dial-up? UGH! But they are labors of love for you, dear readers!
So today, because you have been patient, I will offer two recipes. The first comes from a faaaabulous new website that I stumbled on doing a Google search for, of all things, Hershey’s Dark Cocoa (which we STILL don’t have here in our podunk grocery stores…boo hiss!). It’s called "This Corrosion" and the gal who writes it is HYSTERICAL! Furthermore, she linked me to the funniest site ever called "The Gallery of Regrettable Food." I urge you foodies to check it out, and read ALL the way through it—but I warn you, go to the bathroom first, or you’ll be sorry! ;-) Anyway, this very funny blogger who refers to herself as Mags also posts recipes from time to time, and she offered a great one for a sort of Greek pasta salad. It’s yummy, very pretty, and super-easy, too…well, except that I had to go to FOUR different stores (and then back to the first one—don’t ask) to find the right dressing for it. But it was darn well worth it! Here it is:
Mags’ Greek-Style Pasta Salad
16 oz. cooked whole wheat pasta (I used a whole wheat/semolina blend penne)
1 cup toasted and chopped walnut pieces (don’t be tempted to skip the toasting step!)
1 cup crumbled Feta cheese (I chose a tomato and basil varietal)
1 cup finely chopped red onion (I used a Vidalia because that’s what I had, and I soaked the pieces in some cold water while I worked on the rest of the ingredients, to take some of the bite out of the raw onion)
3 cups chopped baby spinach leaves (I used one package of defrosted chopped spinach, squeezed of excess water because I forgot to buy fresh spinach…oops!)
1/2 cup Girard Champagne Vinaigrette (the one in the triangle bottle--if you can't find it, I also recommend Ken's Steak House Greek dressing)
salt and pepper to taste
*I also took it upon myself to add about a half a can of black olives, quartered, and several smallish Campari tomatoes, chopped. One might also consider some diced cucumber, but I myself did not.
I’m embarrassed to offer the recipe for the next dish. It’s not even a recipe, just a methodology. And it’s SO Sandra Lee, that I’m quite mortified about it. But in my defense, I got home late (after hitting all those stores in search of the champagne vinaigrette!), and dinner had to be done in time for Matt Lauer’s explosive interview with Britney Spears. ;-) This idea actually came from the Cooks' Illustrated message boards. Someone asked for some ideas about what to do with a grocery store rotisserie chicken. And one respondent said that she made chicken enchiladas with it. What a great, go-to meal for a weeknight!
So here’s what I did. I de-skinned and deboned the rotisserie chicken, and chopped up the meat. Then I divided it into ten portions to correspond with the number of tortillas in the package. I used six-inch flour tortillas because my roommate gets grumpy when I use corn tortillas which, truth to tell, I would have preferred for this. I placed some chicken and some shredded Mexican cheese blend that I had leftover from a previous nacho incarnation in each tortilla, rolled them up, and placed them in a glass baking dish (eight in a row, and the last two tucked in along the side) with some enchilada sauce covering the bottom of the dish. I poured the rest of the 28 oz. can of sauce over the top of the enchiladas, and then tossed on about a half pound of crumbled Mexican queso fresco. I baked them uncovered for 30 minutes at 350 F, and then served them garnished with chopped onion and a big old blob of sour cream. I suppose black olives would have been good, too, but I didn’t think of it—despite the fact that I had plenty left over from the pasta salad. Geez! My brain is not working at optimal levels. My roommate started a new job this week (HOORAY!), and the whole household has been awakened by that godless alarm clock at 5:30am (BOO)! And as I am nocturnal, this means that I have had a total of about 12 hours’ sleep in the past three nights. So on that note, I bid you all night-night.
Monday, June 12, 2006
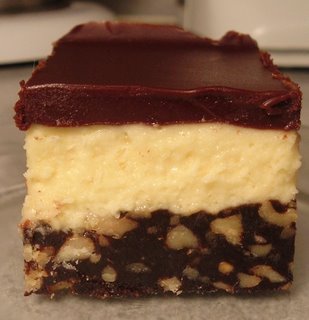
OH, CANADA...We Love Nanaimo Bars!
Again yesterday there was no gardening to be had; it was nasty, cold and windy, though they say that there should be some sun in the next few days. Let's hope so, or I'm not going to have a garden this year! UGH!
Anyway, there was more baking yesterday instead. It's sad when you pull a recipe off of the internet, and you still haven't made it a YEAR later! What does that say about my life? (The date on the bottom of the printout is 6/7/05...GEEZ!). There was a period last summer where I became obsessed with bar cookies/desserts, and being a native of the Pacific Northwest, I had always wanted to try making Nanaimo Bars. Nanaimo Bars are a Canadian dessert, specifically named after Nanaimo, British Columbia. But you can find them all over the PNW where I grew up. The problem was, I made these thick mint brownies first, and even though they were scrumptious, they were so rich, that I couldn't face anything similar for quite some time! Plus, my local gourmet shop was out of Bird's Custard Powder (well, to be accurate, they only had strawberry). So I actually had to take myself across the border into another country to finally acquire some. But if you aren't lucky enough to live six miles from Canada, I feel quite confident that instant vanilla pudding would be a fine substitute. Also, speaking of substitutions, I do not enjoy coconut as a general rule (unless it's fresh, and I'm scraping it off the shell with my teeth!), so I know that this goes against the authentic Nanaimo Bar, but I left out the coconut and increased the Oreo crumbs to two cups and the walnuts to one cup. Finally, for some reason, when I was melting my chocolate, it seized on me (not sure where the invasive moisture came from). So rather than pitch it, I added 1/4 cup of heavy cream and smoothed it out into a lovely ganache, which worked quite well for the topping.
Nanaimo Bars
(Source: www.foodtv.ca)
Yield: 9, though I cut them into 16 pieces myself, as they are VERY rich and sweet!
Base:
1/2 cup unsalted butter
1/4 cup sugar
5 tablespoons cocoa powder
1 egg
1 tsp vanilla extract
1 1/2 cups chocolate cookie crumbs
1 cup unsweetened grated coconut
1/2 cup walnuts, toasted and chopped (almonds are also frequently used)
Filling:
1/3 cup unsalted butter, room temperature
1 1/2 tablespoon custard powder (or instant vanilla pudding mix)
1/4 cup milk
2 tsp vanilla
3 cups icing (powdered) sugar, sifted
Topping:
8 oz semisweet chocolate, chopped
2 tablespoons unsalted butter
Preheat oven to 350° F. Grease bottom and sides of 8-inch square pan with vegetable oil or spray. For base, melt butter and stir in sugar. Sift cocoa powder into mixture and blend well. Whisk together egg and vanilla extract and add. Blend in chocolate cookie crumbs, coconut and chopped walnuts until evenly incorporated. Press into prepared pan and bake for 10 minutes. Allow to cool for 10 minutes then chill for 20 minutes.
For filling, beat butter by hand until smooth and beat in custard powder. Stir in milk and add sifted icing sugar a cup at a time, combining well. Spread over base and chill while preparing topping.
For topping, melt chocolate and butter over a pot of gently simmering water. Pour over vanilla filling and spread to cover evenly. Chill for 30 minutes.
To serve, slice with a hot, dry knife into 1-inch squares. Yield 1 8-inch square pan.
Sunday, June 11, 2006
Conversion begins at home...
It's been five months since I've begun my little food blog, and though I have yet to establish an enormous following, I have one small but significant milestone to brag about. My roommate, always a more-than-enthusiastic eater of pie, has finally begun to bake them herself! Her first effort a couple of months ago, which we jokingly referred to as "the homeliest pie in Christendom," was also among the tastiest! She chose the unorthodox but delightful combination of cherry and blueberry, but other than a filling that was too runny (who among us hasn't had that problem?) and its rather unphotogenic character, it was certainly successful, especially for a first attempt. An outside source and our toughest critic of cherry-based pies, June, confirmed that the pie was delicious. Of course, I was very proud of her!
And as we are experiencing some crazy, October-like weather this weekend (dark, stormy, cold, rainy, and horribly windy), and we still could not get outside to get the garden planted, we decided to stay in and make another pie together today. I had a recipe that I wanted to try, a Blueberry Crumble Pie, and anything with a crumbly topping is Cyd's favorite. But instead of straight blueberry, I picked up a bag of mixed berries (blueberry, raspberry and blackberry) at the Sam's Club--don't you love how everyone adds that definite article to the name of the store? THE Sam's Club, THE Wal-Mart, etc. Why do they do it? It's the same with diseases. "She has THE diabetes" or "He has THE sleep apnea." Puzzling...
Anyway...the pie turned out pretty well, though it's definitely a crumb-lover's pie. In fact, the layer of crumbly topping was thicker than the berry layer! Cyd says she likes it that way, but I think it A) needed more fruit in general, and/or B) needed only 2/3 to 3/4 of the crumble on top. Still, it was quite good--particularly served with another batch of buttermilk ice cream that we whipped up--and that's one more notch on the old girl's pie-making belt! (Just don't ask her to calculate pints to cups, whatever you do! ha ha) And that's also one more convert to the Lindsey's Luscious way! So keep baking, grasshoppers (and try to walk with full measuring cups on the parchment paper without tearing it)! ;-)
CRUMBLEBERRY PIE
(source: www.sweetbabymedia.com)
Crumble:
1 ½ cups flour
1 cup packed brown sugar
¾ cup (1 ½ sticks) unsalted butter, cut into small pieces
1 teaspoon cinnamon
pinch of salt
Filling:
6 cups mixed berries (raspberries, blueberries, blackberries or your preference)
½ cup sugar
½ cup brown sugar
3/8 cup quick-cooking tapioca
1 teaspoon vanilla
1/2 teaspoon finely chopped lemon zest (or 1 tablespoon lemon juice)
pinch of salt
pinch of freshly ground pepper
In a food processor, pulse the flour and brown sugar until thoroughly combined. Add the butter, and pulse until mixture is crumbly. (Don’t overmix!) This can also be done by hand with a pastry cutter if you’d rather. Refrigerate until ready to use. In a large bowl, gently combine filling ingredients and set aside.
Preheat the oven to 350F. Press crust into a pie tin, trim dough and crimp edges as desired. Using a fork, lightly prick all over sides and bottom of dough; refrigerate 20 minutes. Remove pie shell from refrigerator and line with parchment paper. Fill with pie weights or dried beans. Bake until crimped edges are firm, 10-15 minutes. Remove the parchment paper and weights, and continue baking until the bottom is firm, about 10 minutes more. Remove the pie shell from the oven. Pour in the berry filling, and top with the reserved crumble. Place pie on a parchment-lined baking sheet; bake pie until crust and crumble are browned and filling starts to bubble, 1 to 1 ¼ hours. (You may have to cover the edges of the pie with foil or a pie shield if it starts to brown too much.) Transfer to a wire rack, and let cool completely.
Thursday, June 08, 2006
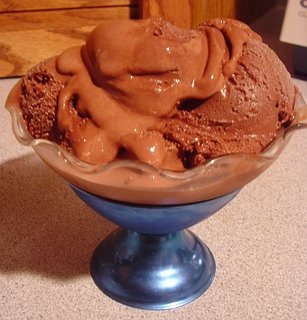
Scream Louder: Gelato for the Aztecs
Every time I venture south into the Big City, I always feel frustrated. NYC is such a gastronomical epicenter, that I always feel that there are too many wonderful restaurants and too little time or too few meals in a day! But I have several absolute favorite, must-have items when I am in the Big Apple. The first is pizza from the Sullivan Street Bakery. I don't even know how to describe the wonder that is the pizza made by Jim Lahey. It is very thin, cracker-crisp, and there are five regular varieties and many more seasonal ones. I love the kind with mushrooms, but the most incredible pizza is the one with overlapping wafer-thin slices of potato, with onion, rosemary, and olive oil. Simple, but simply AMAZING! Another wonderful place to pop in for a snack is Pommes Frites, where they serve you authentic, Belgian-style fries with a kabillion different choices of dipping sauces. Yum! And of course, no trip to New York would be complete without a pastrami sandwich from Katz' Deli on the lower east side! But one of my newest discoveries (I should say, addictions!) is gelato from Jimmy's Gelato in Chelsea Market. And the most incredible variety is the chocolate pepper gelato. Amazingly dense and luxurious, with a real kick of heat in the finish--unusual and incomparable!
Unfortunately, the City is 5-6 hours south of me, and I only manage to make it there a few times a year. And yet, I NEED THAT GELATO! So I have made it my culinary quest to produce a reasonable facsimile of the luscious substance at home, and I think I have an excellent initial attempt, thanks in very large part to Melissa at the Traveler's Lunchbox. Happily, she road-tested three different chocolate gelato recipes, and there was a clear victor in her trial. She modified the recipe and then shared it on her wonderful website. I tweaked it just a little bit more by adding some vanilla and, of course, some cayenne pepper. And then you know that I had to use my favorite Ghiradelli cocoa with ground chocolate in it. It turned out VERY well, I think! However, I might try using a bit more chopped chocolate next time and a bit less cocoa just to see how slightly different proportions influence the flavor and texture. I might also use a cup and a half of evaporated milk and just one cup of whole milk, as it annoys me to have a half cup of evaporated milk left hanging around in a can--plus, it adds such a nice caramel note to the gelato. And although my roommate thought the heat level was just about right, I think I will turn it down a few notches next time. It didn't blow my head off or anything, but I just want a distinct warmth in the background, not such a sharp heat. So my advice is, start with a little cayenne, taste the custard, and then add more (slowly, incrementally!) to taste. And my experience is that it tastes milder when warm, and will be more fiery when it's frozen, paradoxically. Fair warning. Oh, and if this Aztec-influenced gelato doesn't float your boat, why not add some cinnamon instead for a Mayan flair or like Mexican hot chocolate? That would be scrumptious, too. Or you could just make plain chocolate, because this recipe yields a result that is anything but plain! And though I am certainly not claiming that this is health food, gelato does have less fat than ice cream, as it is actually made with milk, not heavy cream. But you'd never know it from the rich, velvety texture! But one tip: let it sit out for, oh say, 15 minutes or so before you tuck in. Gelato is traditionally served 15 degrees warmer than ice cream, and it really tastes better when it's a little melty, like in the picture above. But however you eat it, this recipe is a winner...give it a try!
Aztec Chocolate Gelato
Sources: www.epicurious.com and www.travelerslunchbox.com
Yield: about 1 quart
2 ounces fine-quality bittersweet (or semi-sweet) chocolate
1 1/2 cups whole milk
1 cup evaporated milk
3/4 cup + 2 tablespoons sugar, divided
1 cup unsweetened cocoa powder, sifted (I love Ghiradelli Sweet Ground Chocolate and Cocoa!)
1 teaspoon cayenne pepper (or to taste--start with 1/2 teaspoon then decide from there )
4 large egg yolks
1 teaspoon vanilla
pinch salt
Coarsely chop chocolate with a serrated knife. In a heavy-bottomed 2-quart saucepan, bring milk, evaporated milk, and about half of the sugar just to a simmer, stirring until sugar is completely dissolved. Remove pan from heat and add cocoa powder and chocolate and cayenne pepper, whisking until all the chocolate is melted and the mixture is smooth. With an electric mixer, beat egg yolks, the remaining sugar, and salt until thick and pale. Add the hot chocolate mixture in a slow stream, whisking, and then pour it all back into the saucepan. Cook the custard over moderately low heat, stirring constantly, until a thermometer registers 160°F (do not let it boil!). Pour the custard through a sieve into a metal bowl set over another large bowl of ice and cold water and stir the custard until well-chilled. Freeze custard in an ice-cream maker. Transfer the gelato to a large loaf pan lined with plastic wrap or a plastic container with a lid, and let ripen in the freezer for a few hours before serving.
Cuisine de Misère, Part Deux

Still a day away from payday (may it cometh and that right soon!), so what innovation graced the dinner table tonight? Oddly enough, it was another filled delicacy--a chicken and cellophane noodle spring roll creation. Why, you ask? Because I found half a package of dried Vietnamese spring roll wrappers in the pantry, half a package of thin cellophane noodles, and we were down to the last two chicken breasts in the freezer. So the chicken breasts were thawed and marinated in some teriyaki sauce (Yoshida brand lingering in the fridge...stop hatin'!) for a couple of hours. The noodles were soaked in water for five minutes, and then boiled for just two or three more, then drained and set aside. Half of an onion was finely chopped and sautéed for a few minutes before the chicken, having been cut into very small pieces, was added to the sauté pan along with the remaining marinade and a couple of cloves of minced garlic. I cooked the chicken until just a little pink remained, and then added a chopped red pepper (roasted, from another jar in the fridge), chopped mushrooms (one small can--I know, let it go), a tablespoon of hoisin sauce, a teaspoon of garlic chili paste, a tablespoon of soy sauce, a teaspoon or so of ginger, and quite a few grinds of pepper. I let this cook until the chicken was done. Then I poured off some of the resulting liquid into about a tablespoon of cornstarch and stirred until a slurry formed. I returned this to the pan, and cooked the mixture just until it thickened. I retrieved the cellophane noodles, cut them roughly into two-inch lengths, and tossed them with the chicken mixture. I added a generous tablespoon of parsley and set the filling aside. Next, I soaked each rice paper wrapper in very warm water for a minute or two until sufficiently softened, and then placed a good tablespoon of the chicken filling low down on one side (ok, circles don't have "sides," but the part closest to you), then I folded over the the left and right halves of the circle, and rolled it up away from me, burrito-style. I set each completed roll on a large plate, making sure that they didn't touch each other and accidentally get stuck together. I could have steamed or fried them at this point, but they were quite delicious just as they were (though my roommate called them tasty but "weirdly fleshy"--bah, maybe SHE is!). I wish that I had had something crunchy to add to the filling like water chestnuts or cashews or something, but if wishes were horses, then beggars like myself would ride, wouldn't we? Still and all, I was quite pleased with my Vietnamese-Style Spring Rolls out of odds and ends from the pantry and fridge! Celebrate me!
Tuesday, June 06, 2006
Creative Cuisine, or Making It to Payday

I find myself being exceedingly resourceful and creative in the kitchen lately because of three main influencing factors. One, we have been doing a lot of spring cleaning, including the fridges, freezers, and pantries. Two, we had a state food safety inspector come recently to check out the kitchen so that I might be able to sell goods at the local farmer's market (obviously, this is related to factor #1). And third and most influential, is an annoying period of poverty before my summer school stipend kicks in! So we have just been buying the bare essentials at the grocery store lately (milk, bread, Diet Pepsi, Breyer's ice cream...you know, stuff you'd DIE without!) and making a concerted attempt to use stuff that we already had. And I'm not kidding! I'm talking about using those weird items that are hidden in the dark recesses of your cupboards because you chose them on a whim and never could figure out to do with them. But it has been my little challenge to create new recipes based on these oddball items, making me a sort of Iron Chef de Misère, if you will. I think only my precious John will get that obscure reference, so I will explain. I highly recommend the beautiful memoir, When French Women Cook by Madeleine Kamman. And in it, she honors her grandmother (I believe) who was very talented at what she referred to as "cuisine de misère"--literally, the food of misery, or the art of being able to make something out of nothing when times are tough. Another part of this kind of cuisine that I would add to Kamman's definition is not only making something with the ingredients that you have on hand, but also remaking those dishes into something new the next night--that is, creatively using the leftovers in new and interesting ways so that nothing is wasted.
For example, the other night, I made burritos. They were good, but nothing to blog about. For the filling, I browned some ground beef with a chopped onion and added some dark chili powder and cumin and other south-of-the-border/taco-type seasonings. Then I threw in some corn, and a quintessential cuisine de misere ingredient that I have had for literally years--I think I may have brought it in the move to New York state SIX years ago!
Well, I found my inspiration in the very back of the freezer, a package of Goya empanada wrappers that I probably purchased a year ago or more but have been intimated to actually use. So I thawed them out, rolled them a little thinner, filled them with the leftover burrito mix, sealed them with the help of a little water, a fork and my fingertips, and fried them in some vegetable oil until G B & D! Then I served them with the ubiquitous sour cream and taco sauce, and PRESTO, whole new meal! And they were really great! I will definitely buy more, as they are tasty, really inexpensive (seems like the package of ten may have set me back a buck?), and lovely reddish color to boot! Of course, you could fill them with just about anything that tickles your fancy. Look for them in the frozen foods section of your favorite grocery. And if anyone comes up with a truly fabulous filling, please holla back--I'd love to hear about YOUR creativity!
Monday, June 05, 2006
New Year's Resolution: Redux
Hey! Didn't you vow on January 1st to bake more bread? And when's the last time you made bread or blogged about it, huh?
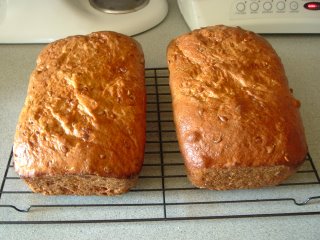
Ok, ok, back off! I've done it, and I'm about to tell you about it. My dear friend, June (of the cherry pie obsession as previously revealed), was kind enough to share a special recipe from her husband's family. They call it Z Bread, though I have no clue why. I'll make a point to check on that and report back. In any case, I produced two lovely loaves of the Z Bread last night, and the recipe worked so well that I wanted to pass it on. Of course, as is my way, I had to mess with it a bit. Part was willful, as I omitted those wrinkled little abominations that people call raisins by choice. But two substitutions were because I was out of things. I had to swap out honey for the sugar, as I told you that I ran out over the weekend. But I do believe that I would make the same switch in the future, because it was yummy with the honey. (That sounds like a rap song, doesn't it? I think I'd like to hear Kanye do it!) And then I found that I was also out of walnuts, so I replaced them with roasted sunflower seeds. Delish! But I will do June and hubby, Tom, and their extended family the honor of reprinting the heirloom recipe in its original form. If someone makes it by the book, please drop me an e-mail and let me know how it turns out. I'm sure it will be great! Thanks, June!
Followup: Z is for Zoran, June's father-in-law (and it would have been her daughter's name had she been a boy!). See? ;-)
Z Bread
1/2 cup water (I used warm water)
2 tablespoons yeast (I used instant)
2 cups warm milk (I used whole)
1/4 cup sugar (I used honey instead)
Mix the ingredients above and let sit until foamy, about 20 minutes. Then to the yeast mixture, add:
1 tablespoon salt
1/3 cup oil (I used vegetable oil)
3 cups whole wheat flour
1 cup walnuts (I used sunflower seeds instead)
1 cup raisins (I omitted these as I find them vile)
3 cups white flour
Knead the dough for eight minutes (I did this with a dough hook in my Kitchen Aid, and I didn't add the nuts/seeds until the very end of the kneading process). Let the dough rise for one hour (I transferred the dough to an oiled bowl first and covered it with plastic wrap). Punch down and repeat. After the second rise, divide the dough, shape into two loaves, and let rise for another hour (I pressed the two halves of the dough into two large loaf pans before the final rise and glazed the tops with an egg wash before baking them). Preheat the oven to 400 degrees, then turn it down to 350 and bake the loaves for 45 minutes.
Recipes for yeasty ears...
Something horrible has happened, dear friends. I have run out of sugar! This is the result of baking a few too many pound cakes over the past week, in an effort to launch a side business--but more about that some other time. So for today, I offer a non-culinary post and a different kind of recipe, one to kill yeast, not to bake with it!
I'm not sure what the weather and climate are like where you live, but in my part of the world, we get an exceedingly high pollen count in the spring and fall. The consequence of that is allergies all around for both humans and animals alike. Even as I blog, I am suffering with raging ear infections, and my roomie is having trouble with her ears, too. I have had intermittent but chronic ear infections for, I'd say, about a decade now, and it used to be about the only reason that I ever went to the doctor--to get antibiotics and drops. One time, when I was using the drops, I was thinking about how much they smelled like vinegar. And sure enough, one of the main ingredients listed was acetic acid, or vinegar. I discussed this with my doctor, and also with my officemate at work's husband who is a doctor, and they both recommended trying a mixture of rubbing alcohol and plain white vinegar when my ears first start getting itchy and watery. Well, mercy me, it was like a miracle potion! I think the alcohol dries out the ear and kills the bad stuff in there, while the acidic vinegar changes the PH and discourages the growth of those pesty yeasties and bacteria. This is a very common home remedy for swimmers who suffer from "swimmer's ear," too. In any case, it has been a godsend to me when my ears start bothering me. So in case anyone else suffers from the same problem, here's what you do. First, buy yourself a little squeeze bottle. I like the kind used for putting color on your hair, like you can readily find at a beauty supply store. Mix a 50-50 solution of rubbing alcohol and white vinegar and shake well. Fill the affected ear canal with the solution, and lay over on your side for ten minutes before letting the solution drain out into a tissue or cotton ball. Do this morning and night for a few days when your ears are really bad, then decrease to once a day until your ears feel all better. If your sinuses also seem to be involved and exacerbating the problem, use something like Sudafed to loosen up the stuffiness and decrease the pressure. But trust me, the magical alcohol and vinegar potion will do the trick! Start using it as soon as you feel the itchy tingle or wateriness in your ear. Don't wait until it becomes painful!
Next, I also have a wonder solution for Fido's ear problems. I have different breeds of dogs, including a cocker spaniel, a basset hound, and two pbgv's, but they have some similarities. Structurally, I seem to like them long and low and medium-sized. And I also seem to enjoy long ears, but long ears require special care to keep clean and free of extraneous hair. And even with regular attention, my dogs will sometimes get ear infections. And the best stuff that I have found to clear up these infections is a recipe well-known to dog breeders and those in the dog show community, commonly referred to as "the blue stuff," though I think it's purple myself. Whatever you call it, it works wonders when your dog has an ear infection. I also use some on a cotton ball for regular ear cleaning about once a month as a part of their general grooming. And I've been known to use it on hot spots and also on any part of them where they may get irritated and chew themselves, such as with a yeasty skin infection. Of course, it does turn those areas purple for a few days, but it eventually wears (or washes) off. In any case, it is very handy stuff to have around when you have dogs to care for. Here is the recipe and the instructions (from the PBGV Club of America's website).
Blue Power Ear Treatment
(Passed on by Pat Etchells, a cocker breeder, who recommends warming up the solution before putting it in the ear by placing it in a cup of very warm water for about a half hour or so.)
INGREDIENTS:
16 oz. Isopropyl Alcohol
4 Tablespoons Boric Acid Powder
16 Drops Gentian Violet Solution 1%
Mix together in alcohol bottle and shake well. You will also need to shake solution every time you use it to disperse the boric acid powder. To use, purchase the "Clairol" type plastic bottle to dispense solution to affected ears. (Gina's Note: I myself only use the squeeze bottle and make a quarter batch at a time, and this lasts me several months!)
TREATMENT: Evaluate condition of ears before treating and if very inflamed and sore, do not attempt to pull hair or clean out ear at all. Wait until inflammation has subsided which will be about two days.
Shake the bottle each time before using. Flood the ear with solution (gently squirt bottle), massage gently to the count of 60, and wipe with a tissue or cotton ball. Flood again on first treatment, wipe with a tissue, and leave alone without massage. The dog will shake out the excess which can be wiped with a tissue, but be careful where you choose to give the treatment, as the Gentian Violet does stain fabrics (and fingers)!
SCHEDULE OF TREATMENT Treat 2x per day for the first week to two weeks depending upon severity of ears. Treat 1x per day for the next 1-2 weeks. Treat 1x per month (or even less frequently, depending on the dog).
All of these ingredients should be available at a pharmacy (or they can special-order them for you). The boric acid powder soothes the ear. The gentian violet solution is an anti-infection agent. The solution appears to work well on any and all ear problems from mites to wax to canker. After the second or third treatment, you can clean out the ear with a tissue or cotton ball. The success rate for this treatment is 95-99%. Those who do not succeed have usually not done the treatment long enough or have not been regular about it.
Dogs on the verge of ear canal surgery have been returned to normal with only the regular follow-up treatment to keep the ear healthy. If an infection seems to be remaining in the treated ear after the above course of treatment, you may also have some pseudomonas bacteria in the site. This can be eradicated by using a gentle flush of raw apple cider vinegar and water (warm). Use two tablespoons of vinegar to one cup of water, 2x per week.
People have also found the Blue Power Solution to be effective for treating fungus-type infections on the feet and elsewhere on the dog, for cuts on dogs or people, and for hot spots. You may find other uses for this simple anti-infective agent. Remember it is for external use only and be careful not to get into the eyes.
Friday, June 02, 2006
We all scream for it...
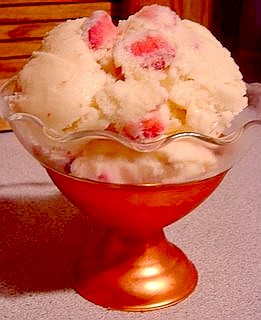
Unlike where you probably are, the strawberries up the road at Mr. Suprenant’s (the jam-maker) are not quite ready for us to pick yet due to some late, unseasonably cool weather. But we have lots of lovely berries in the markets that we can make do with in the meantime. And since we have now segued into a patch of warm weather (that’s what it’s like here: winter, winter, winter, more winter, late winter, later winter, still more late winter, then INSTANT SUMMER), it’s time to dust off the old ice cream machine and see what we can crank out (pun intended)! The flavor o’ the day is Strawberry Buttermilk as we had a pint of strawberries left from the rhubarb crisp that needed to be used and some leftover buttermilk from the magical Vanilla Bean Buttermilk Pie. Though I have heard of it and seen it on the Food Network and in cooking magazines, I had never tried to make ice cream with a buttermilk base before. I worried that it would be too tangy for my liking. Well, color me happy to be wrong! It is tangy, but delectably so…a perfect counterpoint to the sweet, summery berries. In fact, when I start making more fruit pies this summer, I think I will make some plain buttermilk ice cream as an accompaniment. Yum! In the meantime, I highly recommend that you give this recipe a try—give Breyer’s a run for their money (Lord knows they’ve taken enough of mine)!
Strawberry Buttermilk Ice Cream
1 pint of strawberries, hulled and cut into small pieces
1 teaspoon lemon juice
¼ cup sugar
2 eggs
1 cup sugar
1 teaspoon vanilla (or preferably the seeds scraped from a vanilla bean or a teaspoon of vanilla paste)
pinch of salt
2 cups cream (for a lower fat option, you can use half-and-half)
1 cup buttermilk
Prepare the strawberries to your preference on the size of the pieces. Add the berries to a small bowl and sprinkle with the lemon juice and sugar. Stir gently and stick them in the fridge to macerate while you make the ice cream base.
In a large bowl, whisk the eggs for about two minutes by hand until light and frothy. Add the sugar about a quarter cup at a time, and when it's all added, whisk for another minute by hand. Add the vanilla and salt and whisk until blended in. Switch to a spatula or spoon and gently stir in the cream and buttermilk until thoroughly blended together. Pour off the juicy syrup from the berries into the base and stir. (Return berries to the fridge.)
Add the cream base to the frozen canister of an electric ice cream machine (or the ice cream maker of your choice). Churn until the ice cream is about ¾ of the way frozen, about 15-20 minutes. Remove the strawberries from the fridge and add the berries and the rest of the juice to the ice cream. Continue to churn until completely frozen, another 5-10 minutes—until it’s the consistency of soft-serve. Eat immediately, or I prefer to transfer the soft ice cream to a large loaf pan lined with plastic wrap (thank you, Martha), and let it "ripen" for another two hours in the freezer before devouring.
Wednesday, May 31, 2006
Four lovely words: Vanilla Bean Buttermilk Pie

I have paid homage to Jen the Bakerina before, but I must give her props again. We must be on a similar wavelength lately, because when I post about a couple of my favorite frozen drinks, she goes out and buys a new blender. Then when I have a hankering to make a pie, she posts about a favorite of hers that is now going to be one of mine as well: Vanilla Bean Buttermilk Pie!
It's a deceptively simple recipe, but there are pitfalls to be avoided. The first thing you need to do is to track down some parchment paper and pie weights (dried beans will do--or lentils, in my case, as that's all I could find in a pinch), because you must parbake the crust. Then you must be very careful not to pierce the crust or create any other cracks or fissures, or the custard that you eventually pour into it will leak underneath, creating a strange custard-crust-custard strata formation, and all your hard work pre-baking the crust will be for naught. (I found this out the hard way, despite the Bakerina's warnings.) Also, mind your temperatures! I pre-baked the (lined/filled) crust for 15 minutes at 400 degrees, then removed the parchment and weights and baked it for another 10-12 minutes at 375 until it was a pale, golden color. But once you pour the custard in, it bakes at 350. Well, I missed that finer point and left the oven at 375, and ended up making my crust too dark, while threatening to turn the custard into scrambled eggs as well! GOOD GRIEF! And lastly, for heaven's sake, don't be tempted as I was to touch the top of the pie to see if it's done, or you'll rip off some of the tender top, leaving an unsightly hole in the middle of an otherwise photogenic pie. ;-) Still, with all of these shortcomings, the pie was just WONDERFUL, so homey (mine was also bit homely!) and unpretentious and just darn tasty! This recipe is definitely a keeper, and one I'll return to again and again. Thanks, Jen!
Vanilla Bean Buttermilk Pie
makes 1 9" pie
pie crust of your choice, partially baked
1 cup sugar
3 tablespoons flour
1/2 teaspoon salt
2 vanilla beans, split and scraped (or I like vanilla bean paste from Nielsen-Massey, 2 teaspoons)
3 large eggs plus 1 large egg yolk
1 1/2 cups buttermilk
3 tablespoons butter, melted
Preheat oven to 350 degrees. Set an oven rack toward the bottom of the oven.
Place the sugar, flour, salt and vanilla seeds in a blender or food processor and process for about 1 minute. Add the eggs and egg yolk and process just until blended. Add the buttermilk and melted butter and process just until blended once more. (Use a spoon or ladle to skim off any foam if you are bothered by little pockmarks on top of your pie!)
Pour the filling into the pie shell, and place the pie on a lined baking sheet. Bake for 40 minutes, carefully rotating halfway through so that it bakes evenly. If the edges begin to brown too quickly, wrap them with foil or use a pie shield. The pie is done when it is still a little wobbly in the center; the residual heat in the pie will continue to cook it after you take it out of the oven. Serve at room temperature or chilled.
Sunday, May 28, 2006
In Celebration of Rhubarb!

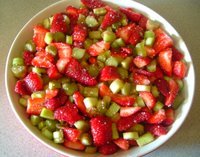
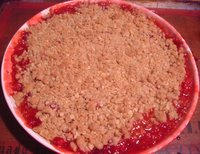
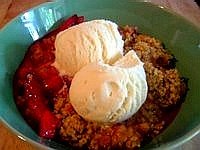
A three-day weekend can only mean one thing--more time to bake! And what springtime delicacy is now offering itself up to me in the back yard? RHUBARB! What's that you say? You can't just walk into your back yard with some scissors and return with some delightfully tangy innards for a pie, crisp or crumble? More's the pity! Oh well...get thee to the grocery or farmer's market post haste and acquire some of this delicious, old-fashioned vegetable. And while you are there, grab some strawberries. You're going to need some of them to make the following crisp which my roommate proclaimed "heaven in a bowl" (especially if you top it with Breyer's Double-Churned Extra Creamy Vanilla)!
Strawberry-Rhubarb Crisp
3 cups rhubarb, cut into half-inch pieces
4 cups strawberries, hulled and quartered
3/4 cup sugar
1 teaspoon lemon juice (or orange juice)
zest of an orange (or 1 tablespoon Grand Marnier)
3 tablespoons quick-cooking tapioca
1 tablespoon corn starch
1 cup flour
1/2 cup brown sugar
1 teaspoon cinnamon
pinch salt
1/2 cup (1 stick) butter, cold, cubed
1/2 cup quick (or referably, rolled) oats
1/2 cup sliced almonds, optional
Preheat oven to 350 degrees. Butter a deep baking dish and set aside.
Gently toss the strawberries and rhubarb with the sugar, lemon or orange juice, orange zest or liqueur, tapioca, and corn starch. Pour mixture into prepared dish.
In a separate bowl, cut together the flour, brown sugar, cinnamon and salt with the butter until the pieces are pea-sized (I prefer to use a pastry cutter to do this). Then gently mix in the oats and nuts by hand. Carefully and evenly spread the crumbly topping over the fruit mixture, trying not to compact it.
Place the baking dish on a lined sheet pan (as it WILL bubble over!), and bake for 45-50 minutes, or until the fruit is bubbling and the topping is golden brown. Serve with whipped cream or ice cream.
This crisp only used up half of the rhubarb that I cut today, so my next effort will be an easy and time-honored recipe from my dear friend, Kurt. And this one is truly fabulous! Not only is this great with rhubarb, when that season is over and the summer stone fruits are abundant, try it with peaches for a delicious peaches-and-cream pie. Wonderful stuff!
Rhubarb Cream Pie
2 eggs
1 cup sugar
3 tablespoons flour
1/4 teaspoon salt
3/4 cups cream
2 cups chopped rhubarb
1 unbaked pie shell
Preheat oven to 300 degrees.
Beat eggs and add sugar, flour and salt. Add cream and rhubarb. Pour into pie shell and bake for about an hour, or until set. Cool and serve.
Saturday, May 27, 2006
Memorial Day Weekend is Upon Us: Bust Out the Blender!
My post yesterday about the beloved hot fudge sauce reminded me of another chocolatey treat that I should share with you. I first heard about it at least a year ago on...gulp...Oprah. If the old girl dieted for days just to be able to have one of these, I knew I had to try it! It is the signature drink from an eastside cafe in New York City called Serendipity. Apparently, it was a favorite spot of Jackie O's back in her day, and she used to take Caroline and John-John there after an afternoon of shopping for this special frozen treat. I have since been to Serendipity in person, and I believe that my version is better! Plus, it took us three trips and a two-hour wait just to get into the tiny place, and then the drink itself set us each back ten bucks. So as always, making this yourself is less of a hassle and much more affordable. What follows is based on the actual recipe from Serendipity, but I have tinkered with it a little, as is my way. The key ingredient, I believe, is the Ghiradelli cocoa mix with the chocolate bits in it--yum! It's about five bucks, but it will last you a long time--unless, of course, you get hooked on frozen hot chocolates! And I think you might. :-)
Frozen Hot Chocolate
1/2 cup semi-sweet chocolate chips
1 tablespoon Ghiradelli ground sweet chocolate and cocoa
1 1/2 tablespoons sugar
1 1/2 cups milk (preferably, whole)
3 cups of ice cubes
whipped cream
chocolate shavings (optional)
Place chocolate chips in the top of a double boiler over simmering water. Stir occasionally until melted. Add the cocoa mix and sugar. Stir until completely melted. Remove from heat and slowly add ½ cup of milk until smooth. Cool to room temperature. In a blender, place the remaining cup of milk, the room-temperature chocolate mixture and the ice. Blend on high speed until smooth and the consistency of a frozen daiquiri. Pour into a giant goblet and top with whipped cream and chocolate shavings. Drink with a straw, or a spoon, or both!
The next recipe for another one of my all-time favorite frozen drinks has been on a faded and stained card, magnetted to my fridge for at least a decade. It came from a student of mine named Camille Thornock (her name is still on the card, too!) who took my basic communication course back in the day. At the end of that class, we do a little bit of public speaking, and one of the assignments is to do a persuasive sales speech where they try to sell the class a product that can't cost more than a nickel. Well, Camille sold her own copycat recipe for Orange Julius. If I remember correctly, I think she used to work in a mall near an Orange Julius and was going broke buying the frozen orange confections every day, so she developed her own homemade version. Indeed, many of my favorite recipes have come out of the COM 100 course. Often, the student will bring a sample of a delicious treat and then sell the recipe for five cents. Of course, if they know what's good for them (and their final grades!), they'll give the teacher a freebie! ;-) I save their recipes from year to year, and I still make many of them. In fact, in the post of March 5th when I shared my best recipes featuring lemons, the dessert called Lemon Freeze came from one of my communication students and remains a summer potluck staple. My other favorites from that class include an excellent salsa with pinto beans, a traditional Scottish shortbread (one of my student's mom was a Scot and made reknowned shortbread for Scottish festivals), a yummy chocolate chip cookie made with vanilla pudding in the dough, the BEST teriyaki jerky in the world, and delicious pesto made with spinach and walnuts, Buckeyes (chocolate-covered peanut butter balls), fudge, a cake filled with a marvelous pastry cream, and even some tasty cookies made with, of all things, Cool Whip called Lemon Whipper Snappers. Oh, and one of my more recent students worked at an Italian restaurant in town, and he shared the recipe for a great pasta dish with chicken, tomatoes, olives, artichoke hearts, lemon and white wine, among other things. (By the way, if any of these recipes are of interest to anyone, just make the request in the comments section, and I'll post them.) But every summer, when the weather starts to warm up, I bust out the blender and start making my old stand-by, the Orange Julius. And you can vary it according to your tastes, of course. I like the orange unadulterated myself, but I will admit that throwing a handful of fresh blueberries into the mix makes for a very pleasing result as well. HAPPY BLENDING, EVERYONE!
Orange Julius à la Camille Thornock
1 cup milk
1 cup water
1/4 cup sugar
6 oz. orange juice concentrate
4-6 drops almond extract (Camille swore that this was the secret ingredient that made the drink taste authentic! I also like to add up to a teaspoon of vanilla myself.)
1 tray ice cubes (14 in your standard Rubbermaid-type tray)
strawberries, banana, or blueberries (optional)
Blend until thick and smooth. (This makes more than enough to share, if you're willing to!)
Thursday, May 25, 2006
Who needs $10-a-jar fudge sauce???

This picture has absolutely nothing to do with the post to follow...but I brought in an armful of lilacs this morning to make an impromptu bouquet for the table, and I thought they were pretty enough to photograph! Don't you agree? :-) And now, onto the topic of the day: HOT FUDGE!
At the end of each October, I faithfully attend the Essex Fall Craft Show near Burlington, Vermont. (There's apparently one in the spring, too, but not on as grand a scale.) Not only will you find wonderful works of art and all sorts of handicrafts, you will also get to sample TONS of gourmet food products. There is a man from Maine who makes the most AWESOME fruit salsas you've ever tasted--my favorites are blueberry, razberry, and mango tango, but some people swear by the peach. And I also stock up on Halladay Farms' excellent seasoning/dip mixes--my favorite is their Vermont Chardonnay mix. In fact, my neighbor just a couple of miles up the road in Mooers, NY who is both the local dog catcher and the best jam-maker in the whole world (and I can say that as I make some fine jam my own self!), has started selling his preserves there. His business is called Suprenant's Berry Farm, and he has over 150 varieties of jam in inspired and unconventional combinations, but his signature item may be the Quad Raspberry made with four different kinds of raspberries that he grows himself. Incredible!
But one of the products that I no longer buy at the craft fair in Vermont is Sundae's Best Fudge Sauce. This delectable product has been featured on the Food Network and one of the food magazines I get just had a blurb about it, too (I think maybe Rachael Ray's mag? I can't be sure right at the moment--my brain is already on summer vacay!). But if it's so good--and it is truly decadent!--then why don't I buy it anymore? Because you'd have to take out a second mortgage to be able to afford it! It comes in a small jar that's hardly worth your trouble (read: single-serving for a chocoholic!), and their large, 15-oz. jar is TEN DOLLARS! OUCH! So I decided to take it upon myself to develop my own version for much, much less. Plus, it is so easy, anyone can whip up a batch in no time. I gave some jars of the sauce away as Christmas gifts last year, and the recipients gushed over it! In fact, every time I see my friend, Angela, who is a dynamite Italian cook in her own right, she begs me to make her some more--which is only fair, as she gives me many jars of homemade applesauce every year. :-) I gave her the recipe, but she said it didn't turn out as well when she made it. I don't really get that, as you just dump everything in a saucepan, stir it well, and cook it over low heat until it all melts and comes together. Then pour it into a jar and stick it in the fridge. You can nuke it and serve it over ice cream, use a couple of tablespoons in a mug of hot milk for hot chocolate, throw some in your latte, or as Angela prefers, just grab a spoon and tuck in! Scrumptious!
Decadent Chocolate Fudge Sauce
12 oz. (1 1/2 cups) semi-sweet (or bittersweet) chocolate chips
4 tablespoons butter
1/4 cup sugar
pinch of salt
2 tablespoons cocoa powder
3/4 cup half-n-half (or since you're already living dangerously, use cream!)
1 teaspoon vanilla
(Ok, maybe some basic procedures should be followed to be on the safe side.) Melt the chocolate chips and butter together over low heat (if you don't trust yourself not to scorch it, do this over a water bath). In another pan, whisk the sugar, salt and cocoa into the cream or half-n-half and bring to a boil. Add the hot cocoa mixture to the melted chocolate and butter and blend together thoroughly. Remove from heat and add the vanilla, mixing well. Jar it up, refrigerate, and then try not to devour the whole thing in one sitting!
Sunday, May 21, 2006
Pancakes and Meatloaf, or Too Much Food Network!
See? This is what happens when you finally get a day off and you end up watching too much Food Network! You end up with a dinner menu consisting of pancakes and meatloaf! (If they can do chicken and waffles, why not pancakes and meatloaf?) I was watching some show about diner cuisine, and I was subsequently possessed by the desire--no, the desperate need--for pancakes and a meatloaf sandwich! (Obviously, I am restricting my carbs. Tee hee.)
The pancakes were good, but were not from scratch (don't judge me!). They were made from a lovely organic buckwheat mix that I picked up somewhere on my travels. (I prefer edible souvenirs when I road trip...or cookbooks. But I digress...) However, please allow me a short discourse on meatloaf. Previous to this evening, I thought that I already had the very best meatloaf recipe in the whole world, given to me by my wonderful friend, Twonky Bellonkamy (aka Tony Bellomy). But recently, I was forwarded a meatloaf recipe from one of my PBGV acquaintances, highly recommended by another friend who deemed it a "killer meatloaf!" So I thought I'd give it a whirl. Well, bygum, I think our house meatloaf has been supplanted! This really was the best meatloaf I've ever had! I know meatloaf can be very subjective, so I guess I'll just say that it's exactly how I prefer my meatloaf to be. Tender and moist, but not falling apart, and flavorful without the spices and other additions overpowering the meat itself. To be fair, the recipe was VERY similar to my friend Tony's, with two notable changes. One is the omission of a topping. You know, that ketchup/brown sugar/worcestershire affair, which I enjoy, but don't really need--especially if my goal is a meatloaf sandwich. And then the one ingredient that sets this recipe apart is the inclusion of Bloody Mary mix (as opposed to ketchup or tomato soup or the like). Now, as I am not a drinker, I didn't have any Bloody Mary mix on hand, but I was able to locate a few recipes on the 'net that I integrated to create a tasty homemade version. It made about six cups of the stuff, so I froze the leftovers for future meatloaves--of which there will be MANY following my new favorite recipe! And here 'tis...
BLOODY MARY MEATLOAF
1 pound ground beef (sirloin, if you can swing it!)
½ pound Italian sausage (I like a garlicky version--and this is my addition, by the way, as I prefer a beef/sausage mix for my meatloaf. The original recipe called for one pound of beef only.)
1 small onion, finely chopped
1 green pepper, finely chopped (OPTIONAL, as I do NOT prefer it! But I did mince a few jalapeno slices and threw them in for good measure and a bit of a kick. Yum!)
1 cup quick oats (NOT instant!)
1 teaspoon salt
½ teaspoon pepper
½-1 teaspoon granulated garlic (to your preference--"never too much garlic" is my motto)
1 egg
1 cup Bloody Mary Mix* (preferably, a spicyand/or beefy variety!)
Mix all ingredients together well by hand. Form an oblong-shaped loaf on a lined cookie sheet. Bake at 350 degrees for about an hour.
*Spicy Beefamato-like Bloody Mary Mix
46 oz. tomato juice
8 oz. beef bouillon
½ teaspoon pepper
2 teaspoons celery salt
½ teaspoon onion powder
juice of one lemon (or lime juice would be great, too!)
3 tablespoons Worcestershire sauce
3 tablespoons juice from jalapeno/nacho slices
3 tablespoons vinegar (I like apple cider vinegar, but white is fine)
2 tablespoons sugar
Tabasco to taste (several good glugs—don’t be timid!)
Saturday, May 20, 2006
Happy Flea and Tick Season!

I rarely divert from my format of recipes-with-stories. But it's May, and my thoughts have turned, not to romantic love, but to the love of my animals. Now I do love them, but having so many of them on a teacher's paltry salary, it can be a challenge to provide the best possible medical care. Don't get me wrong--I would go without groceries for myself before they would lack for food or a necessary trip to the vet. But some of the medications that you get from your vet are just ridiculously expensive! For example, at my vet, Frontline Plus for flea and tick controls has just gone up to $17 a dose! And I have FOUR dogs! That would be $68 a month! Now, I don't blame the vet themselves, but it's the drug companies--the same type of company that loves to gouge us humans--that jack up their prices, knowing they have us over a barrel. And every year, when it's time to stock up on Frontline and Heartguard, I become quite cranky about it! :-(
But one major benefit of being involved in the world of purebred dogs over the last few years is that I have learned LOTS of tips from breeders who maintain a large number of dogs in their kennels and need to keep costs down. The first concerns flea and tick control. I use Frontline Plus, as do most people I know, though there are other good products out there like Revolution and Sentinel. And each of these can be purchased for about HALF PRICE (that's including the shipping!) if you order these medications from Australia where you don't need a prescription for them. The company that I order from is called IPet International (Pet Shed is another popular one), and they have a website from which you can order directly. But I think I may have saved another couple of bucks by bidding on Ebay instead of ordering directly (actually, I didn't really bid--I chose the "buy it now" option). This is the same product made by the same manufacturer, Merial. The packaging is slightly different, as the dog's weight is expressed in kilos rather than pounds. Also, the seller has 100% positive feedback on Ebay and has thousands of feedback responses. Most of the posts speak to the speed of delivery from Australia to the States. It usually takes 7-10 days from Sydney, and they promise to ship within 24 hours of placing your order. I just ordered six doses of the largest size (89-132 lbs.), and that will take care of my four 25-45 pound dogs for the whole flea and tick season!
What's that you say? Six doses for four dogs for six months? How does that work? Well, this is the other tip that I got from several of my dog breeder friends--splitting the doses. One extra-large dose (the red box with the Bernese Mountain Dog, I believe) can be split between all four of my medium-sized dogs. The dose for an 89-132 pound dog is 4.02ml. Based on weight, Prunelle needs .67 ml, Rosie needs double that (1.34 ml), and Percy and Grady need approximately 1 ml. Do the math, and you'll find that that works out perfectly when you split the extra-large dose. One breeder I knows just kind of eyeballs the application, but I couldn't do it. One dog would always end up with way more than his/her share, leaving another dog short-changed. So I squeeze out the dose into a small ramekin and again, use a syringe (with the needle removed) to measure the correct amounts, and then squirt the medicine from the syringe between each dog's shoulder blades. Ta-dah! Four dogs treated for the price of one (HALF the price of one if you get your Frontline from Australia)!
So that takes care of your fleas and ticks, but what about heartworms? Typically, Heartguard is the drug of choice for heartworm preventative (or Interceptor is also used). But I stopped using Heartguard a couple of years ago when I got my youngest dog, and his breeders explained how they safeguard their dogs against heartworms for pennies a month. Following their advice, I bought a vial of injectible ivermectin (this is cattle wormer, but it's the same drug as in Heartguard) from my local feed store. It was about $40, but it lasts forever--I've had mine for two years and have barely made a dent in it! Then I already had 1.0 cc syringes from one dog's allergy shots, but I bought a 3 cc one as well. I also bought a liter of propylene glycol (the ingredient that keeps soft dog treats soft like Pupperoni and Jerky Treats) from the Wal-Mart pharmacy. Now there is some discussion that propylene glycol (in ENORMOUS quantities!) may be a carcinogen, so you could use olive oil or vegetable oil instead, but ivermectin won't mix in water. Each month, I take 3 cc's of either propylene glycol or oil and mix it with just .1 cc of the ivermectin (pay attention to that decimal point, please--that's one-tenth, not one whole cc!). Many sources online will tell you that the formula is .1 cc of ivermectin (undiluted in a base) per 10 pounds of the dog's body weight is correct. But that would be an appropriate dose if your dog were INFESTED with internal parasites! But as a simple monthly heartworm preventative, you need only a tiny fraction of that amount. That's why you dilute it in a base. Anyway...once you dilute the invermectin and mix it well, then you administer it at .1 cc per 10 pounds of doggie. You can squirt it onto a piece of bread or a favorite treat, but I just open their mouths and squirt it onto their tongues to be sure that they got it. And that's it. I have my dog's blood tested for heartworm regularly as directed by their vet, and they are heartworm-free! I actually think that my dogs are more protected now, as I keep them on heartworm preventative all year round, not just May-October like I used to when I was buying Heartguard. Oh, I should tell you that ivermectin can be fatal to collies and related herding breeds (shelties, for example). I don't know all of the breeds that might be affected, but if you already use Heartguard on your dog, you would be fine, as it is the same drug. Of course, it is always in your best interests (and your dog's!) to check with your veterinarian before trying any of the ideas that I have shared.
Have fun with your pets this summer, and give them a smooch from me and mine! :-)
Tuesday, May 16, 2006
Where's MY gingham apron?? GRRR!
I have a dream, friends. (I know it's almost Memorial Day, not Martin Luther King, Jr. Day, but bear with me.) I know some would think it's a silly dream, but it's MY dream nonetheless. I do not dream of WINNING the Pillsbury Bake-Off, no. But I DO dream of mincing in with the rest of the Bake-Off finalists, cheerily garbed in our blue-and-white gingham aprons, eager to craft innovative things with crescent rolls and such, with my beloved friend, Kurt (who shares my Bake-Off dream), cheering me on. But, sigh, it seems it is not meant to be. I enter faithfully every year (now that it has become an annual event), but I just can't seem to come up with anything that uses fewer than six mainly pre-fab ingredients (with a minimum of two "eligible" products per dish) and can be made in 15 minutes or less and is healthful to boot! Indeed, that's not really cooking is it? It's really just assembling (or re-assembling) preprepared foodstuffs, and I have no idea why someone would pay a million dollars for THAT! Ok, the cynical side of me knows why...a million bucks is chump change after they get a bunch of suckers like me to go out and buy a ton of Pillsbury products that we wouldn't normally purchase just to experiment with recipe ideas. It's just sad that it's not a REAL cooking contest like when it started and all that was required was that you use Pillsbury flour! Ok, I take it back. Last year's winner was close to real cooking. It was a takeoff on pecan pie made with bashed-up granola bars. In fact, I keep meaning to try it, as it sounded very good. But this year, the winner made chicken and stuffing, and GUESS what the stuffing was made out of? Prefab waffle sticks! And the chicken was glazed with the maple-flavored pancake syrup that comes with the waffle stix! Now I must admit, it was very creative and EXACTLY what usually wins the contest, namely, an unusual use of qualifying ingredients. And it was very simple and perfect for a work week dinner, which they also look for, and I wouldn't even doubt that it actually tasted good. I myself enjoy that combination of sweet and savory. Still, the bottom line is, what the Bake-Off has become just flies in the face of everything that I hold dear--that is, my main cooking philosophy that good food made with real ingredients takes time and effort, just as do all important things in life.
But every year, I try again, to no avail. And I think some of my ideas have been darn good! I can fashion many a wonderful thing out of a can of crescent rolls, let me tell you! The Salmon en Croute I devised was extremely tasty, and the Cherry Almond Bread Pudding was nothing short of decadent! But would they accept me into the holy gingham sisterhood? Noooooo! Well, screw them, I say! I will share my ideas with you dear people instead. The recipe I was thinking about today that is perfect for your Memorial Day barbecue and all of the other summer cookouts coming up is a marinated bean salad. And I must admit, this is dangerously close to not cooking at all, in the PBO tradition. It mostly involves opening up a lot of cans, which the marvelous Nigella Lawson claims is truly satisfying, and I agree--even if it seems like cheating. The original recipe was an homage to a delicious salad that I had from the salad bar at the wonderful Wegman's flagship store in Syracuse, NY. I adapted it to include edamame which was a qualifying ingredient in the Bake-Off last year (as were Green Giant corn and Progresso black beans!). But I have also been known to replace the edamame with whatever bean or legume that I have on hand. Along with the black beans, one might consider dark red or light red kidney beans, cannellini beans, or my fave, chickpeas/garbanzos/ceci beans. Ooh! Fresh, springtime fava beans would be excellent, too! But you do what you feel led to do. As always, I encourage you to play around with the ingredients and amounts until the resulting dish pleases you...and not those damn Bake-Off Nazis! Tee hee.
(Now don't you go entering this recipe yourself next year...you KNOW I will try, try again! The pain of rejection fades like that of childbirth...and you find yourself doing it again! My gingham dream never fadeth...though, come to think of it, last year, it was some off khaki-and-red number designed by Todd Oldham, of all things! Bring back the blue-and-white apron, I say, and bring back actual COOKING to the contest! Hear me, oh guardians of the sacred Bake-Off!)
Soy Good Edamame Salad
(Bake-Off entries HAVE to have cutesy names...it's de rigeur, as Martha would say!)
2 quarts water
generous pinch of salt
2 10-oz. bags (frozen) shelled edamame*
1 15 oz. can corn
1 19-oz. can black beans, drained
3 cloves garlic, peeled and minced
1/4 cup roasted red peppers (about one large one from a jar), chopped
1/4 cup onion, chopped (about a quarter of a large one)
1/2 cup olive oil
1/4 cup white wine vinegar
1/2 teaspoon salt (or to taste)
1/4 teaspoon black pepper (or to taste)
1/4 cup parmesan cheese, shredded
1/4 cup fresh basil leaves, very thinly sliced
1. Bring a large pot of water to a boil (enough to cover the soybeans--at least two quarts) with a good pinch of salt. Add the frozen edamame and bring them back to a boil. Boil for 6-7 minutes or until tender. Drain, and cover with cold water for a few minutes to cool. Drain again. (This would also be the drill for fava beans, though you'd need to peel the skins, too. And obviously, skip this step altogether if you are using all canned beans.)
2. Combine edamame, corn, drained black beans, minced garlic, chopped red peppers and onions in a large bowl. Dress with the olive oil and white wine vinegar, salt and pepper. Mix well so that everything is coated.
3. Cover salad and refrigerate for at least a couple of hours or overnight. Just before serving, toss with the shredded parmesan cheese and thinly sliced basil.
*Switch out the edamame for any bean(s) you like!
Saturday, May 13, 2006
Yeah! She lives!
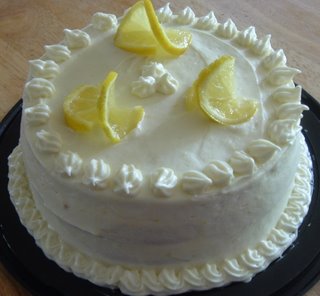
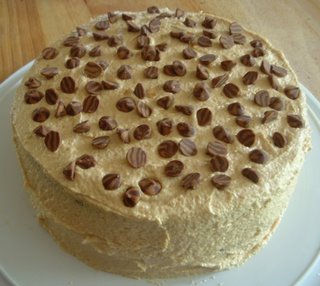

Well, I never would have thought it possible just a day ago, but it's OVER. At long (VERY LONG!) last, the school year has come to a close. And my immediate plans include, after finishing this entry, taking a shower, falling into bed, and waking up maybe Monday morning? I was at my desk every night this week until 11pm or midnight, and last night was the longest haul. I left school around 10:30 (the night janitor, Wolfgang--nope, not making that up--teased me about slacking off and leaving "early!"), but I still had to go to the store and get things for a party at school the next day. As usual, I had volunteered to bring the birthday cake. But I had a vision for a lemon-blueberry creation that I was worried might freak people out a bit. Plus, the chocoholics sometimes take the staunch position that it's ain't dessert without at least some chocolate! So I decided, since we were celebrating several summer birthday people at once, to make TWO cakes. Ok, so perhaps this was not the wisest decision, considering that I arrived home to begin baking around midnight! (Why do I do it to myself? Someone please explain it to me?)
Now I must confess something to you, my friends, and I know I have made this confession to you before. (Five months into a blog, and she's already repeating herself? Sheesh! But I'm just that serious about it!) Although I have many excellent from-scratch cake recipes that I often rely on, I am a big fan of the box cake mix. (Oh, take your hands off your hearts and stop that silly gasping!) It is really difficult to get a cake from scratch that rivals the texture of the box mix, as giant machines process the ingredients until they are super-fine, producing that feather-light quality. However, I do believe in doctoring up the mix, riffing on it, and making it one's own. And I hold nearly religious convictions about frosting! I will allow the box mixes, but please skip the can o'frosting. What kind of space-age polymer must bind up all that cloying goo so that it might have a stable shelf life? ICK! No, indeed, make your own frosting, I implore you!
For the lemon-blueberry affair, I began with French Vanilla cake to which I added extra vanilla, the zest of one lemon, and I swapped out some of the water for the juice of the lemon. I didn't want an extremely tangy cake, but something just gently lemony. I baked two 8-inch cakes, and when they were cool, I levelled them off, split the layers each in half, and filled them with some of the wild blueberry jam that I make every summer (about 1 -1/2 cups total). I was also careful not to take the jam too close to the edge of the cake so that it didn't leak out of the layers as I assembled the cake. For the frosting, I used a lemon-cream cheese recipe from Bon Appetit . It was very delicious, but very, very soft, even after setting up in the fridge, making it devillishly difficult to pipe. So perhaps it needed a little extra powdered sugar? And I definitely should have cut the recipe in half! In any case, here it is:
Lemon-Cream Cheese Frosting
2 8-ounce packages cream cheese, room temperature
3/4 cup (1 1/2 sticks) unsalted butter, room temperature
4 cups powdered sugar
1 teaspoon grated lemon peel
1 teaspoon vanilla extract
Using electric mixer, beat cream cheese and butter in large bowl until light and fluffy. Gradually beat in powdered sugar. Beat in lemon peel and vanilla. Cover and refrigerate until just firm enough to spread, about 30 minutes. Makes about 4 1/2 cups.
Bon Appétit, August 2001
I must tell you, though when I first told people that the cake was blueberry-lemon, I was met with a continuum of responses from surprise to suspicion to mild disdain. But after they tried it, well, the whole cake quickly DISAPPEARED! It was gone long before the chocolate cake was, much to my amazement. And it looked really, really pretty with four layers sandwiched together with all that blueberry goodness! (The picture doesn't do it justice as that was the last knackered piece that I managed to save for my roomie. And I had to wrestle it away from the others before smushing it into my tiny office fridge all day, and then transporting it all the way home between two flimy paper plates. I'm surprised it hadn't become lemon-berry crumble by the time I thought to photograph it!) Anyway...it was delicious, and it's definitely a combination that I'll make again. Very summery.
For the chocolate-peanut butter cake, I prepared a Dark Chocolate Fudge cake mix, adding some extra vanilla (see a pattern here?) and about a teaspoon of espresso powder to make the flavor even deeper. I baked two 9-inch layers, and had it not already been obscenely late, I might have split those layers, too, but I simply didn't have the will. For the frosting, I used a peanut butter-cream cheese recipe from Godiva. And I sprinkled a generous amount of chocolate and peanut butter swirled chips on both the middle and top layers. It looked cute, but I must say, I didn't care for the faux peanut butter flavor of the chips. The next time I make this cake, I will decorate it with miniature Reese's cups like I normally would (the store was out of them last night, so that's why I went another way--oh well, live and learn!). Nevertheless, people were duly impressed, and I was happy to return home with two empty cake carriers!
Peanut Butter Cream Cheese Frosting
1 package (8 ounces) cream cheese, at room temperature
2 ½ cups confectioner's sugar
4 tablespoons (1/2 stick) unsalted butter, at room temperature
2/3 cup chunky peanut butter (or smooth is fine, too)
2 teaspoons vanilla extract
Beat cheese, confectioner's sugar, butter and peanut butter in a large mixing bowl with electric mixer at low speed, about 1 minute or until well blended. Increase speed to medium-high and beat for about 3 minutes or until light and fluffy. Scrape down sides of bowl, then add vanilla. Beat 1 minute. Spread frosting evenly over cake in pan using a small offset spatula.
Tuesday, May 09, 2006
Finals Week: ARRRRGGGHHH!!
I am in the thick of it, friends. It's finals week at the two institutions of higher learning where I teach, and the NO SLEEP RULE is firmly in effect until this weekend! Someone remind me again why I thought it was a good idea to be gone for a week recently? DUH! But I am taking a moment away from the eternal grading of papers (running screaming away from the mountains of work is more like it!) to share with you two of my stand-by recipes for when there is precious little time to craft great works of culinary genius. These are recipes for any old "no news is good news, middle of a mid-year day" (bonus points to the first person who gets that reference!). And your minimal efforts will be greatly rewarded, I assure you.
Since I seem to be in a layered dish/casserole kind of place lately, let me start with one of my all-time favorites, cavatini. This recipe originally came from one of my favorite people in the world--a former student and also roommate of mine--Karen. I have tinkered with it a bit, but it's easy and delicious, and always a crowd-pleaser at potlucks and such. Really, it's a great dish to turn to when your family grumbles that you've made spaghetti yet AGAIN! I myself could happily eat spaghetti once a week, but this is a nice variation on that theme. It's also similar to lasagna, but MUCH less labor-intensive! In fact, this is the Taco Bell philosophy of food, whereby you simply rearrange the same ingredients to give the illusion of a new menu item! ;-)
Cavatini
1 lb. ground beef (or Italian sausage)
32 oz. jar of your favorite spaghetti sauce
7 oz. box pasta shells (or whatever shape pleases you!)
2 cups shredded mozzarella (at least!)
8 oz. can of mushrooms, drained
1 pkg. pepperoni slices (look for Emeril’s if you can find it—yum!)
Brown ground beef (or sausage). Drain the meat and add spaghetti sauce and mushrooms. Prepare pasta and drain. Layer pasta, then meat mixture, then pepperoni slices, then cheese, and repeat the layers. Cover with foil and bake at 350 degrees for 30 minutes. Let stand 10 minutes before serving.
*Note: You can throw in any desired veggies with the meat mixture. I sometimes sauté an onion and/or garlic with the beef or sausage. I also use real mushrooms instead of canned when I have them on hand (sautéed with the meat, of course). Further, you could add something like cubed zucchini or yellow squash to the mix, which I often do in the summer when I have too much squash around! So vary this recipe according to whatever you have around and feel like adding in.
The next recipe is another great one for the busy work week. It looks involved (mostly because it won't let me single-space the ingredients for some reason!), but it doesn't take that long to put together, and it makes an enormous VAT of food that can be used for leftovers the second night, or to throw into a plastic container and take to work for lunch the next day. And it's actually pretty healthy to boot! (I know that healthful food generally goes against our philosophy at Lindsey's Luscious, but call this a happy accident!) I shared this recipe with my work colleagues a few years ago, and to this day, my division coordinator makes the sauce and keeps it on hand for an Asian dressing to put on pita sandwiches and the like. Her family refers to it as "Gina's Sauce!" :-D I hope you'll enjoy it, too.
Chicken Sesame Noodles
1 pound box vermicelli (or thin spaghetti), cooked and drained
4 breasts boneless chicken, poached and sliced
2 large carrots, peeled and shredded
1 small bunch green onions, sliced thinly
1 cup (or more) green peas (or pea pods or sugar snaps), blanched
1 red pepper, cored, seeded and sliced thinly
1 jalapeno pepper, cored, seeded and minced
1/4 cup peanut butter
1/2 cup rice vinegar
2 large cloves garlic, peeled and roughly chopped
1 tablespoon hoisin sauce
1 teaspoon sesame oil (or to taste)
2 1/2 tablespoons peanut or vegetable oil
1 teaspoon chili paste (or to taste--I prefer two myself!)
1 tablespoon brown sugar
1/2 teaspoon powdered ginger (a grating of fresh would be even better!)
salt and pepper to taste
2/3-1/2 cup roasted, dry roasted, or honey roasted cashews, halves or pieces
1. Cook pasta according to package directions. Poach chicken breasts in the same pot with the vermicelli. Drain pasta, rinse with cold water until cool, then drain again. Slice chicken when cool enough to handle.
2. Put cooled pasta and chicken in a large bowl. Add prepared vegetables. Mix gently with hands to combine everything well.
3. In a blender or food processor, puree the peanut butter, vinegar, garlic, hoisin, oils, chili paste, sugar, and spices until smooth. Pour over other ingredients. Make sure everything is coated thoroughly.
4. Serve at room temperature or chill in the refrigerator. Garnish with cashews before serving.
*Note: You could add or substitute anything you like in this dish, such as some shredded Napa cabbage, bean sprouts, sliced water chestnuts, etc. And I'm sure that it would be good with, say, shrimp instead of chicken. Be creative!
Sunday, May 07, 2006
Taters!
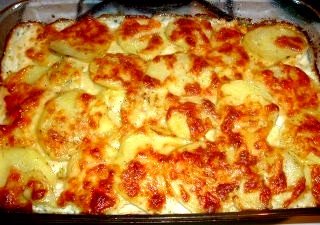
So...I made the Potatoes Dauphinois to go with dinner tonight, and I thought folks might like to see how they turned out, especially since I've been going on and on about them! :-) Oh, and I realized in making them that the recipe didn't say what temperature to bake them at. I went for the standard 350 degrees for 45 minutes, and they turned out like this. But I should mention that my potato slices were, say, less than a quarter inch, NOT a half-inch (and I wouldn't want them any thicker than that!). So take that under advisement...
Subscribe to:
Posts (Atom)